# Dev Environment
A development environment is one where you can make the software you
need to run. You need this to run the latest free software which is
often only implemented in source code. Particularly to take advantage
of common mathematical libraries you need a Fortran, C and C++
compiler even if you never use those languages directly. This is
easy if you use Linux. The overwhelming majority of people don’t.
In fact, Windows has 92% of the desktop market and Mac has almost 6%.
# Structure of this blog post
I am going to go through some typical development goals and assert what
I think you need. I am going to defer how to get these components until
the end of post.
# What software do you need to run?
## I want to build a static web site
A static website is one that serves the same pages to all visitors (except the
administrator).
If you want to build a static website you can use the CUNY Academic Commons which
does not require you to install anything. The site is powered by WordPress. The
interface is driven by a Graphical User Interface (GUI) which is simmilar to modern
applications. This can be comforting for those new to coding and frustrating for
people accostomed to greater control. WordPress is a Freemium model where basic
designs and applications are availble for free. Better colors and design are in so-called
premium themes (sold by WordPress.com) which require licenses and license fees to use.
## I want a Ruby/Python Website
Two popular static website frameworks are Jekyll (<http://jekyllrb.com>)
and Pelican (<http://blog.getpelican.com>). Jekyll is written in Ruby
and Pelican is written in Python. You will need a Ruby or Python development
environment. You will need to install compilers, an alternate
windowing environment (Mac only), a package manager, a language
version manager, git and a virtual environmnent manager. Examples of
these sites are facebook, Twitter and Pinterest. What you need to do
build them typically depends on your operating system. (See the section
on your Operating system and language choice later in this post.)
## I want to build a dynamic web site
A dynamic website is one that serves different pages to different
users. This is also called web 2.0 or a web service. You will
definitely need a Ruby or Python development environment since you
will need to protect user information and security patches are usually only
applied to the latest versions. This is why many websites get hacked over
and over.
## I want to do my statistics homework
You probably don’t need a development environment. There are Windows
binaries for R (<http://cran.r-project.org/bin/windows/base/>) and Mac
(<http://cran.r-project.org/bin/macosx/>). You may run into problems if
you are using a cutting edge package that requires a compiler or
windowing software on Mac (XQuartz). However for “Stats 101” this
unlikely to be the case. I also highly recommend Modified Emacs for
Windows (<http://cran.r-project.org/bin/macosx/>) or Mac
(<http://vgoulet.act.ulaval.ca/en/emacs/mac/>) over RStudio which is
trying to develope a series of libraries based on it Shiny webserver
(<http://www.rstudio.com/products/shiny/shiny-server/>) which costs
$15,000 per install.
## I want to do text analysis with NLTK
Here again you probably don’t need a full blown development
environment. You will want a language manager, pyenv
(<https://github.com/yyuu/pyenv>) for Linux or Mac. For Windows just
use the installer and modify the path manually. See the instructions
bellow. Bottom line, you don’t really need to install NumPy so you
can get away with a lot.
## I want to topic modelling with Mallet
Mallet(<http://cran.r-project.org/web/packages/mallet/index.html>)
requires the Java Runtime Environment to work with R. This also means
that you need to install the rJava library
(<http://cran.r-project.org/web/packages/rJava/index.html>).
The important thing to know is that these are *wrapper* libraries.
They only allow R to pass values and receive values from lower level
libraries which you have to install and configure.
Apple no longer includes Java by default so for any Operating
system the best advice as October 2014, my best advice is to
follow Oracle’s instructions which are given for each OS
(<http://docs.oracle.com/javase/8/docs/technotes/guides/install/install_overview.html>).
After that you should install rJava (and fix any problems)
before attempting to use Mallet.
## I want to do machine learning with Scikit-learn
Scikit-learn (<http://scikit-learn.org/stable/>) is a popular machine
learning in Python. It provides simple and efficient tools for data
mining and data analysis Built on NumPy, SciPy, and matplotlib.
Installing the Num-py and SciPy libraries requires the same development
environment as building a website. Given that infrastructure (which is
a big given) all that you need is to:
`pip install -U numpy scipy scikit-learn`
This automatically upgrades all dependencies to the latest version available.
## I want to do webmapping with R
Here again, the packages that you will need sp and rgdal are wrappers
around lower level C libraries that have to be installed first. These are
gdal (<http://trac.osgeo.org/gdal/wiki/DownloadingGdalBinaries>) and Proj.4
(<http://trac.osgeo.org/proj/>). Download these first from the links before
trying to install any r packages such as rgdal or sp.
`install.packages(“rgdal”,depedencies=TRUE)`
`install.packages(“sp”,depedencies=TRUE)`
## I want to do webmapping with Python
The package you are probably going to want is GeoPandas() the python
equivalent of R’s spatial dataframe. Again GeoPandas is an extension of
Pandas which has a dependency on numpy so you need to set up a Python
Development Environment.
`pip install numpy pandas shapely fiona six geopy matplotlib`
## I want to make interactive visualizations
Interactive visualizations generally served on the web. The standard
library for doing this is d3 (<http://d3js.org>). You may read about
shiny (<http://shiny.rstudio.com>) and Hadley Wickham’s new ggvis
(<http://ggvis.rstudio.com>) package. I would caution against this
since this is Freemium rather than FREE software. Each server
installation costs almost $15,000.
# Build Ruby or Python development environment
### Windows
Ruby and Python are not native to Windows. There is no python version
manager for windows like there is for linux and Mac. However managing
it is not an impossible task. It just involves manually changing the
path environmental variable. The Windows python guide
(<http://docs.python-guide.org/en/latest/starting/install/win/>)
explains how. Although it assumes that users have powershell
installed. For changing the path you may want to consult
(<http://stackoverflow.com/questions/21372637/installing-python-2-7-on-windows-8>)
For Ruby the situation is easier. First install git bash
(<http://msysgit.github.io>). Then download the latest version of Ruby
and Pik at (<https://github.com/vertiginous/pik/downloads>). Then
follow the directions (<https://github.com/vertiginous/pik>)
### Mac
There are versions of Ruby and Python on Mac. These are old and relied on by the operating
system. Updating them is likely to break your computer. What you need to do is install
x-code,a windowing library, the homebrew package manager and git.
– Obtain the compilers
First you need to make sure that you have the latest operating system.
To do that, you need to left click on the Apple icon and read the release.
<p><img src=”../../images/osRelease.png” width=”350px” alt=”os” ti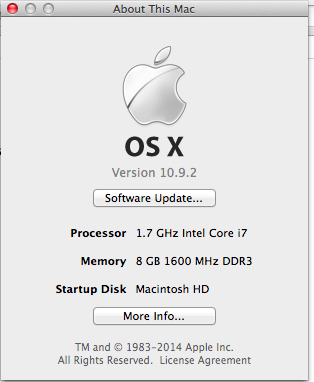 tle=”os”></p>
Then we have to obtain an [appleID](https://appleid.apple.com/) including submitting a credit card.
The good news is that they won’t charge you. We just need to obtain
the xcode which has Apple’s development tools. The only ones I have
ever used are the compilers which are FREE software. Bottom line is,
legally they can’t charge for them ([copyleft](https://www.gnu.org/philosophy/apsl.html)). Search in Google for
“xCode download”. It will automatically detect your OS and if you have
Mac OS X installed, it will include the free button you need to press
to download it.
When it finishes downloading it will automatically install and and you
will see the picture below. The only difference is a small button which
now says installed. (Yay!)

– Obtain an alternate windowing library
The next step is to download the xQuartz project which let’s the free
software on your machine open new windows. Software needs to open new
windows if it needs to warn you about something so this is an
essential function. You can find it at this [xQuartz link](http://xquartz.macosforge.org/landing/). The file
is a dmg. Since this is not an official Apple product it will be
saved in downloads. [Here](http://www.ofzenandcomputing.com/how-to-install-dmg-files-mac/) is a link that explains in detail how to install a dmg file. A dmg is disc image file. You need to left click
on it. That will open an empty box. See picture below. Double click
on the box and that will start an installer. You will need to put in
your password. Also see picture further below.
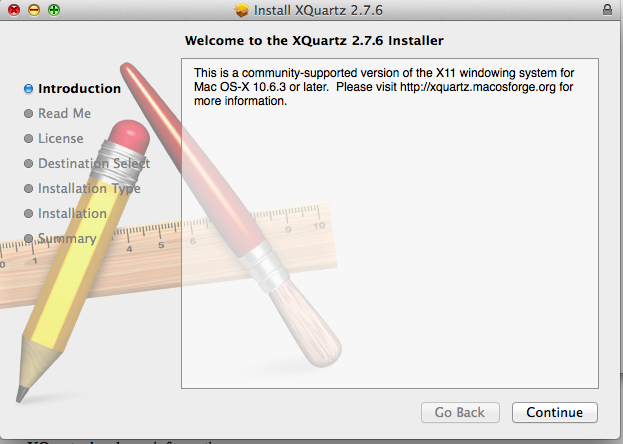

You have to log back in and out for xQuartz to take effect.
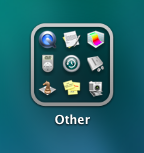
– Obtain a package manager
Most distributions of Linux come with a package manager to sort out which
software depends on which other libraries. These were a huge innovation
in the Linux world. And there is a package manager for Mac OS X. It is
called [Homebrew](http://brew.sh/). To install it we are going to need the terminal which
is hard to find on a Mac. You need to left click the launcher icon. See
picture below.

Then you need to find the terminal. It is hiding in the other icon. See
the picture below and left click the similar image on your Mac.
Then left click the terminal icon, pictured below.
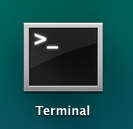
Now copy the Homebrew installation script (using command-C to copy and
command V to paste) and paste it inside the terminal as pictured below:
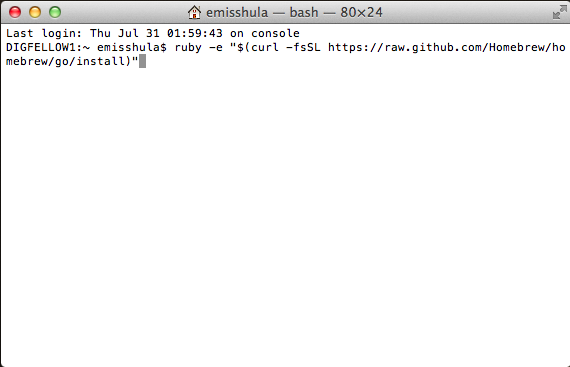
Now press the [enter key]. You will be prompted for your password. When
Homebrew finishes type `brew doctor` at the prompt. If all goes well
you will get a positive message. As [Zed Jones](http://zmjones.com/mac-setup/) points out, we still need
to manually set the path. In the terminal type:
`sudo emacs /etc/paths`
You will have to change the file to look like this:
/usr/local/bin
/usr/bin
/bin
/usr/sbin
/sbin
Type Ctrl-x Ctrl-s to save it and Ctrl-x Ctrl-c to quit.
– Obtain git
The first thing we need is git. Git is the source control and
collaboration software that is most popular in the FREE software
world. Type
brew install git
– Obtain a version manager
If you are only ever going to build one website, you can skip this. However most of us will
build more than one. In that case you are going to need a version manager to isolate your
Ruby or Python code base. You should install RBenv for Ruby and PyEnv for Python. You also
need to install RBenv plugin for virtualenv and Pyenv plugin for virtual env completely isolate
your code.
~ cd “$HOME”~
~ git clone git://github.com/yyuu/pyenv.git .pyenv~
Define environment variable PYENV<sub>ROOT</sub> to point to the path where
pyenv repo is cloned and add $PYENV<sub>ROOT</sub>/bin to your $PATH for access
to the pyenv command-line utility.
~ echo ‘export PYENV<sub>ROOT</sub>=”$HOME/.pyenv”‘ >> `/.bash_profile`
~ echo ‘export PATH=”$PYENV<sub>ROOT</sub>/bin:$PATH”‘ >> `/.bash_profile`
Add pyenv init to your shell to enable shims and autocompletion.
~ echo ‘eval “$(pyenv init -)”‘ >> `/.bash_profile`
### Linux
You have the compilers. You don’t need the windowing library. You can just
`sudo apt-get install gcc make git`
For Linux you need to install the dependencies for Ruby and Python:
`sudo apt-get build-dep ruby`
or
`sudo apt-get install build-essential`
`sudo apt-get install libsqlite3-dev`
`sudo apt-get install sqlite3 # for the command-line client`
`sudo apt-get install bzip2 libbz2-dev`
Check out pyenv where you want it installed. A good place to choose is
$HOME/.pyenv (but you can install it somewhere else).
~ cd “$HOME”~
~ git clone git://github.com/yyuu/pyenv.git .pyenv~
Define environment variable PYENV<sub>ROOT</sub> to point to the path where
pyenv repo is cloned and add $PYENV<sub>ROOT</sub>/bin to your $PATH for access
to the pyenv command-line utility.
~ echo ‘export PYENV<sub>ROOT</sub>=”$HOME/.pyenv”‘ >> `/.bashrc`
~ echo ‘export PATH=”$PYENV<sub>ROOT</sub>/bin:$PATH”‘ >> `/.bashrc`
Add pyenv init to your shell to enable shims and autocompletion.
~ echo ‘eval “$(pyenv init -)”‘ >> `/.bashrc`~