Last night, as our final GCDI Sound Series workshop of the semester, I taught a new workshop: Audio Annotation with Praat and Python. And when I say “new”, I mean new to me. Although I’ve wanted to run a workshop like this for a long time, this is the first time I’ve had the opportunity to put together this workshop. Planning it has been exciting, but whenever it’s the first time I’m running any new class or workshop, I am always nervous about the usual thing: whether the scope of the material is correct for my students and whether this lesson will be accessible to my students, will my students respond to the way I will present the material, etc.
While the workshop went well, and my nerves were assuaged, there are aspects of the workshop I would like to change, and things I’d like to add, before the next time I run this workshop. What follows is a discussion of what my workshop “Audio Annotation with Praat and Python” contained, as well as my reflections about how I will change this workshop to make it even better and more accessible in the future.
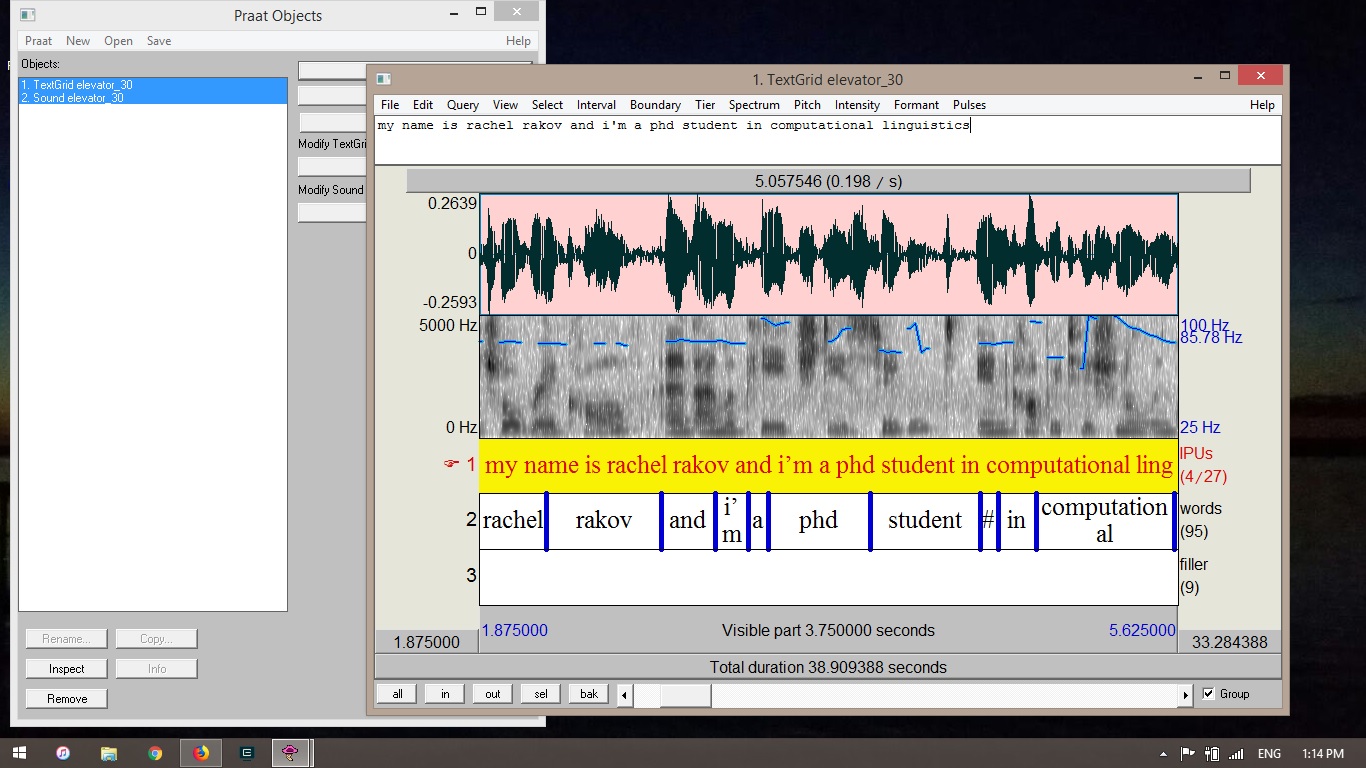
Praat is a tool for doing phonetics and other kinds of speech analysis. It also has a well-known annotation system, using layered TextGrid tiers to allow for close annotation of as many different things in an audio file that you might want to annotate. Praat is free and extremely well maintained, and is a wonderful tool for both speech analysis and annotation.
As my research is in speech, and as Praat is a standard tool in my work, I was excited to show students from other disciplines that it can be a resource for any audio annotation work. That said, the design of my workshop was speech-based; the audio that we worked with was all speech audio. Although I had examples of other types of audio it might be useful to annotate (such as bird song), having audio examples of non-speech would have helped to better exemplify the versatility of audio annotation.
The first thing we did in the workshop was record audio with Praat so students could work hands-on with their own speech during the workshop. Digital Fellow Kelsey Chatlosh had previously given me a great idea for what students should say: a 30 second elevator pitch of their research! It’s always good to practice this, and it would give each student a sufficient sample of speech data to annotate. During the workshop, the average length of the each student’s elevator pitch was around 18 seconds, a little more than half the length of the 30-second elevator pitch. While this shorter version still left students with sufficient speech data to annotate, in the future I think I will insist that each student really do 30 seconds of speech. It might mean rerecording, but that just gives the students more practice recording with Praat!
Next, we did a little follow-along clicking to create our TextGrids and their tiers. We chose for this exercise to have three tiers of annotation: sentences, words, and breaths (which were defined as loud, audible times of taking a breath of air). Our first two tiers were TextGrid interval tiers, which capture the start and end timestamps of the annotation. Our third tier, breaths, was a point tier, which annotates to a single timestamp.
Once our tiers were created, I gave a short demonstration of annotation (in this case, a close transcription of the sentences in the audio file), and set the students to it it out. I was impressed with how quickly they caught on to Praat, pressing the correct hotkeys and learning to create sentence boundaries.
Before we started in on the words tier transcription, we regrouped to discuss how long each student thought transcribing the words in their sentences would take. Every student made a prediction, and then I gave the students 20 minutes to practice word boundary annotations. Although this went well in the workshop, in the future I would like to demonstrate annotating word boundaries before having the students go to it, since word boundaries are hard to hear when the speech you are annotating is natural speech. We speak quickly! It’s common for words to blend together so that you might not hear the “eye” vowel sound if you’re saying the word “my” very quickly – it might sound a lot more like “muh”, or appear very short in your annotation. This can be a little confusing if it’s the first time you’ve worked with speech data or listened very closely for individual words in a sentence. A demonstration of this phenomenon (and showing that sometimes words hardly sound like words at all in isolation) would likely have clarified some questions that I was asked by several students during the hands-on practice.
The last part of my lesson was a demonstration using TextGird Tools, a toolkit for the Python programming language that makes it easy to read in TextGrids and get the annotations that you’ve created with their associated timestamps. I had prepared a Jupyter notebook with a number of examples of the way that you can read in your TextGrid data and then manipulate it to show different things (how many seconds of silence were in your audio clip, the most and least common words in your audio clip, etc). In the future I would like to also include examples here that were not speech based, and would like to include more visualizations showing results the of ways that we can work with annotation data once it’s in Python. I do think that making this a demo rather than a code-along was a good idea. It kept the class accessible to a wider range of students, since no knowledge of Python programming was required for students to attend this workshop. In the workshop last night, none of the students had programming experience, so I walked through larger ideas of types of analyses that could be done in Python, glossing over the exact code created to make them. (For students interested in Python, we do have workshops on that too! Stay posted to our GCDI workshop schedule here.)
Overall, the students left feeling that they had learned a new tool (as marked by workshop evaluation forms they filled out) that they might use in the future. I left feeling pleased with the workshop, with a number of ideas on how I will change this workshop next time to make it more accessible for students across disciplines, and with further ideas of how I can step away from my speech bias even more when presenting this workshop. I also left with, if you can believe it, a feeling of real excitement to get back to speech annotation.