Workshop Overview
For this workshop, we will explore Hypothes.is, a versatile digital annotation tool, for social reading online. We will review the four available options for deploying Hypothesis in a web browser. By the end of this workshop, participants will:
- become familiar with Digital Annotation as a pedagogical method
- learn how to activate Hypothesis for:
- The CUNY Academic Commons
- Firefox and Chrome web browsers
- Via URL manipulation
- On personally owned or mangaged web pages
- For private reading groups
By introducing participants to the different options for using this tool, this workshop empowers instructors to remain flexible in adapting to student needs and technological contexts.
Jump to a specific section of the workshop:
- What is Digital Annotation?
- Up and Running with Hypothesis
- First Option: on the CUNY Academic Commons
- Second Option: as a Browser Extension
- Third Option: the Via Method
- Fourth Option: Embedding into Websites
- Configuring Reading Groups
What is Digital Annotation?
Let's begin by quickly defining "Digital Annotation." Digital Annotation is the use of digital tools to mark up electronic text, in the form of highlighting or commenting. It can be used individually (for self-study and research purposes) or for social reading.
In lieu of introductions
Since this workshop is asynchronous, I'll replace the usual icebreaker (where we go around the room and introduce ourselves) with a moment of brainstorming about our intentions for working with Digital Annotation. We will begin, then, by taking five minutes to acquaint ourselves with where we are coming from and what we hope to learn here.
On a sheet of paper or blank text document, explain your interest in Digital Annotation. What has your experience been in the past? And how do you want or hope to use Digital Annotation in the future? Though you might not have a solid idea of how Digital Annotation works at this point, try to brainstorm possible goals or strategies for enhancing your teaching. How might Digital Annotation complement your work as an instructor? Take no more than five minutes for your brainstorm.
I'll start:
I've been using Digital Annotation in almost all the English classes that I've taught at Hunter College, CUNY, for the past four years. When I taught English 220: Introduction to Writing about Literature, my goal was to use Digital Annotation to model close reading pratices, particularly identifying and analyzing "literary devices" like metaphor and irony. In other classes, I moved from using annotation to model close reading to using it to encourge my students explore and extrapolate on their own interests when they read. I instructed them to highlight what sticks out to them and to explain why they found it striking. The goal was to get my students to connect discrete moments in narrative to ideas and themes from the work at large. For the future, I'm thinking about annotation in a new way, and I'm more interested in highlights than textual responses. How it might annotation engage embodied reactions or feelings that occur during the reading process? Specifically, I've been playing around with highlighter colors to indicate different kinds of nonverbal or preverbal responses to reading. By using annotation in alternative ways, I hope to open up the we read and engage with texts online.
Unpacking "Digital Annotation"
Now that we have a stronger sense of what we hope to gain with Digital Annotation, we return to our defintition, taking a closer look into some of the key terms that make up Digital Annotation:
Digital Annotation is the use of digital tools to mark up electronic text. It can be used individually (for self-study and research purposes) or for social reading.
Let's unpack the terms in italics:
Digital tools: an application, either standalone (something you download), as a plugin (browser tool), or embedded into a website.
Mark up: adding comments and/or highlights to text in order to emphasize specific words, phrases, passages. Associated with marginalia. Can be used to indicate moments of interest, questions, confusion, conflict or another reaction.
Social Reading: When you read texts with others, as a group. Can be in a classroom setting, other academic setting, or public setting.
Let's look at some examples of digital annotation tools within social reading environments for teaching.
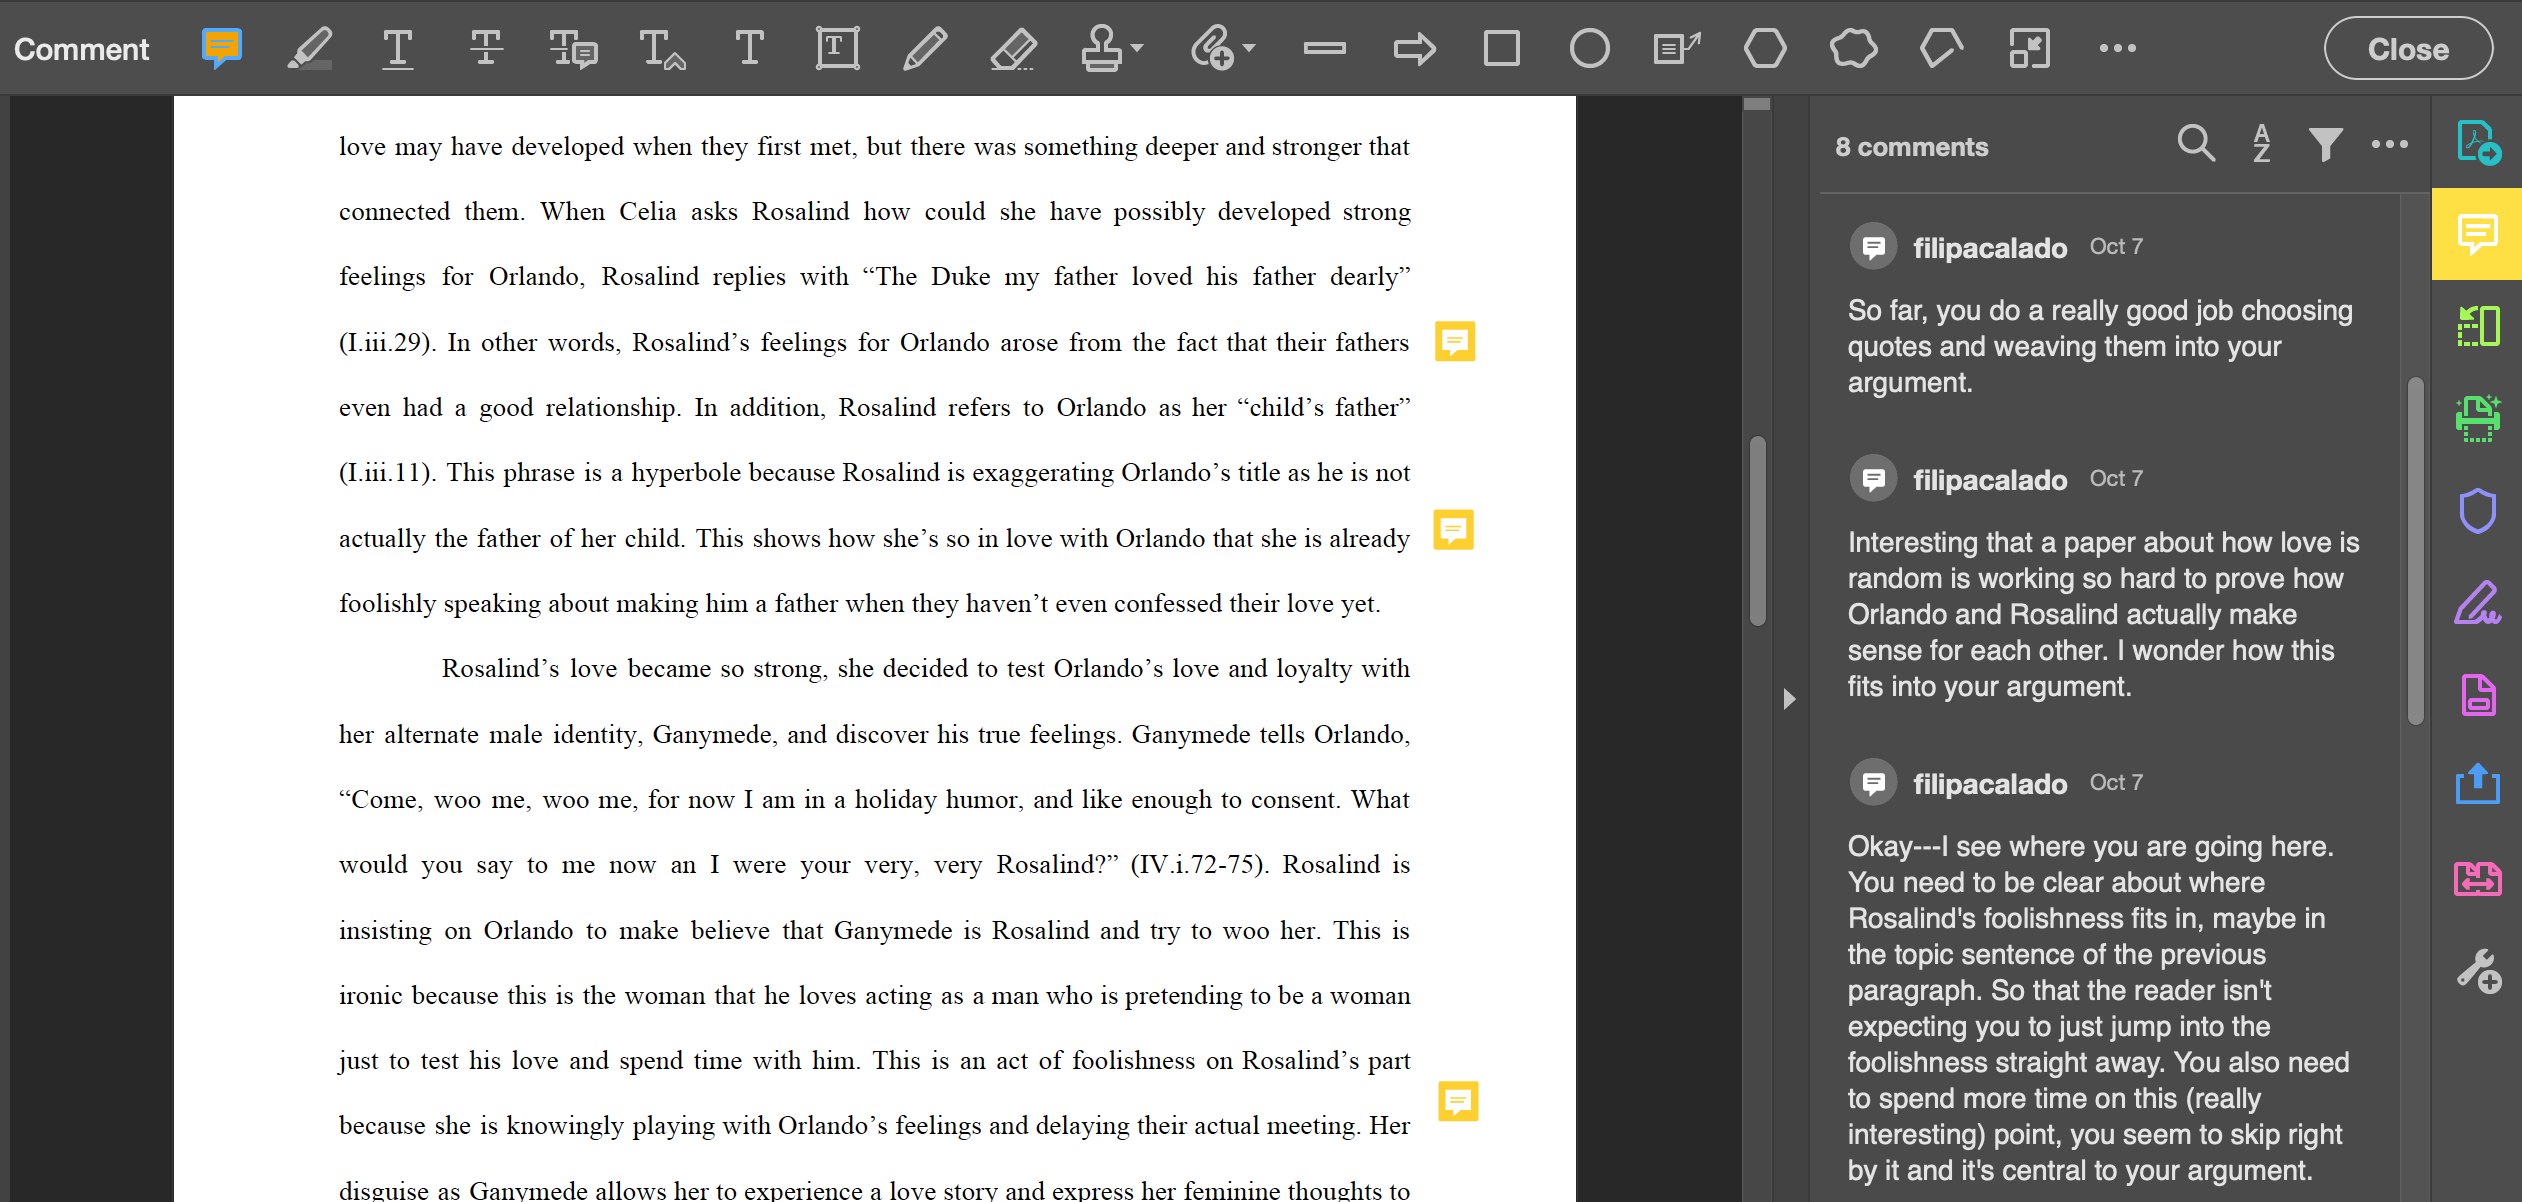
First is Adobe Reader/Acrobat, a standalone app (meaning that you download the application and it lives on your computer) that allows you to highlight and comment on PDFs.
In the below image, you can see the annotation icon on the right-hand margin, and the comment that corresponds to that icon on the panel. I've used Adobe Acrobat "comment" function to respond to student papers.
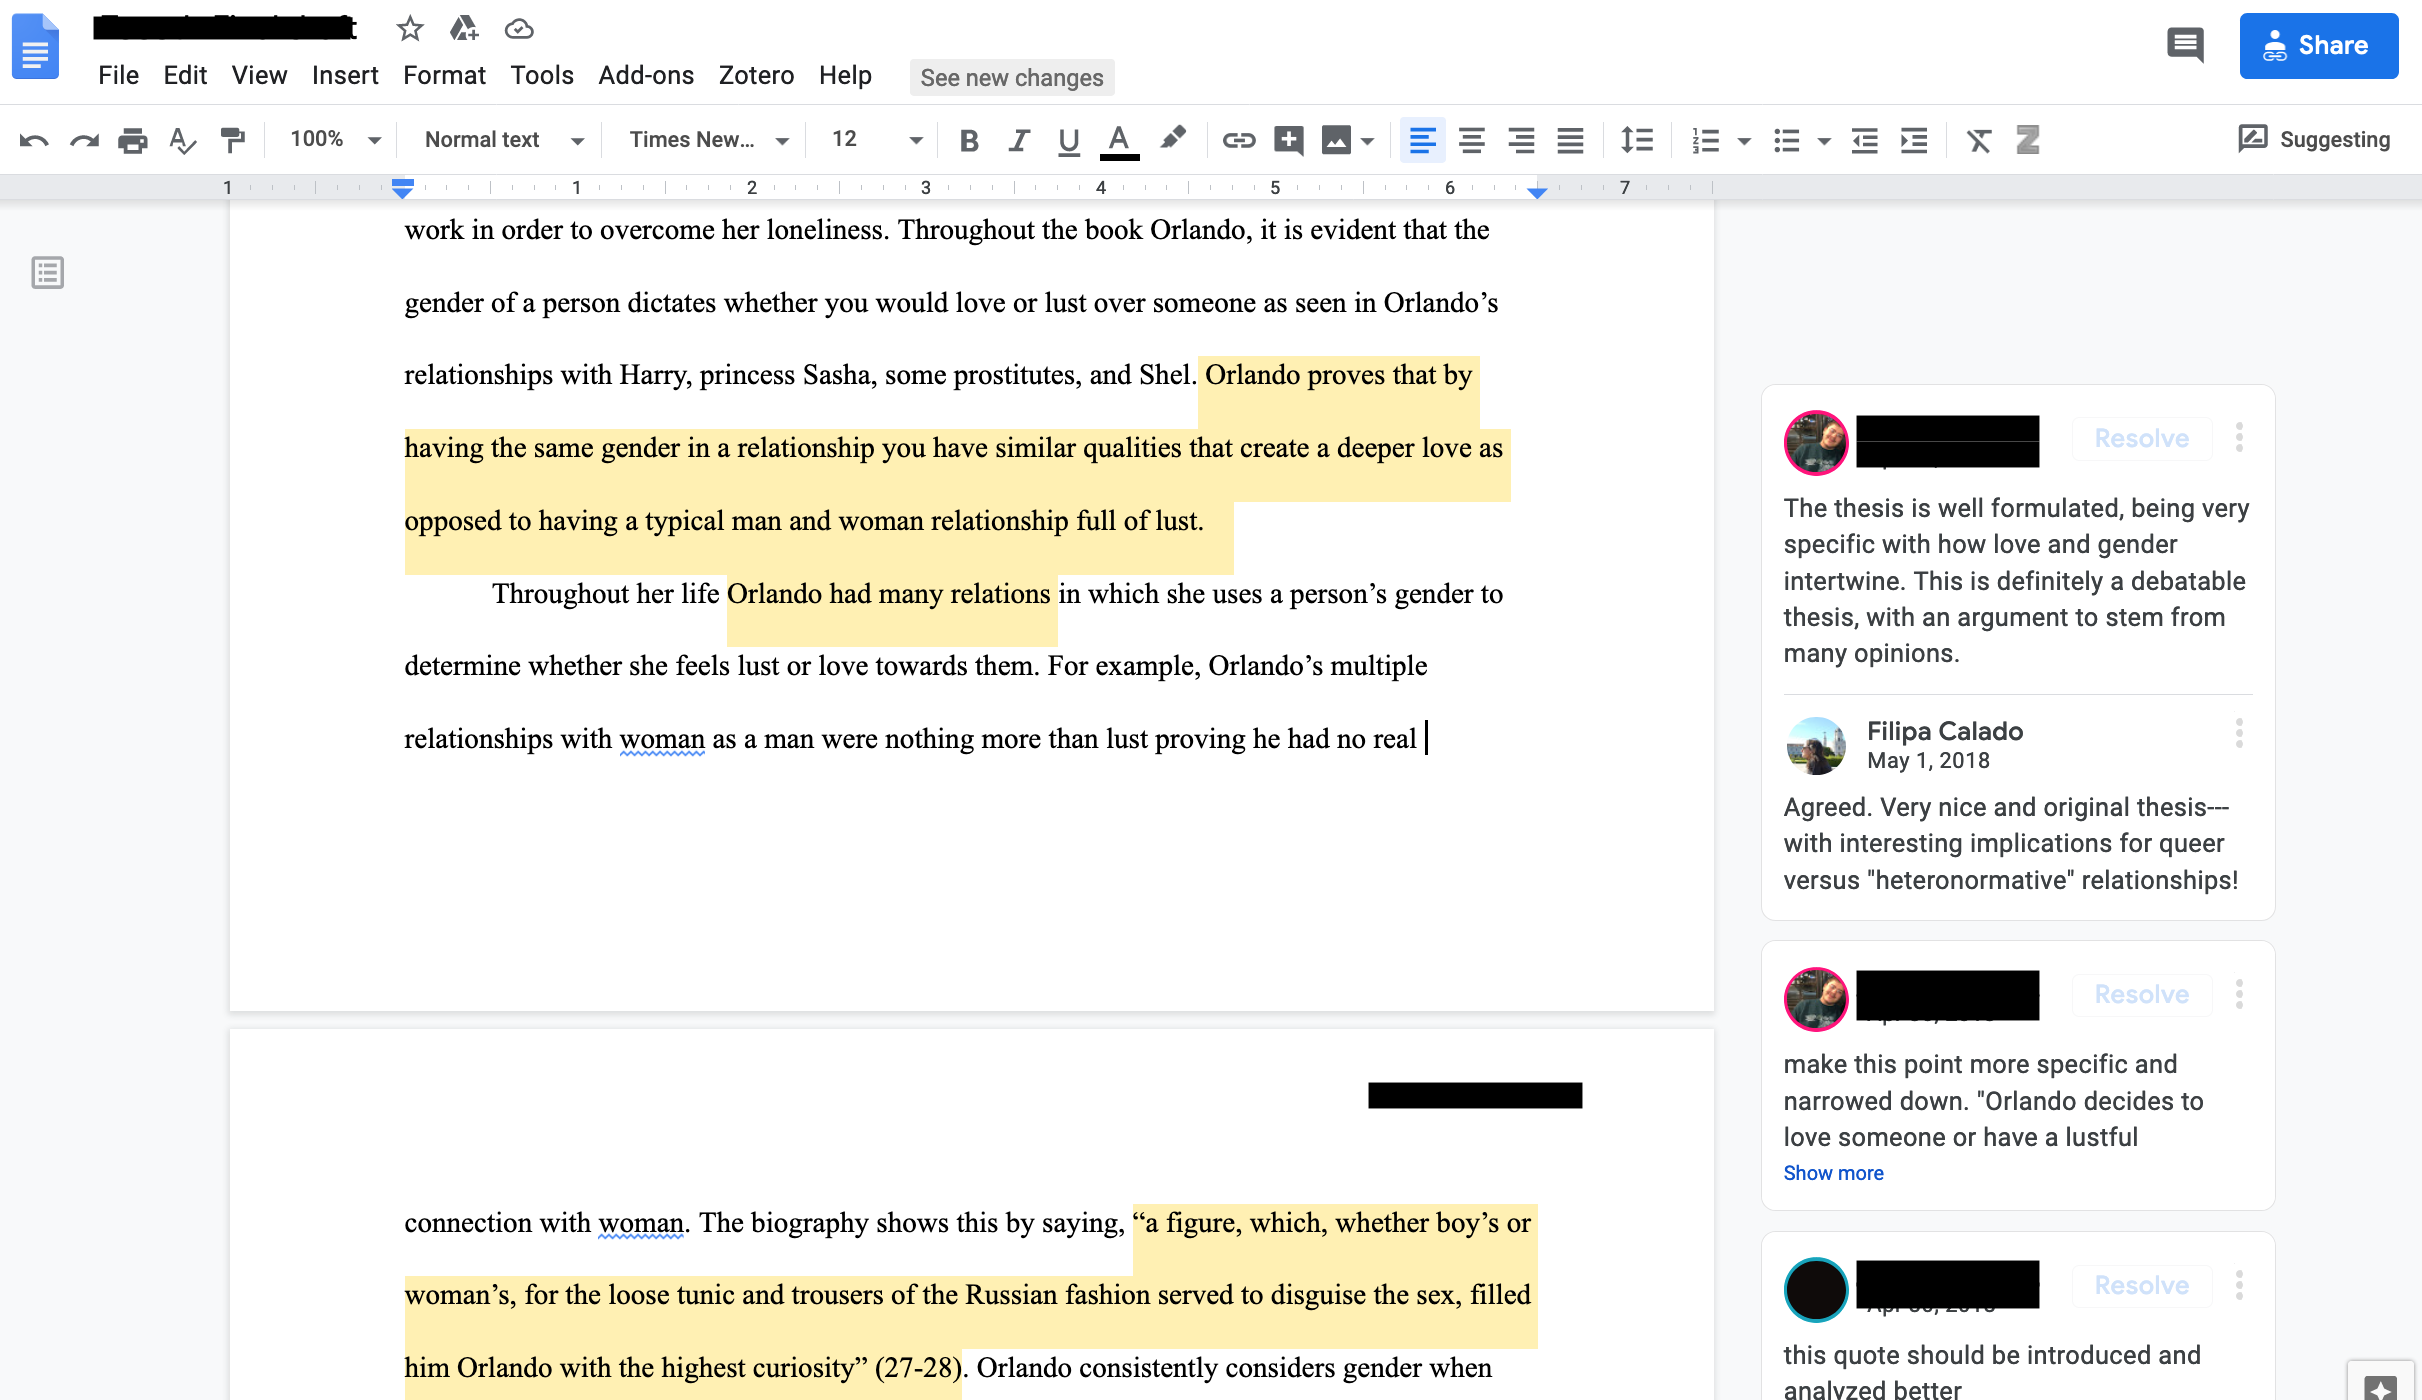
Second is Google Docs, is a web app (an application in your web browser) that can be used to draft, highlight, and comment text with others.
My students use Google Docs for peer reviewing papers. They highlight a peice of text, and write a comment. You can see their comments on the right-hand side.
Pegagogical Goals
Before using hypothesis, let's come up with some pedagogical goals. First, we will think about some ways you might use Digital Annotation for your own purposes. This exercise works well with a partner or small group, but you can complete it on your own.
- How are you or people you know already deploying annotation tools or techniques for teaching and learning? How do you want to use annotation for the classroom? Think of some examples that address your own goals and needs with digital annotation. You can say things like, "To have students take notes while I'm lecturing" or "To model close reading' strategies."
See some examples of my own usage in teaching:
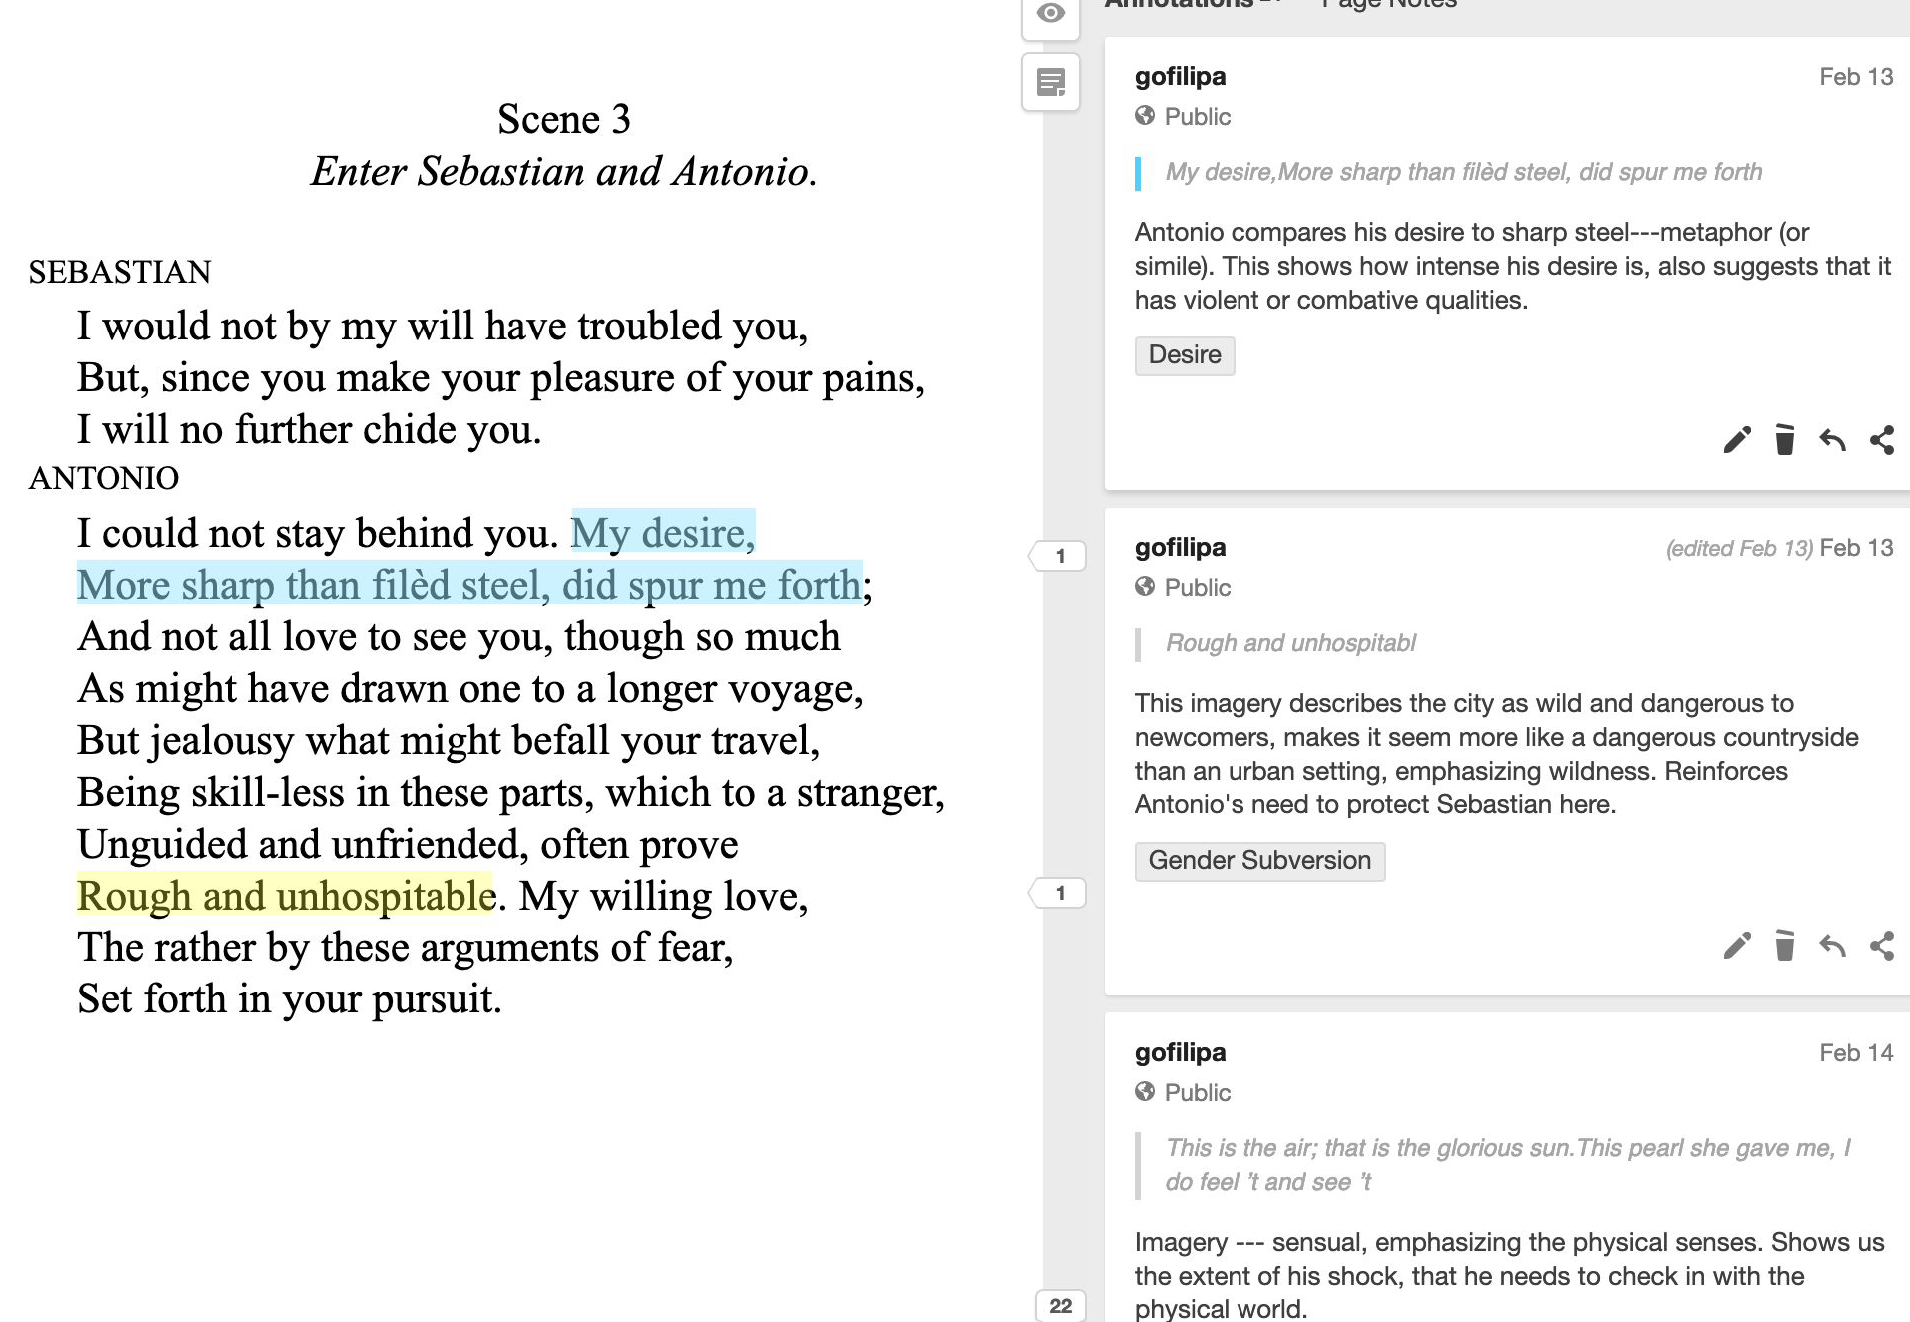
In this image, I use hypothesis for modeling "close reading," or close attention to textual detail. Close reading can emphasize elements like figuration or word choice. Here, I'm using annotation to show my students how to dig deeper into the literary devices like metaphor, simile, and imagery. After modeling this activity for my students, they then used annotation to find and analyze other literary devices in the text.
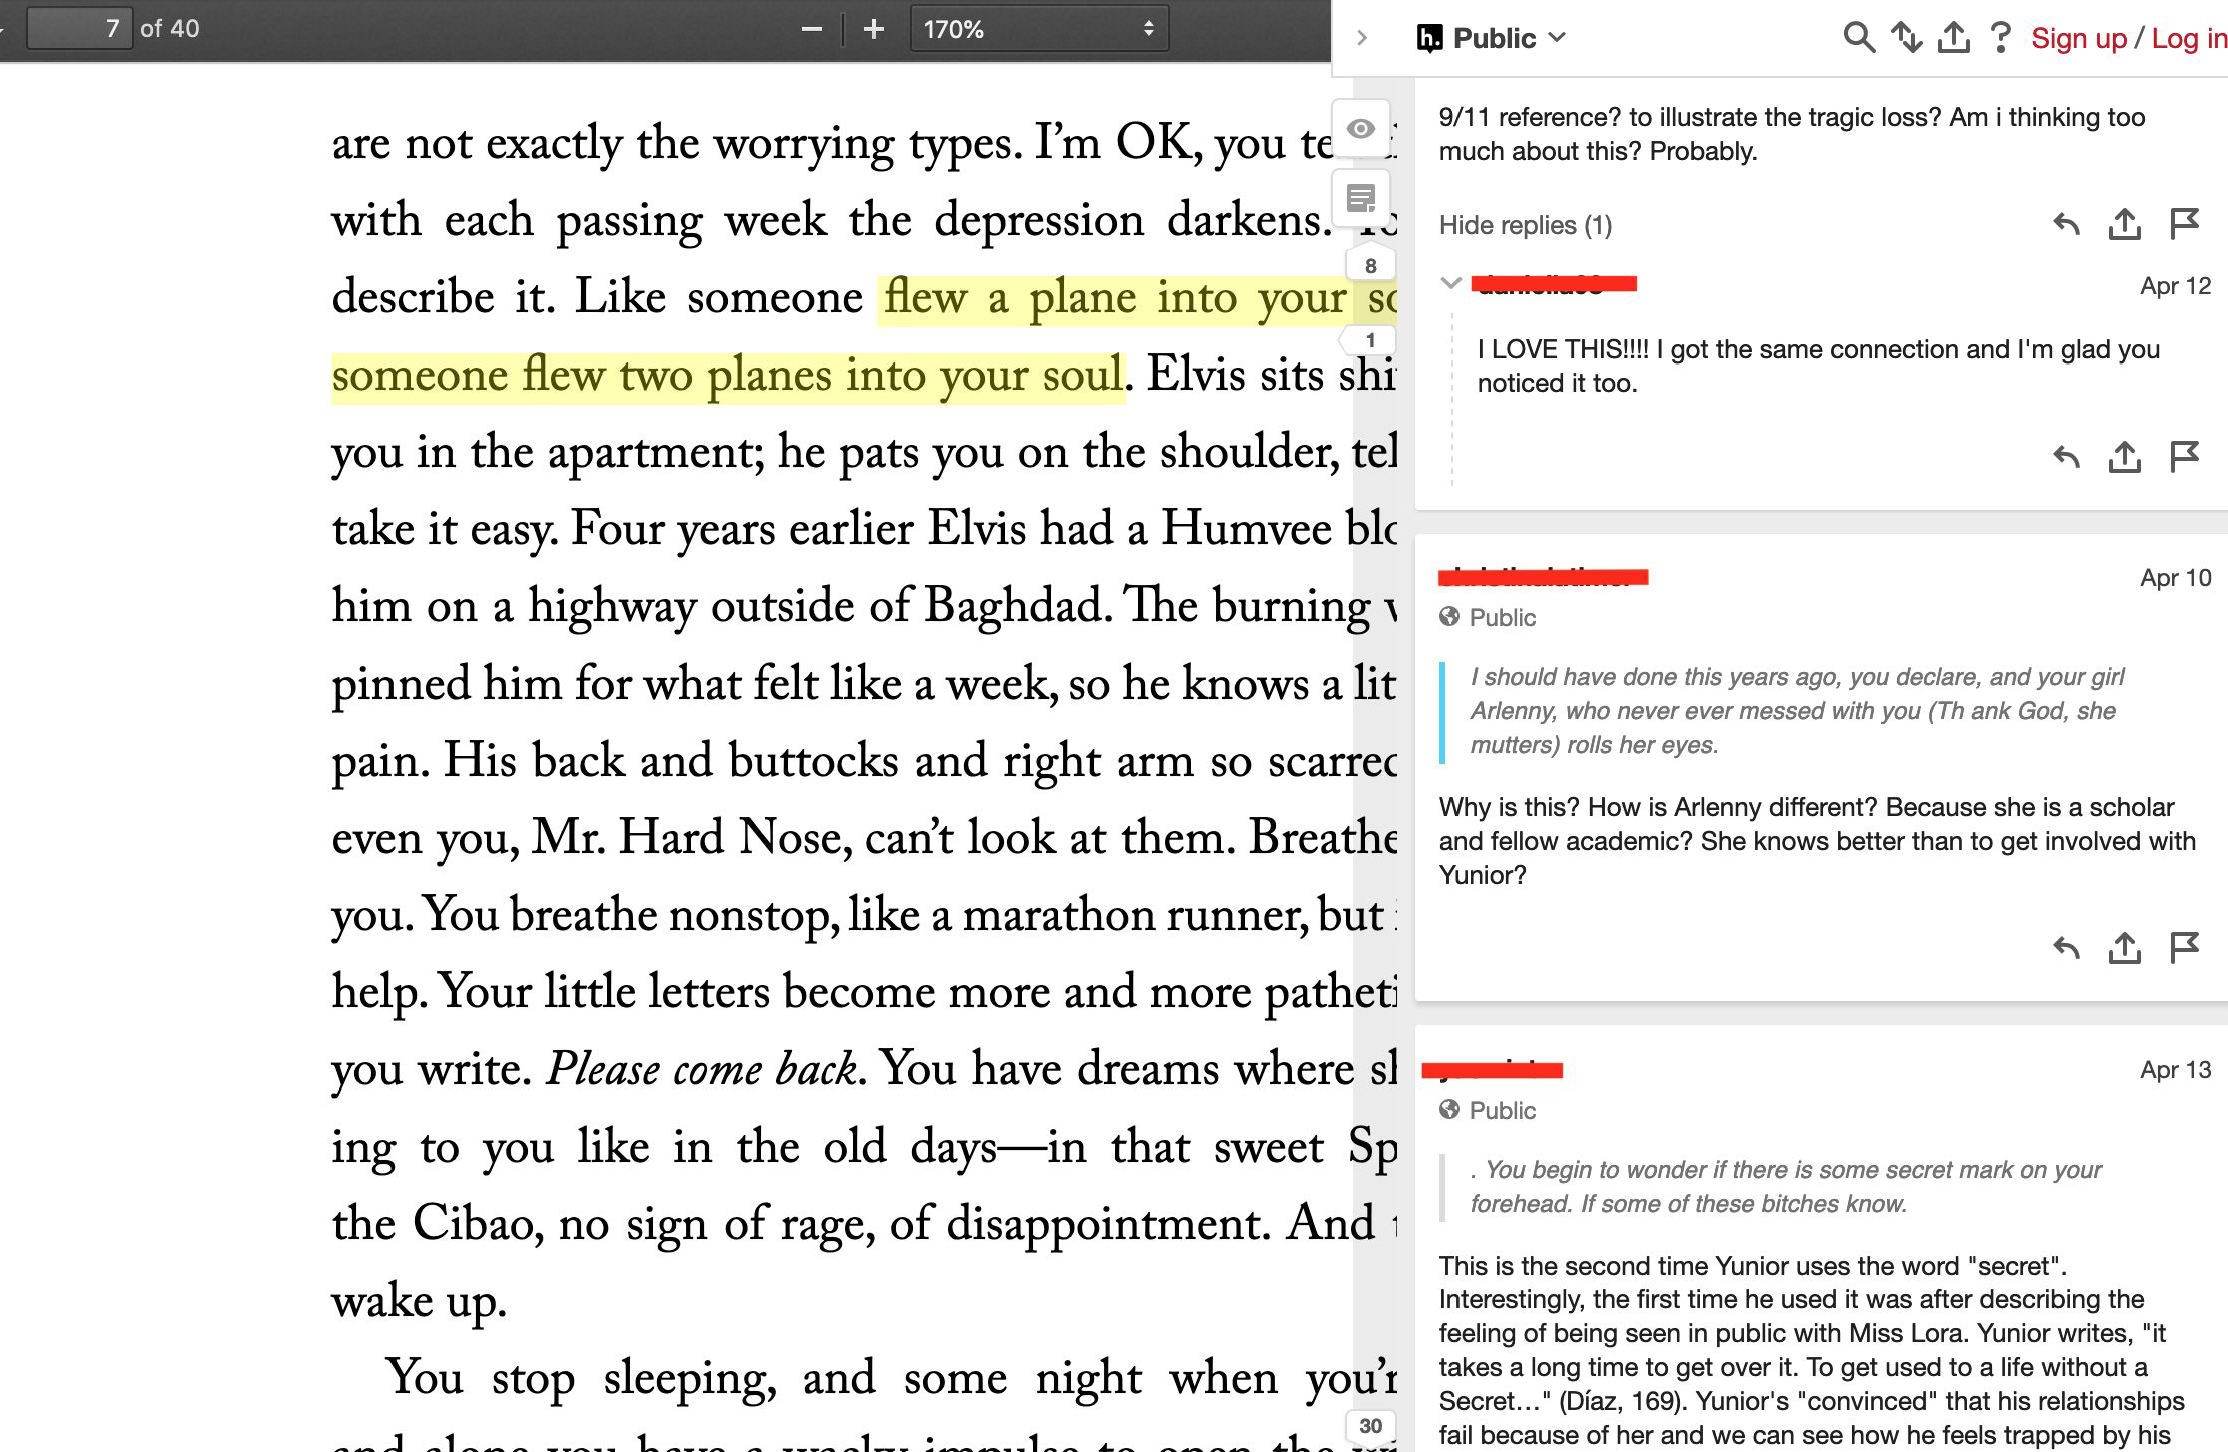
Here, you can see a more free form use of annotation, with students taking initiative to comment on what seems most interesting to them. For this class, I gave explicit directions for students to comment on things that are striking to them, while still providing them with some prompts to act as guidance. Here are the prompts that I distributed to my students:
Your comment might do any of the following:
- In your comment, identify a literary devicefrom the text selection, and explain how the device enhances a certain quality about the person or idea that is being described, or relates to a course theme.
- In your comment, pinpoint a theme or recurring idea from the text. How does the text selection elaborate or complicate the theme?
- Use your comment as a space to work toward crafting a discussion question about the text selection. Think of a question that would provoke discussion and even debate among your peers.
- Instead of creating your own comment, you can respond to someone else, and use that opportunity to offer your own thoughts or extend the conversation. You can use their as a jumping off point for your own ideas, or present another point of view on the topic.
I've found that giving my students some structure is much more effective for encouraging them to annotate. With this structure, I'm able to guide their responses toward achieving some of our learning objectives of the course. Often, they use these prompts as a starting point that leads them toward a more freeform and generative answer. I think of these guidelines as an enabling constraint.
Sample Assignments for Teaching with Hypothesis
Now let's dive into some use cases. The hypothesis folks have come up with a useful article outlining 10 Ways to Annotate with Students. Here we have some great starting points for integrading annotation into your classroom. I'm going to highlight a few of the more inspiring strategies, which you can adapt to your own purposes:
Teacher Annotations:
Pre-populate a text with questions for students to reply to in annotations, or with notes elucidating important points as they read. This is a good opportunity to guide your students toward discussing specific themes and passages in preparation for class discussion.
Glossing the Text:
Have students look up difficult words or unknown allusions in a text and share their research as annotations. This creates a little crowd-sourced glossary on the sidebar for useful refererence during reading.
Posing Questions:
Have students highlight, tag, and annotate words or passages that are confusing to them in their readings. You can then ask other students try to answer their questions, or devote some class time to reviewing and answering questions. You might even expand this exercise toward constructing research questions or thesis statements.
Close Reading:
Have students identify formal textual elements and broader social and historical contexts at work in specific passages. This is a particularly effective way to teach critical reading strategies and draw students' attention to the ways that language, figuration, and rhetoric can influence our reading of a text.
Creating Annotated Bibliographies:
This method gives students a bit more freedom. Have them research a topic or theme and tag and annotate relevant texts across the Internet. You can follow along with their progress by tracking their username on the hypothesis website.
Annotation as Multimedia Writing
For a more playful and experimental assignment, have students annotate with images and video or integrate images and video into other types of annotations. Students will need to think creatively about what images or video relate to specific moments in the text.
As you can see from the above examples, one of the main benefits of using Digital Annotation for teaching is to draw attention to concrete elements of the text. Practice annotation in a way that encourages your students to ground their ideas and arguments in the text. Working from textual evidence in this way allows your students to develop their critical thinking and writing skills.
More Pedagogical Resources:
For those of you who want to dig into specifics of using annotation in the classroom, check out these examples of classroom use. This page contains annotation excerpts from undergraduate courses across the US. Take a look at the screen shots to see the ways that students are using annotation in these courses.
If you want to give your students some guidelines for annotating, send them these Annotation tips for Students. This article goes through how to make an annotation, what to pay attention to, and how to make annotations contribute to the reading (rather than summarize the reading). There's also technical information for students who want a little tutorial on how to use the annotation sidebar.
Up and Running with Hypothesis
Creating an Account on hypothesis
Please sign up for an account (do not install the plugin yet) on https://web.hypothes.is/start/.
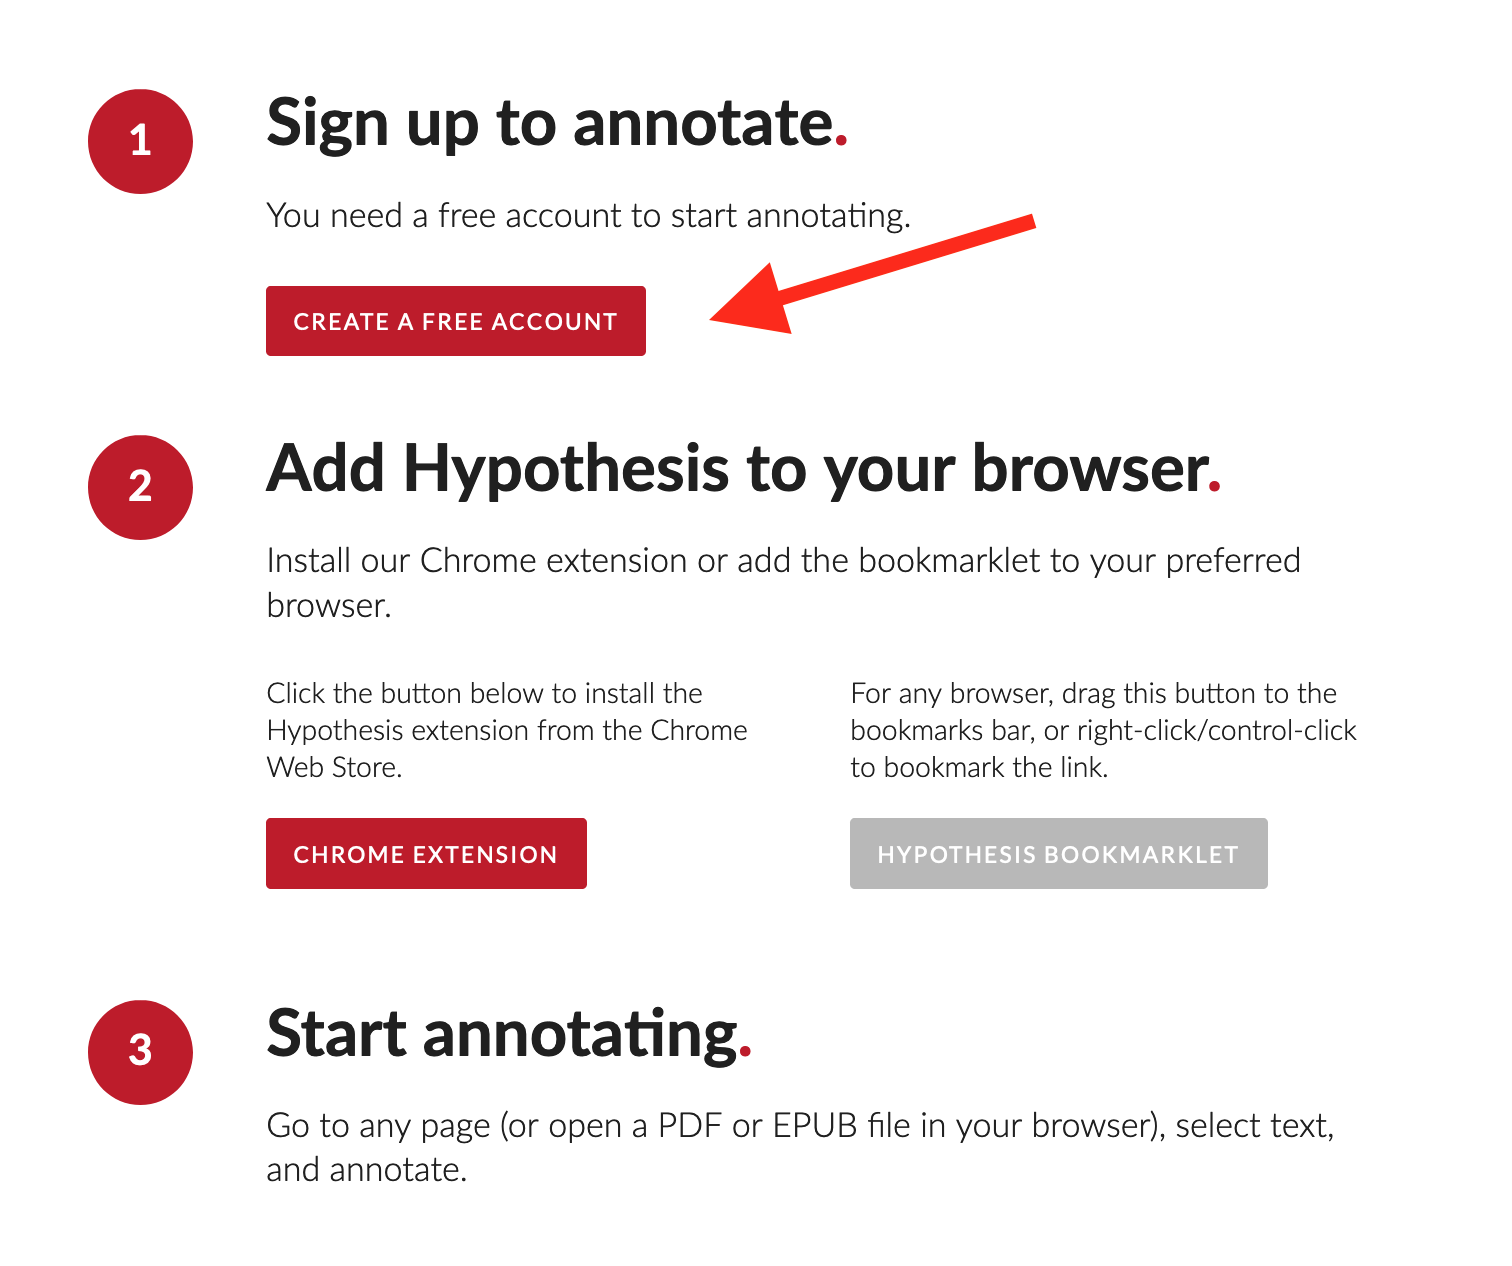
Press "Create A Free Account," and enter in your name, email, and password.
That's it! You're now a registered member of hypothesis.
Next, we are going to look at how to use Hypothesis to annotate. There are four options for using hypothesis. We will begin with the CUNY Academic Commons, then look at a couple of browser extensions (for Firefox and Chrome), check out a URL workaround, then finish with the embedding option (for the advanced user).
The reason we are looking at four different ways of using Hypothesis is to give you the flexibility for using any one of these options. Your technological circumstance will depend on whether you're reading texts on a course website, such as PDFs that you upload, or on the web generally, like news websites or blog posts. You'll also learn some hacky ways of deploying hypothesis, as a backup method if the other methods fail. The main thing is to remain flexible to different technological contexts, so you can provide your students with options and react to obstacles as they arise.
Making Annotations
For this workshop, we won't be making any annotations. Instead, the focus is on learning how to install and activate the Hypothesis tool.
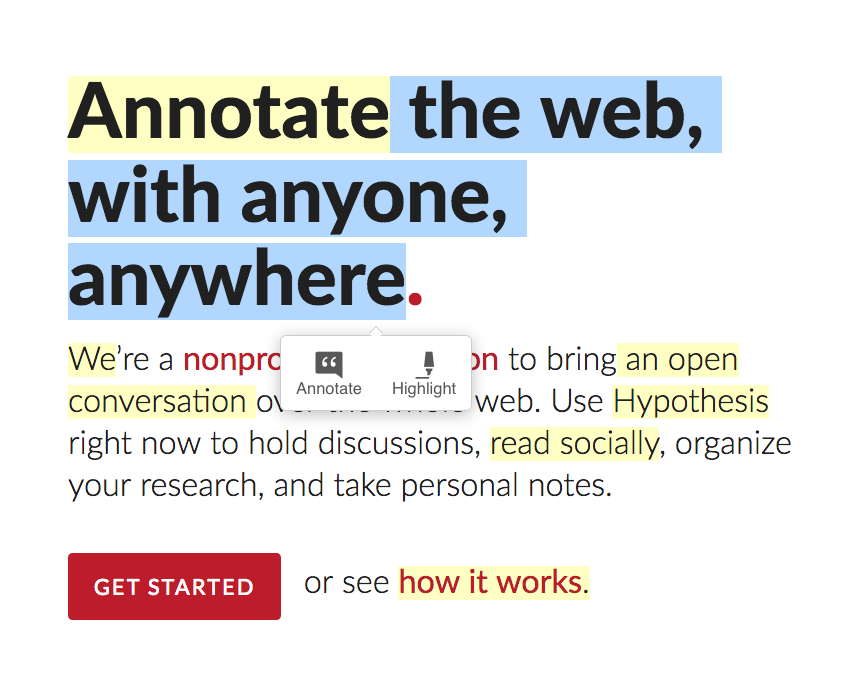
That being said, making annotations is very intuitive, once you have Hypothesis installed and activated. To highlight, all you need to do is select a peice of text. Do this by clicking and dragging your pointer over a bit of text. Then, a little annotation toolbar will pop up with two options, "Highlight" and "Annotate." To highlight, simply press the highlight button, and the selection will appear in yellow.
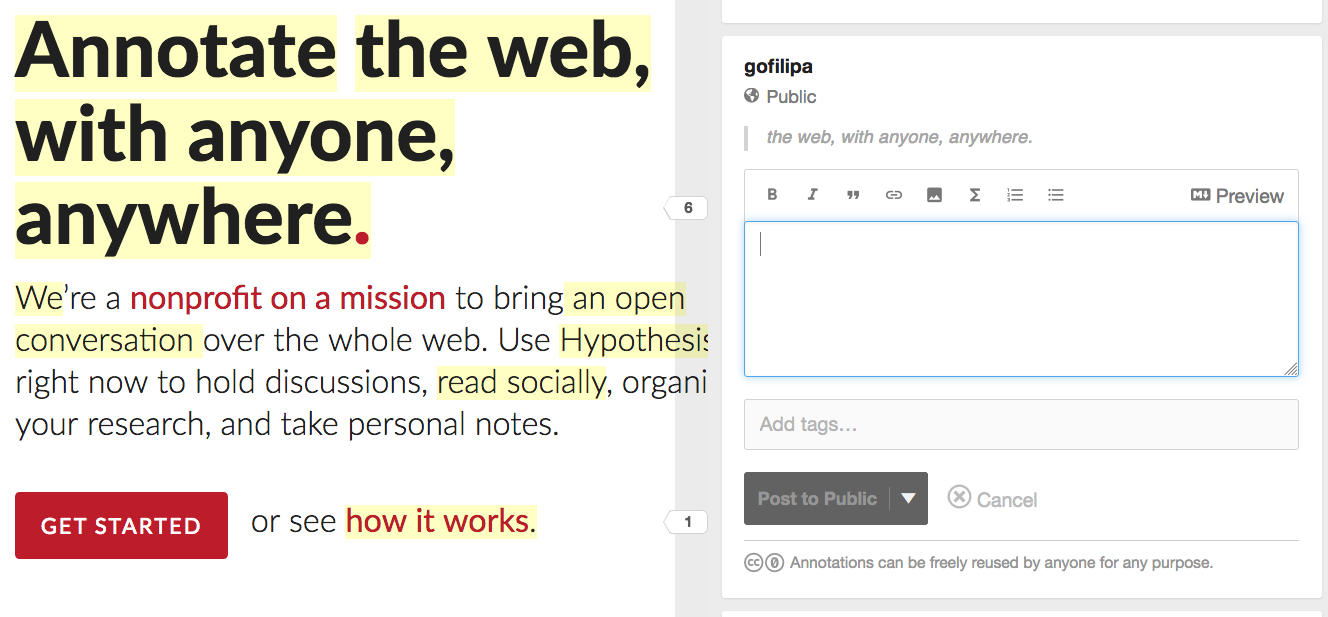
To annotate, press the relevant button, and the sidebar will expand. Now, you'll be prompted to type into a textbox. After you're done typing your answer, press "Post to Public."
And that's it! Now, let's dive into the four options for using H.
First Option: Hypothesis on the CUNY Academic Commons
First, if you haven't already, please sign up for a Hypothesis account.
Using Hypothesis on the CUNY Academic Commons is the easiest option for your students. They won't have to download or configure anything on their own, because you've already done it for them. They will just need to navigate to the correct CUNY Academic Commons course website and the annotation tool will function automatically.
This is also arguably the easiest method for the teacher, provided that they already have a course website on the Commons. If you don't have an account on the CUNY Academic Commons, sign up here. And, if you don't have a course website set up, you can follow these directions.
Got a website set up? Good. Now we can activate the hypothesis plugin on your new course website. The CUNY Academic Commons offers a number of "Wordpress Plugins" that are already installed on your site and need to be activated.
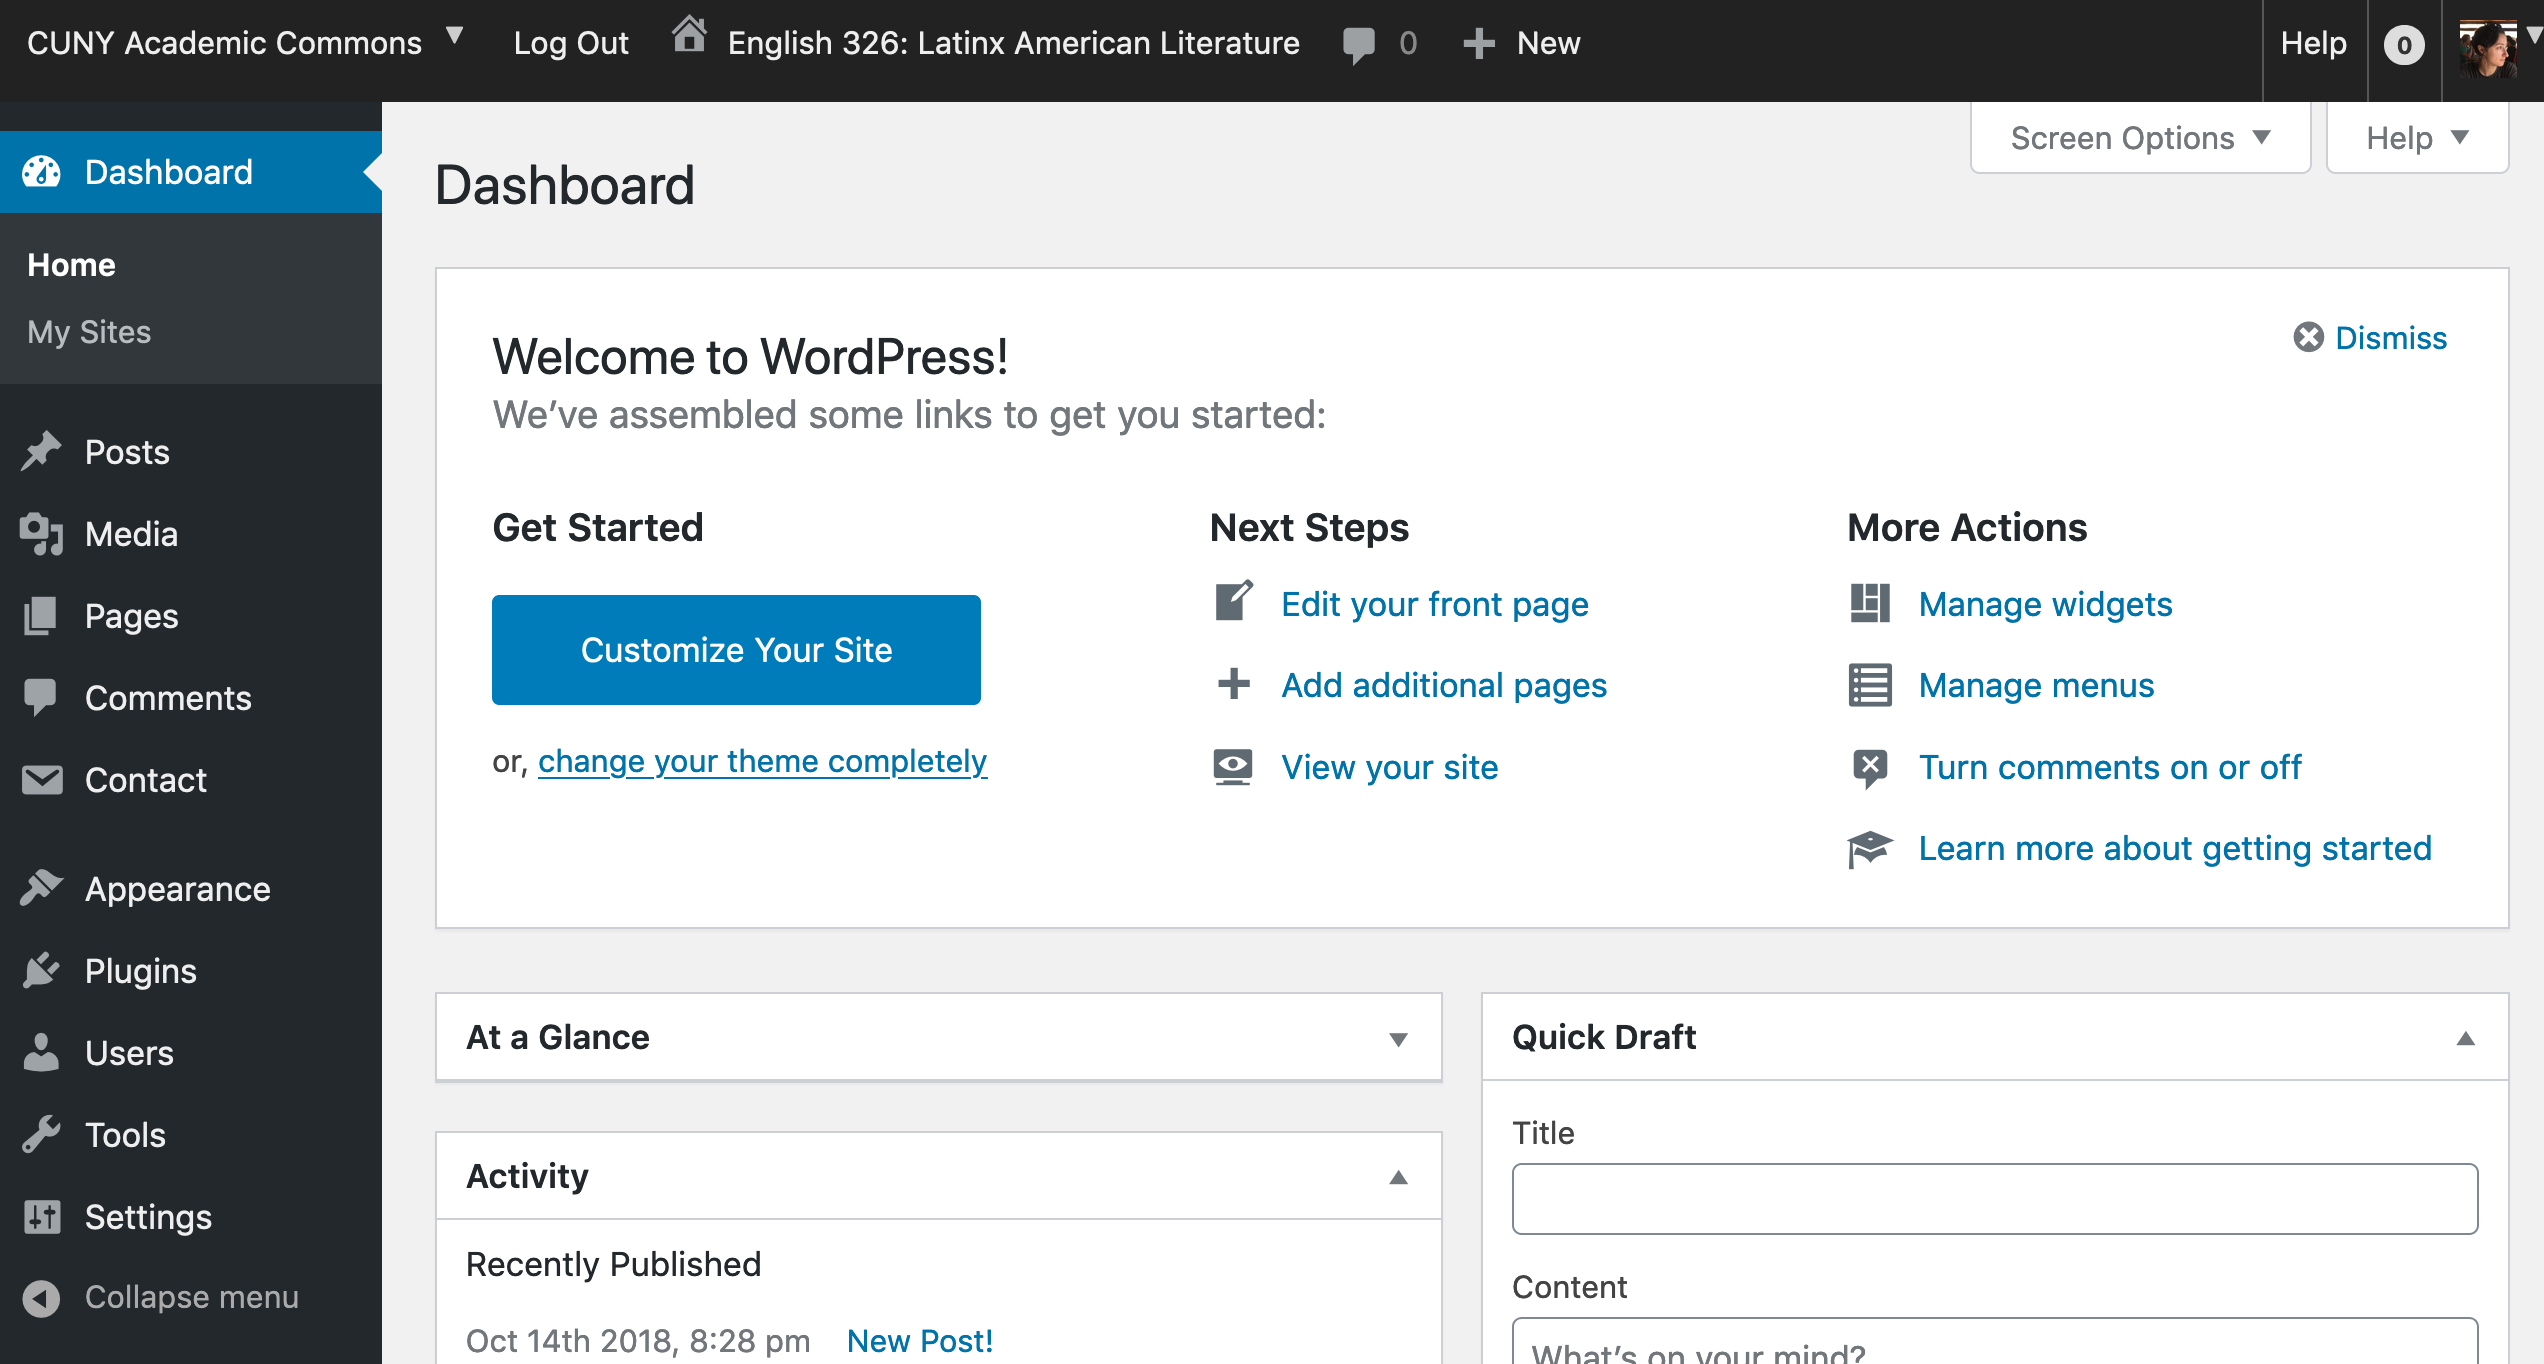
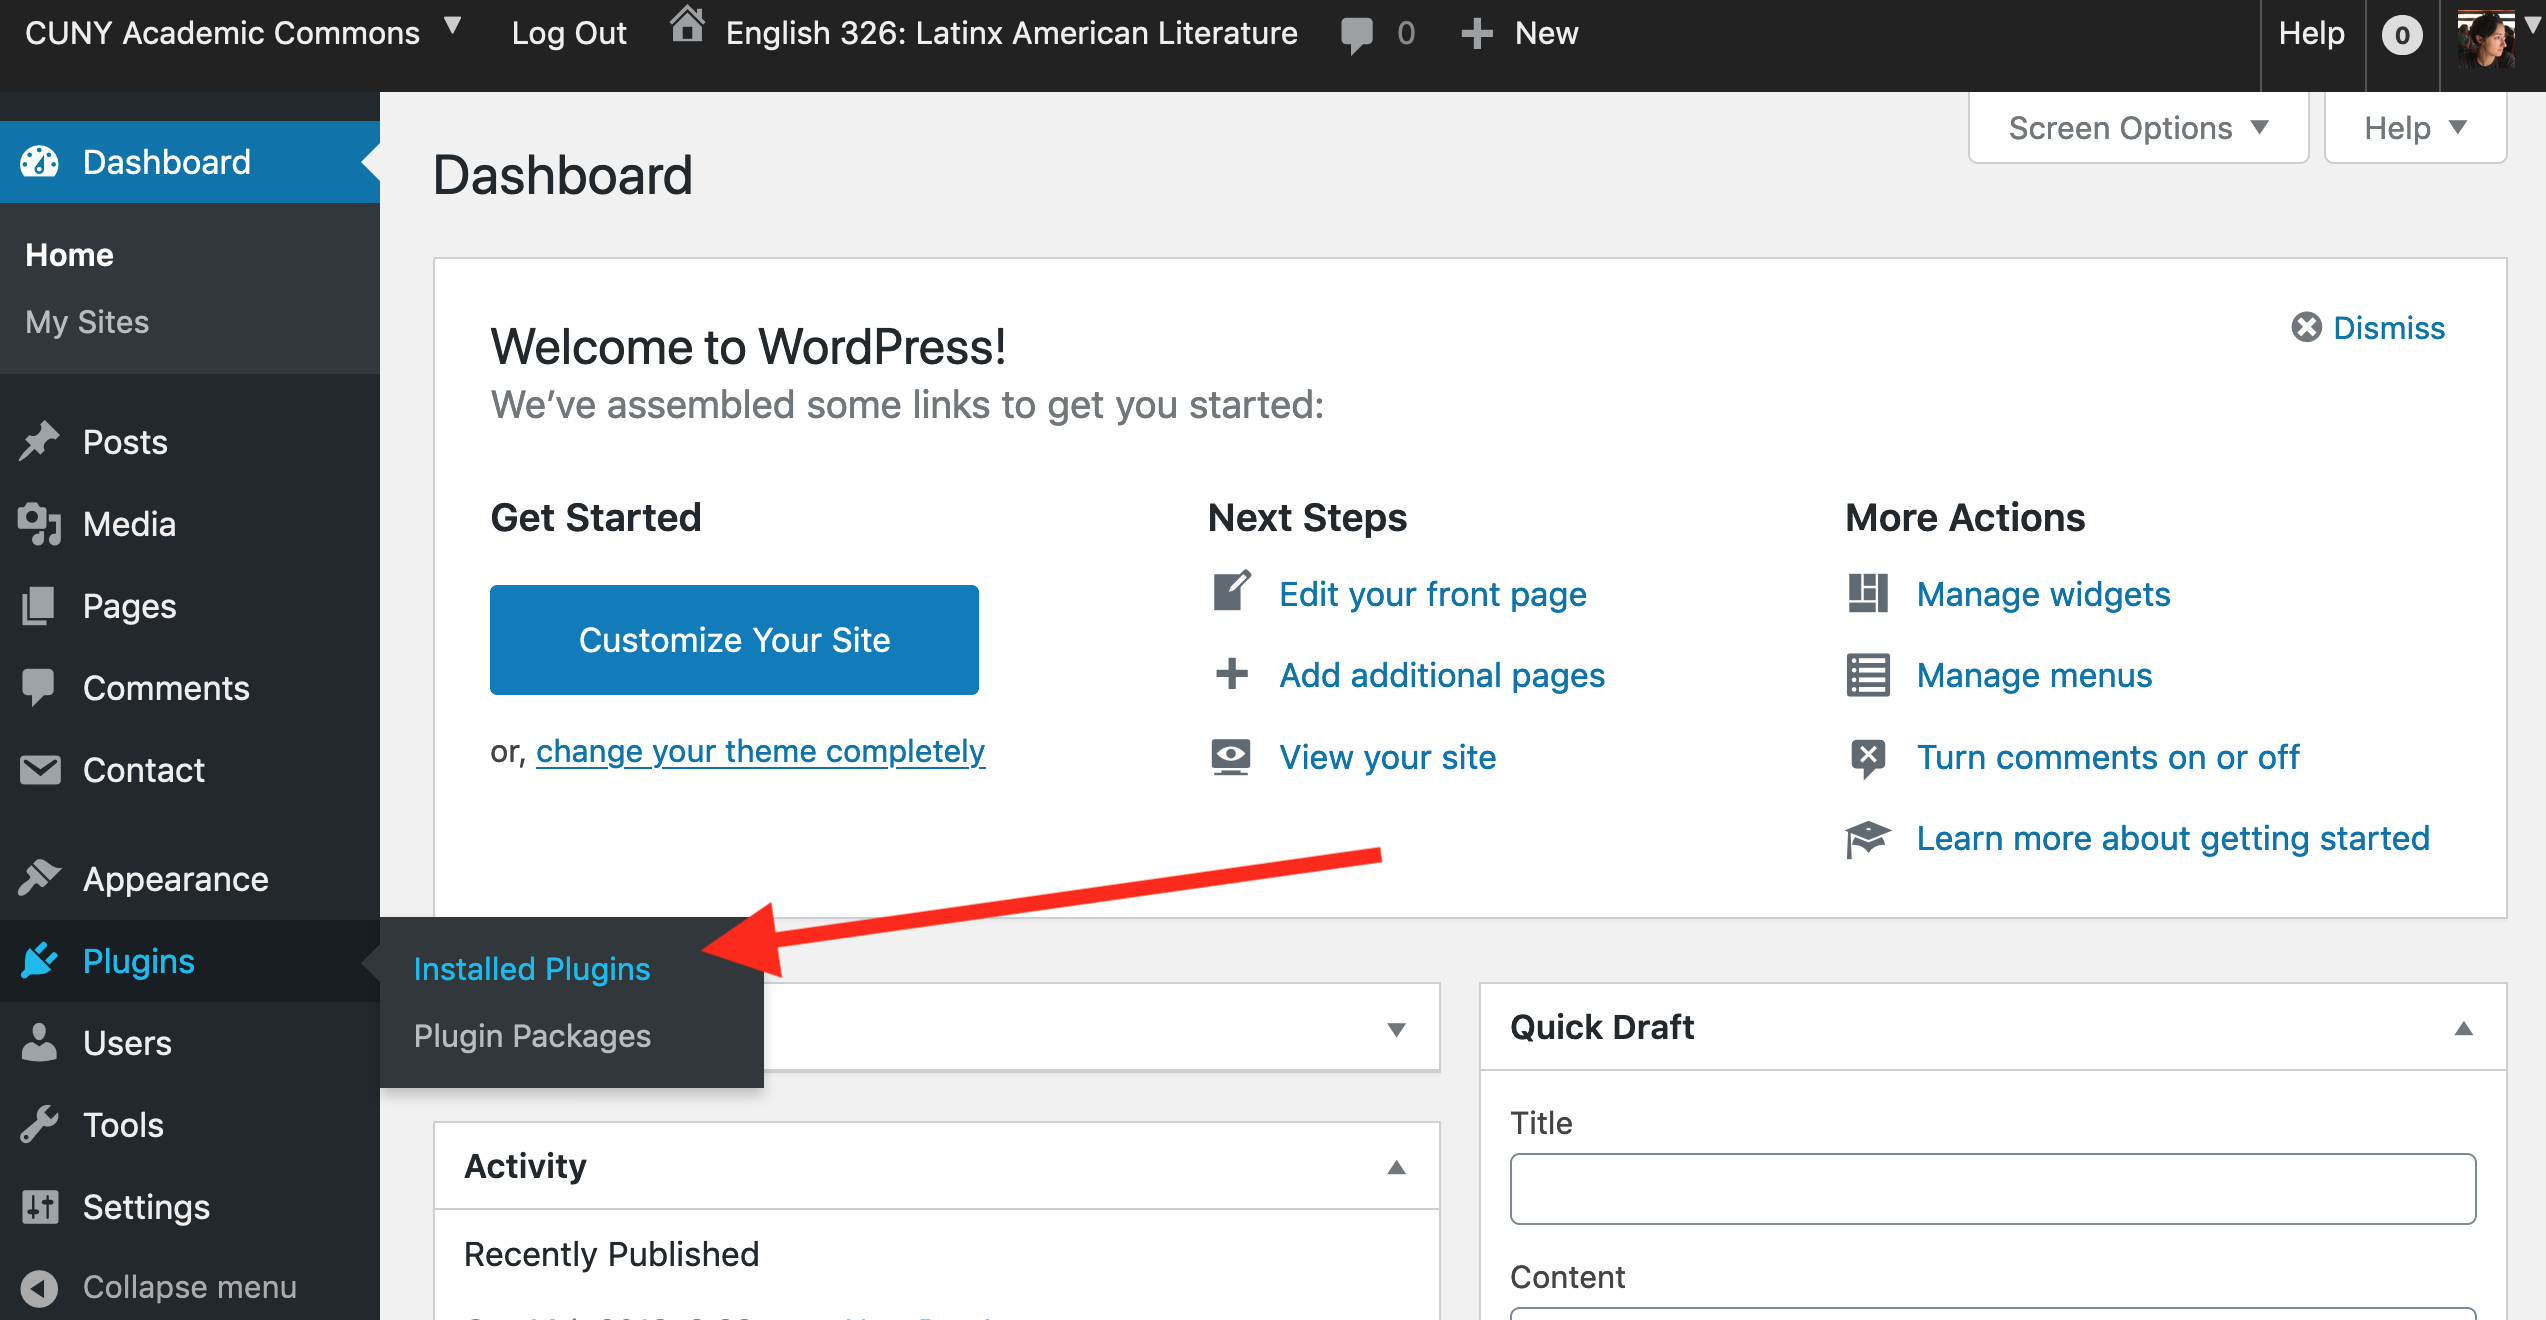
First, navigate to your Dashboard. This should be the main landing page when you click on your site from the dropdown menu on the upper right corner. To get there, hover over your profile picture, then hover over "My Sites," then click on the relevant site. It should bring you to this page:
Once you're here, navigate over to the panel on the left. Look for the tab that says "Plugins." Hover over it or click on it, then click on "Installed Plugins."
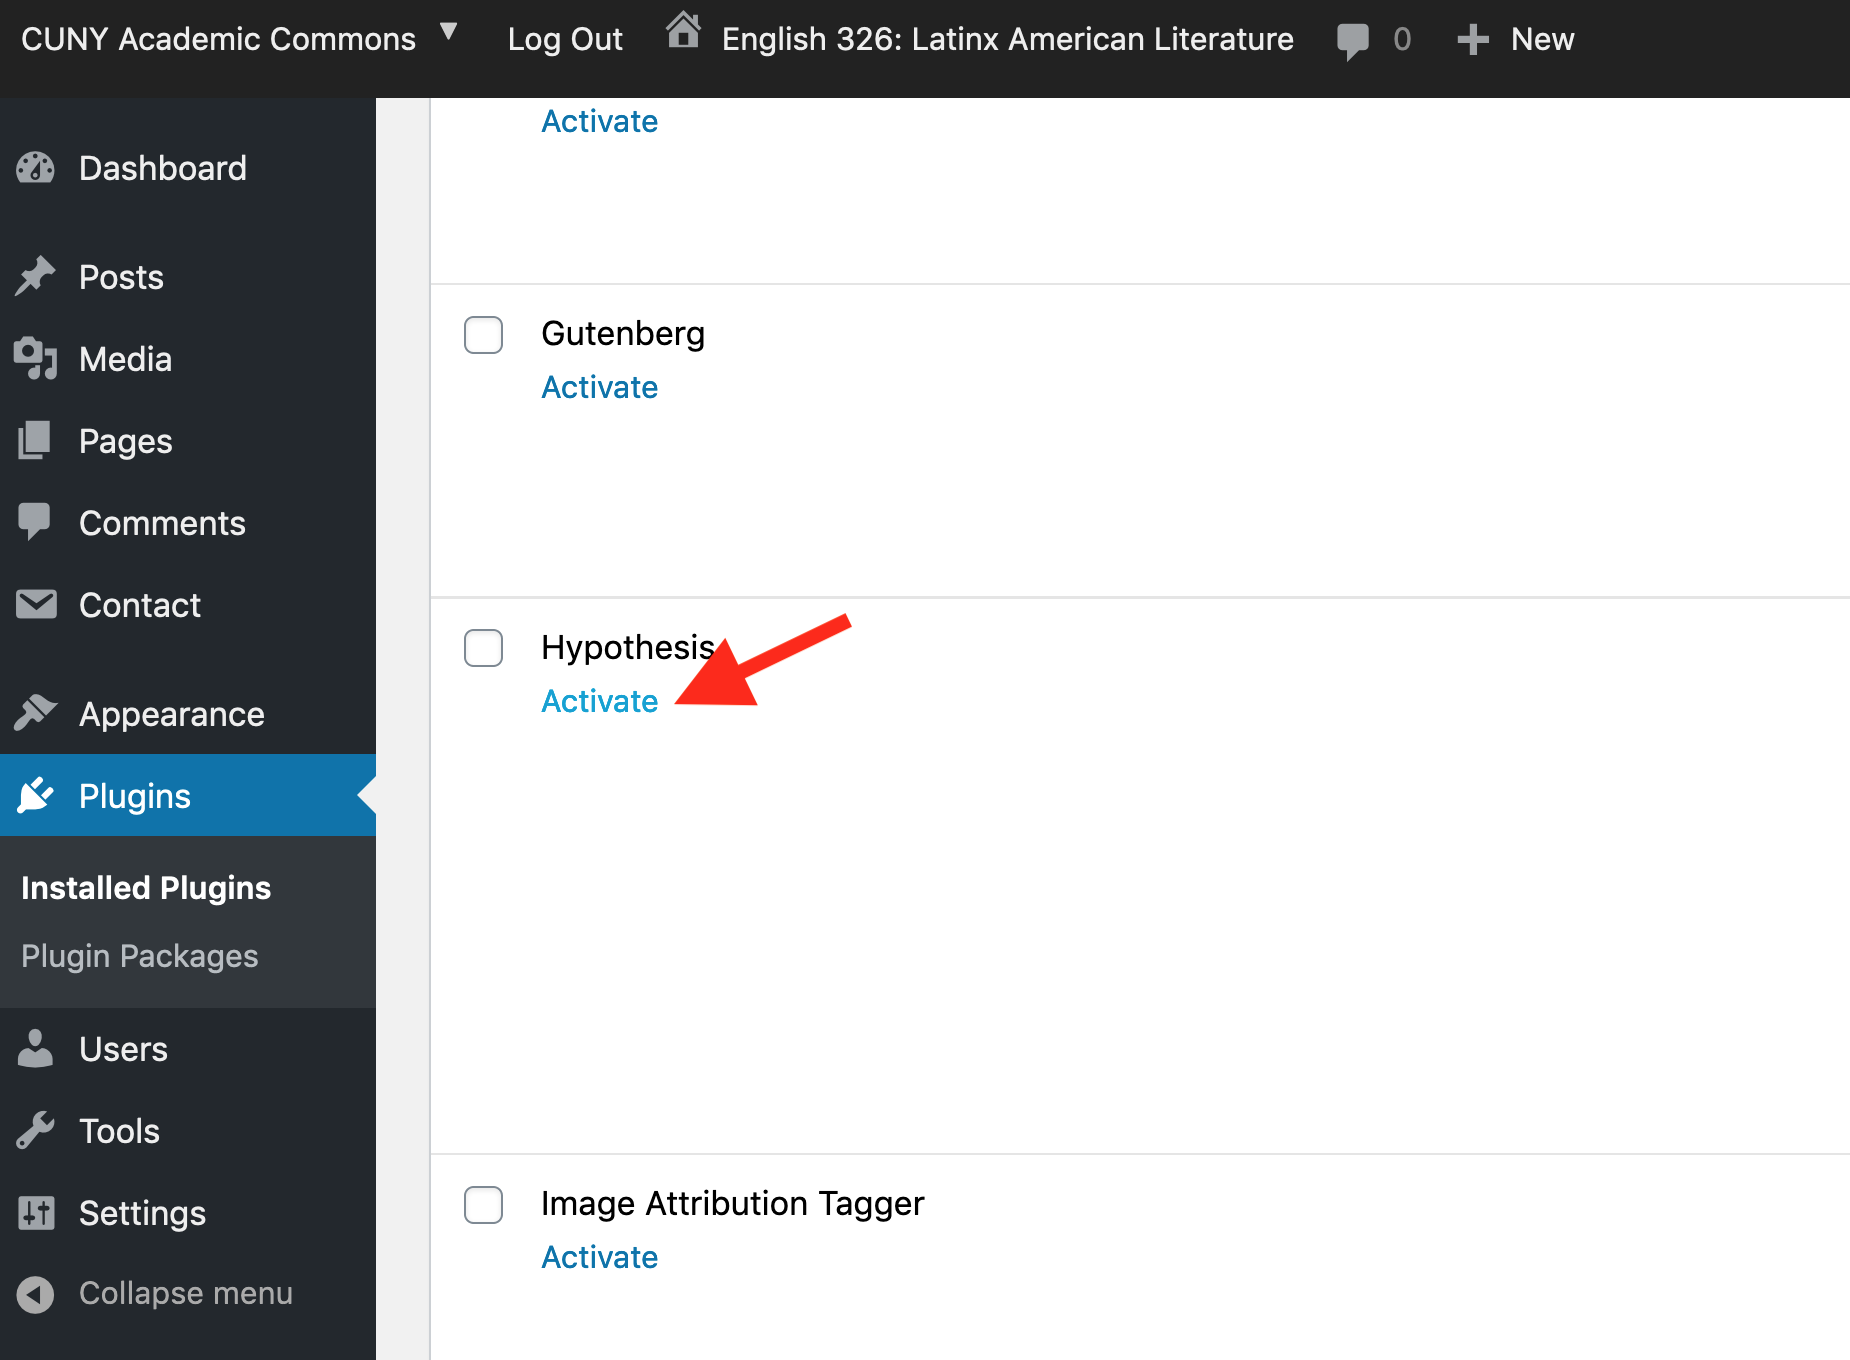
Next, you'll see a loooong list of plugins that are already installed, but not activated, on your website. Scroll down or (if you're a pro) Control-F to find Hypothesis.
Found it? Good. Now click on the "Activate" button underneath the name.
Great! You're almost there.
Now we need to configure Hypothesis in your settings. Back in your Dashboard menu, find the "Settings" tab. Hover or click on the tab, and look for the "Hypothesis" option. If the Hypothesis option is not there, go back one step and make sure you've activated it on the Plugins directory.
Once you click on Hypothesis, you'll be taken to the "Settings" page.
Here, you will configure where and how the tool operates on your course website. The specific options are up to you. I generally click the first three boxes, which makes highlights and the sidebar show up on default when the web page loads, and enables PDF annotation, which is essential if you'll be uploading PDFs for your class to read.
If I don't want Hypothesis to load on the front page, or on specific pages, I just check the relevant boxes.

At the bottom, you can manually indicate which pages that Hypothesis should be active. Type the page names into the text box, making sure to copy the name from the way it appears in the URL (you can navigate to the page in your browser, then take a look at the URL bar to see the page name within the larger URL statement). If you're going to manually enter more than one page, use commas and no spaces to separate page names. See below for an example.
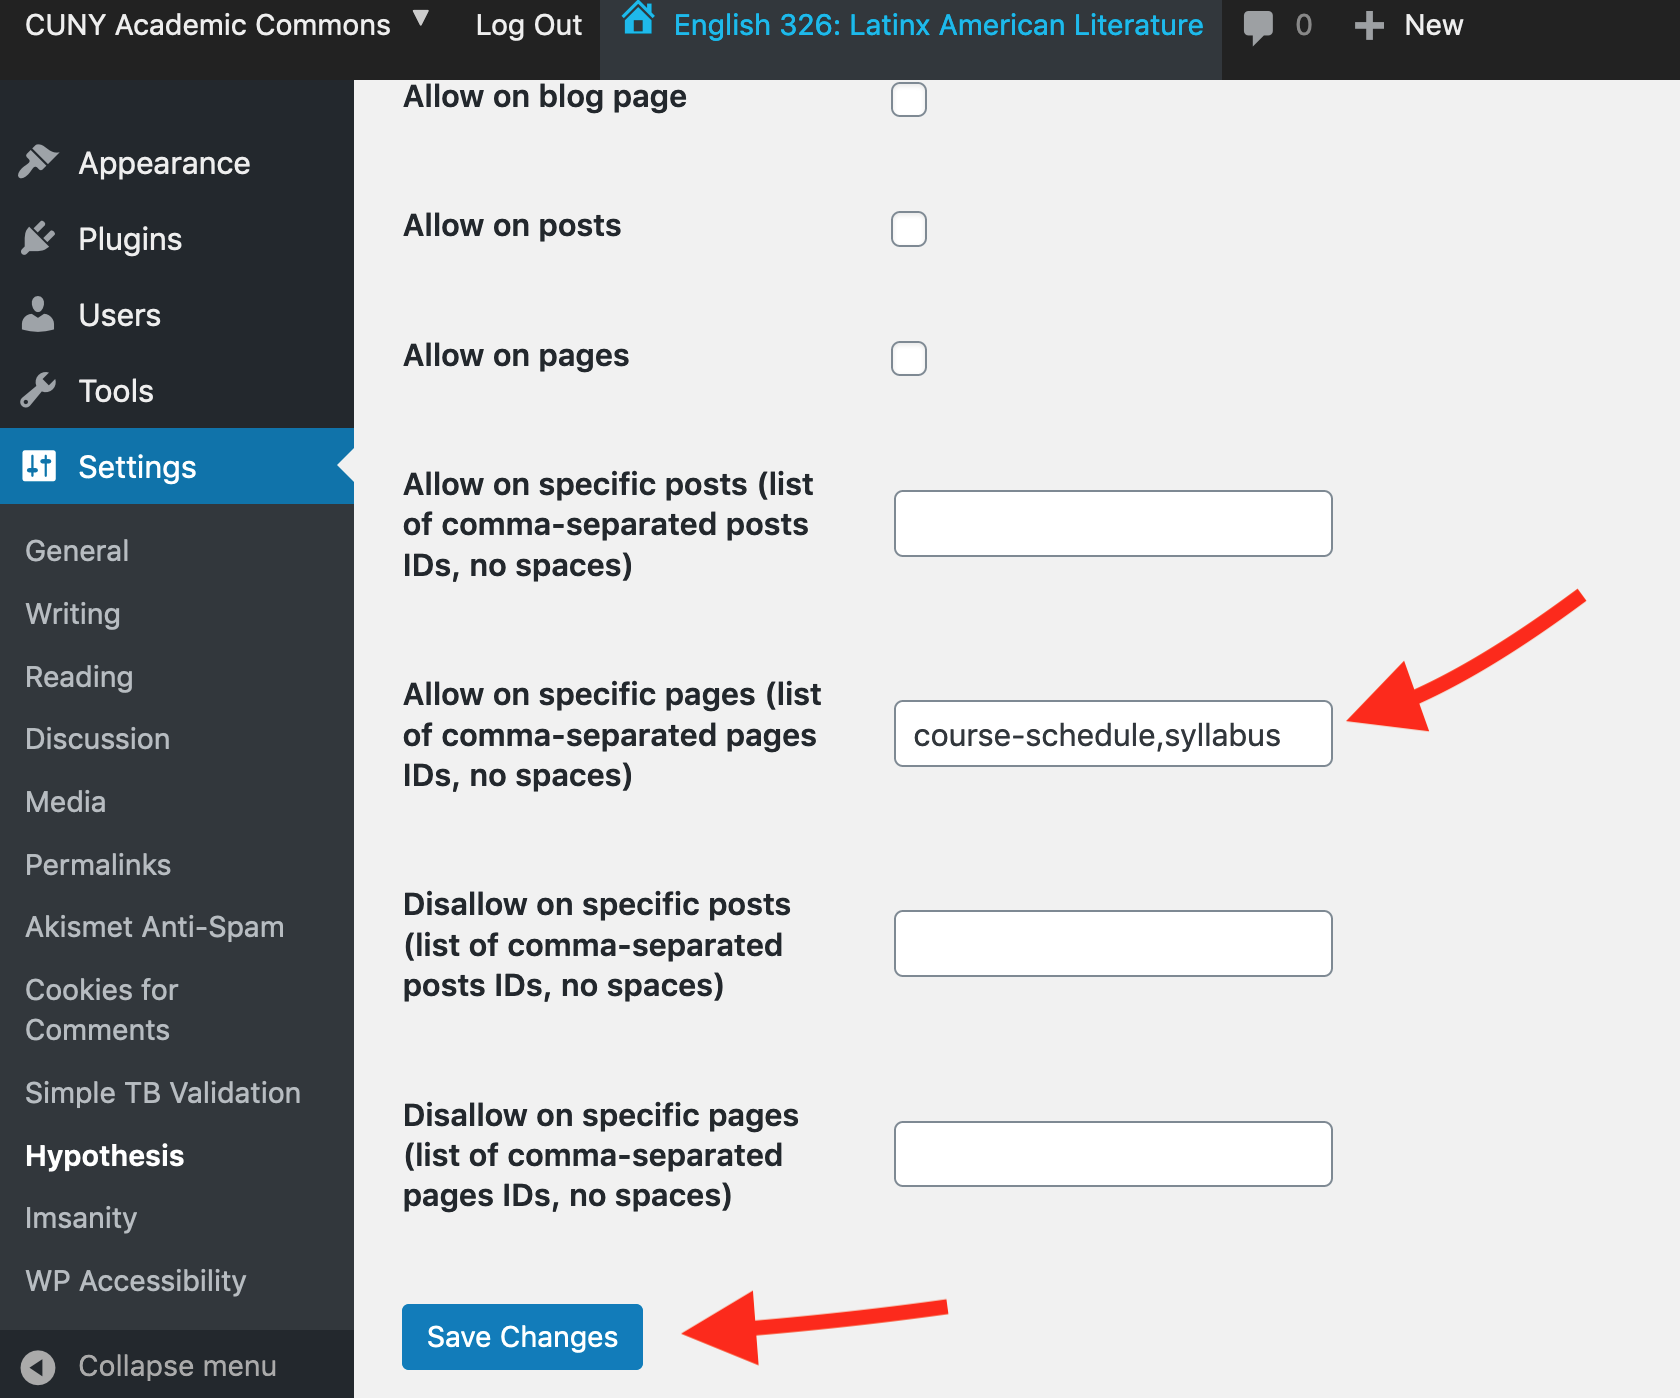
Always remember to press "Save Changes" at the bottom of this page after you've finished entering your settings.
And that's it! You should be able to see Hypothesis automatically load on the pages or PDFs of your course site, depending on how you've configured the settings. If it's not to your liking, you can always come back to change things later.
Second Option: Hypothesis as a Browser Extension
Using Hypothesis as a Browser Extension means that you will be activing the tool when you navigate to a website. It is slightly more work for the user, but it is not technically difficult. In order to use the browser method, you must install the plugin herself on either Chrome or Firefox browsers. If you cannot use one of these web browsers, skip down to the Via Method option for using Hypothesis.
First, if you haven't already, please sign up for a Hypothesis account.
The next steps for installing and activating the plugin will depend on whether you are using a Firefox or Chrome web browser. The objective is the same, but the specific process differs for each browser.
If you get stuck or want more information, check out Hypothesis's "Quick Guide for Teachers."
Using Hypothesis with Firefox: The Bookmarklet
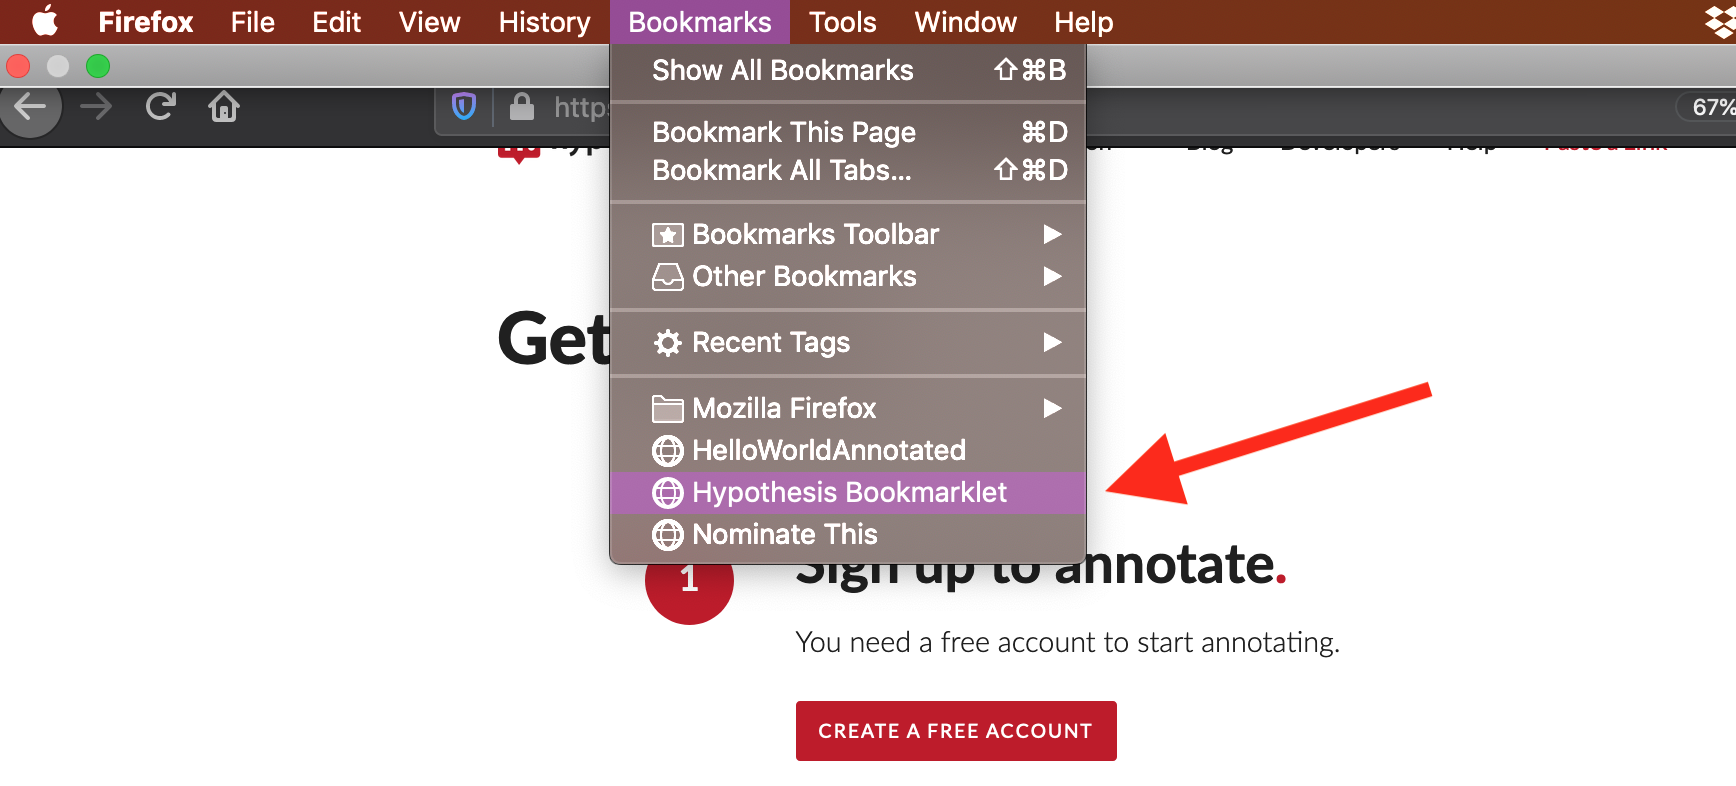
Begin on the Hypothesis "Get Started" page. Under the step #2 heading, "Add Hypothesis to your browser," look for the Hypothesis Bookmarklet button.
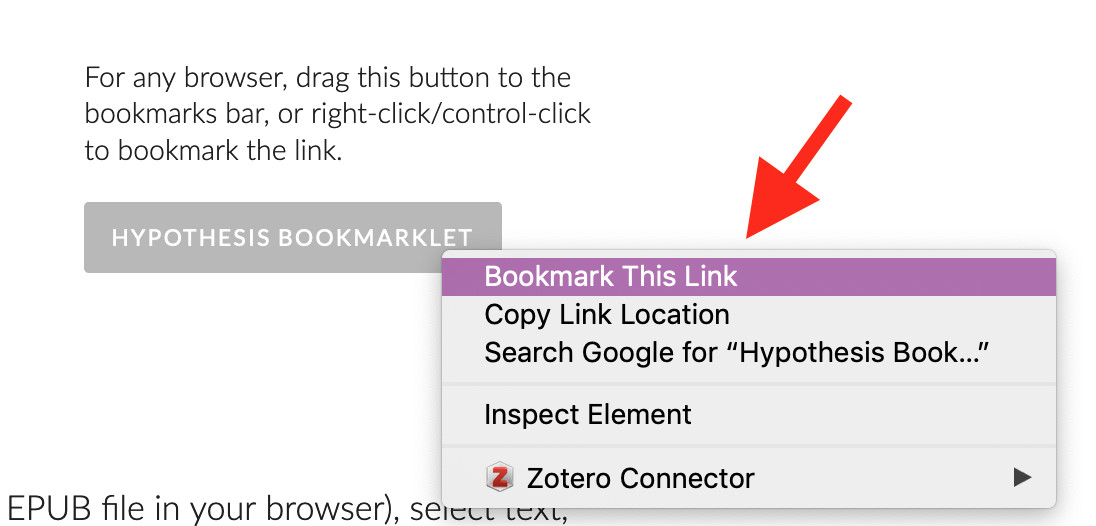
Right click on this button (on a laptop, you can do this by pressing two fingers on the track pad). From the dropdown menu, select "bookmark this link".
Alternatively, you can click and drag the button onto your Bookmarks Toolbar. Either way, make sure you note where the bookmark is saved, so you can access it later.
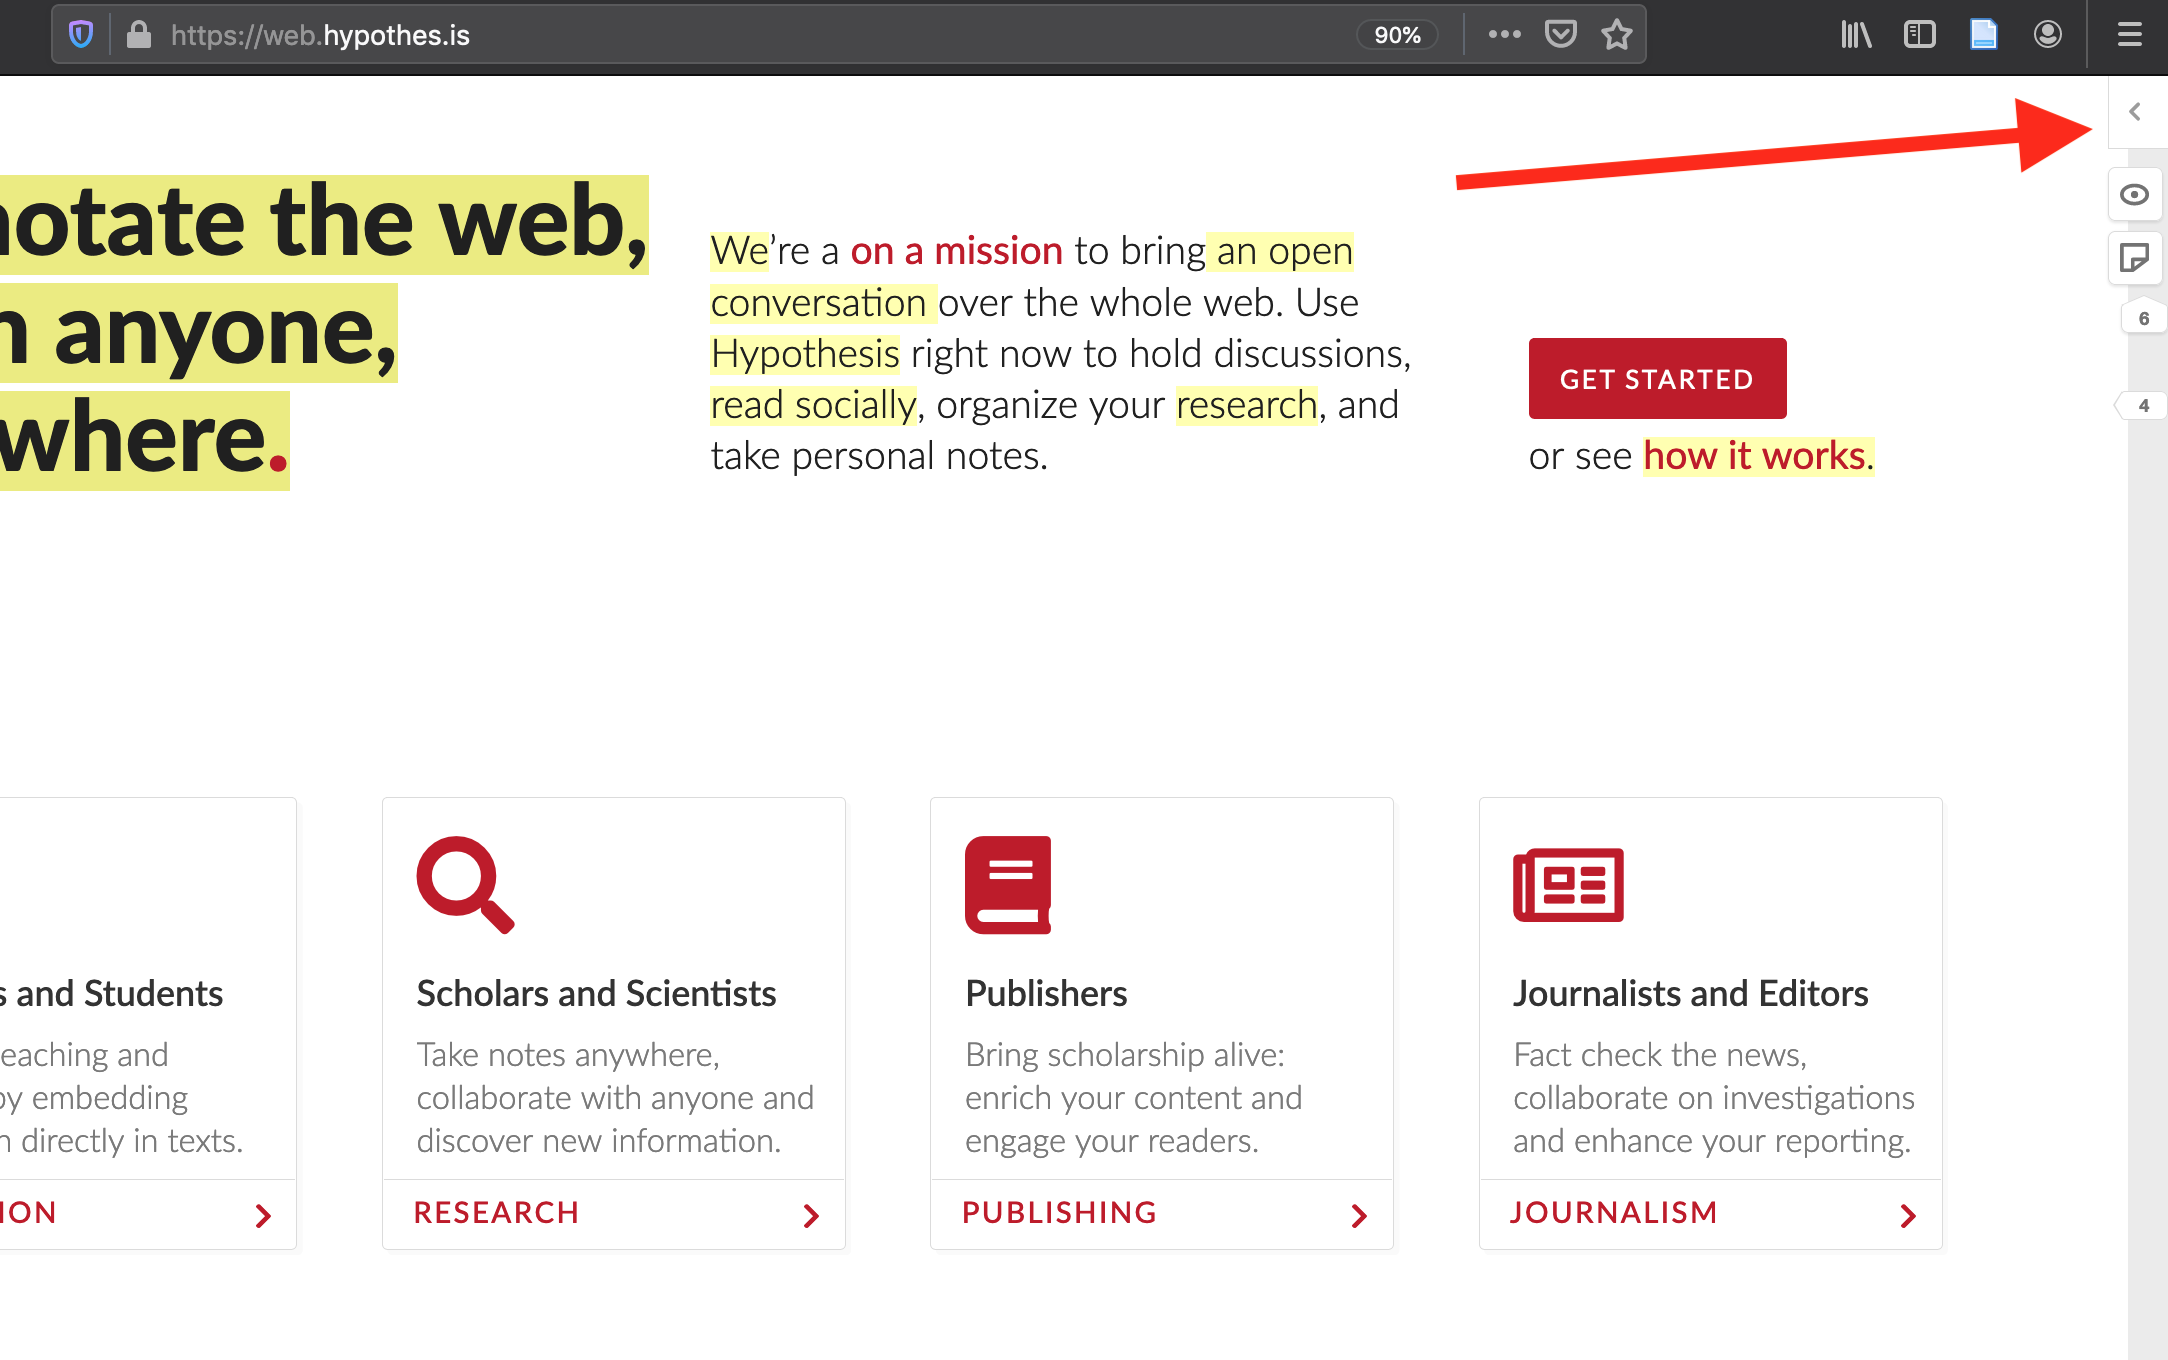
To activate the tool, you'll simply click on the Hypothesis bookmark from your bookmark menu. This will automatically load Hypothesis on whatever page is currently in your browser.
The Hypothesis toolbar should appear on the righthand side, as a panel on the edge of your window. You can expand the toolbar by clicking on the little arrow at the top of this panel.
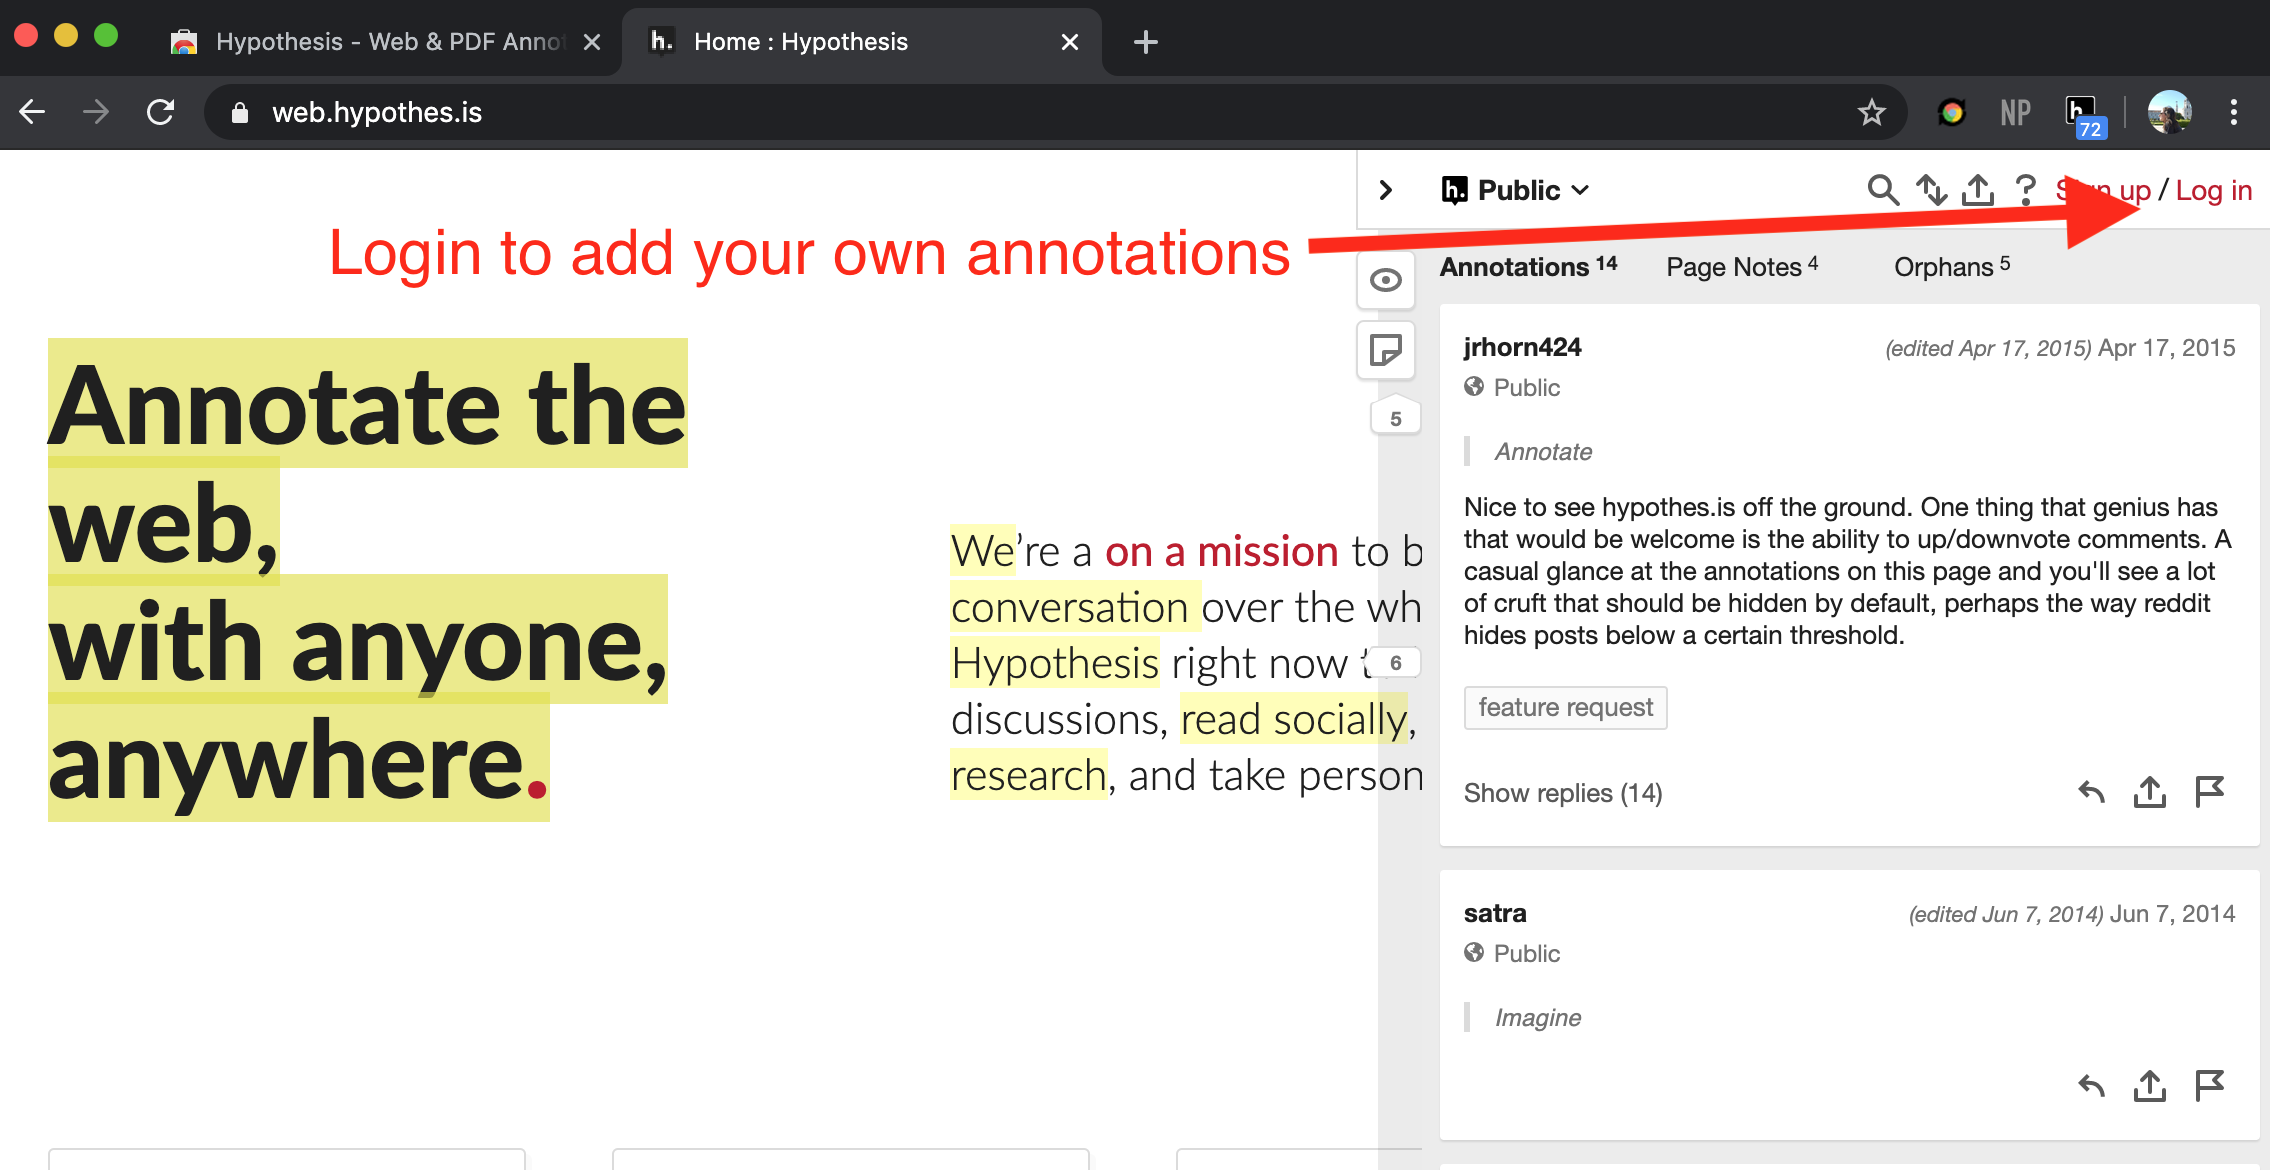
In order to make annotations, you'll have to login to your Hypothesis account.

You can test out this method by navigating to your favorite website and clicking the bookmark. You'll see that some really large websites (like The New York Times) take a little while to load the tool, while smaller websites (like CBS New York) will load the tool almost immediately. Make sure you test out the bookmarklet on whatever site you're using before sending your students over to annotate on that site.
Using Hypothesis with Chrome: the Plugin
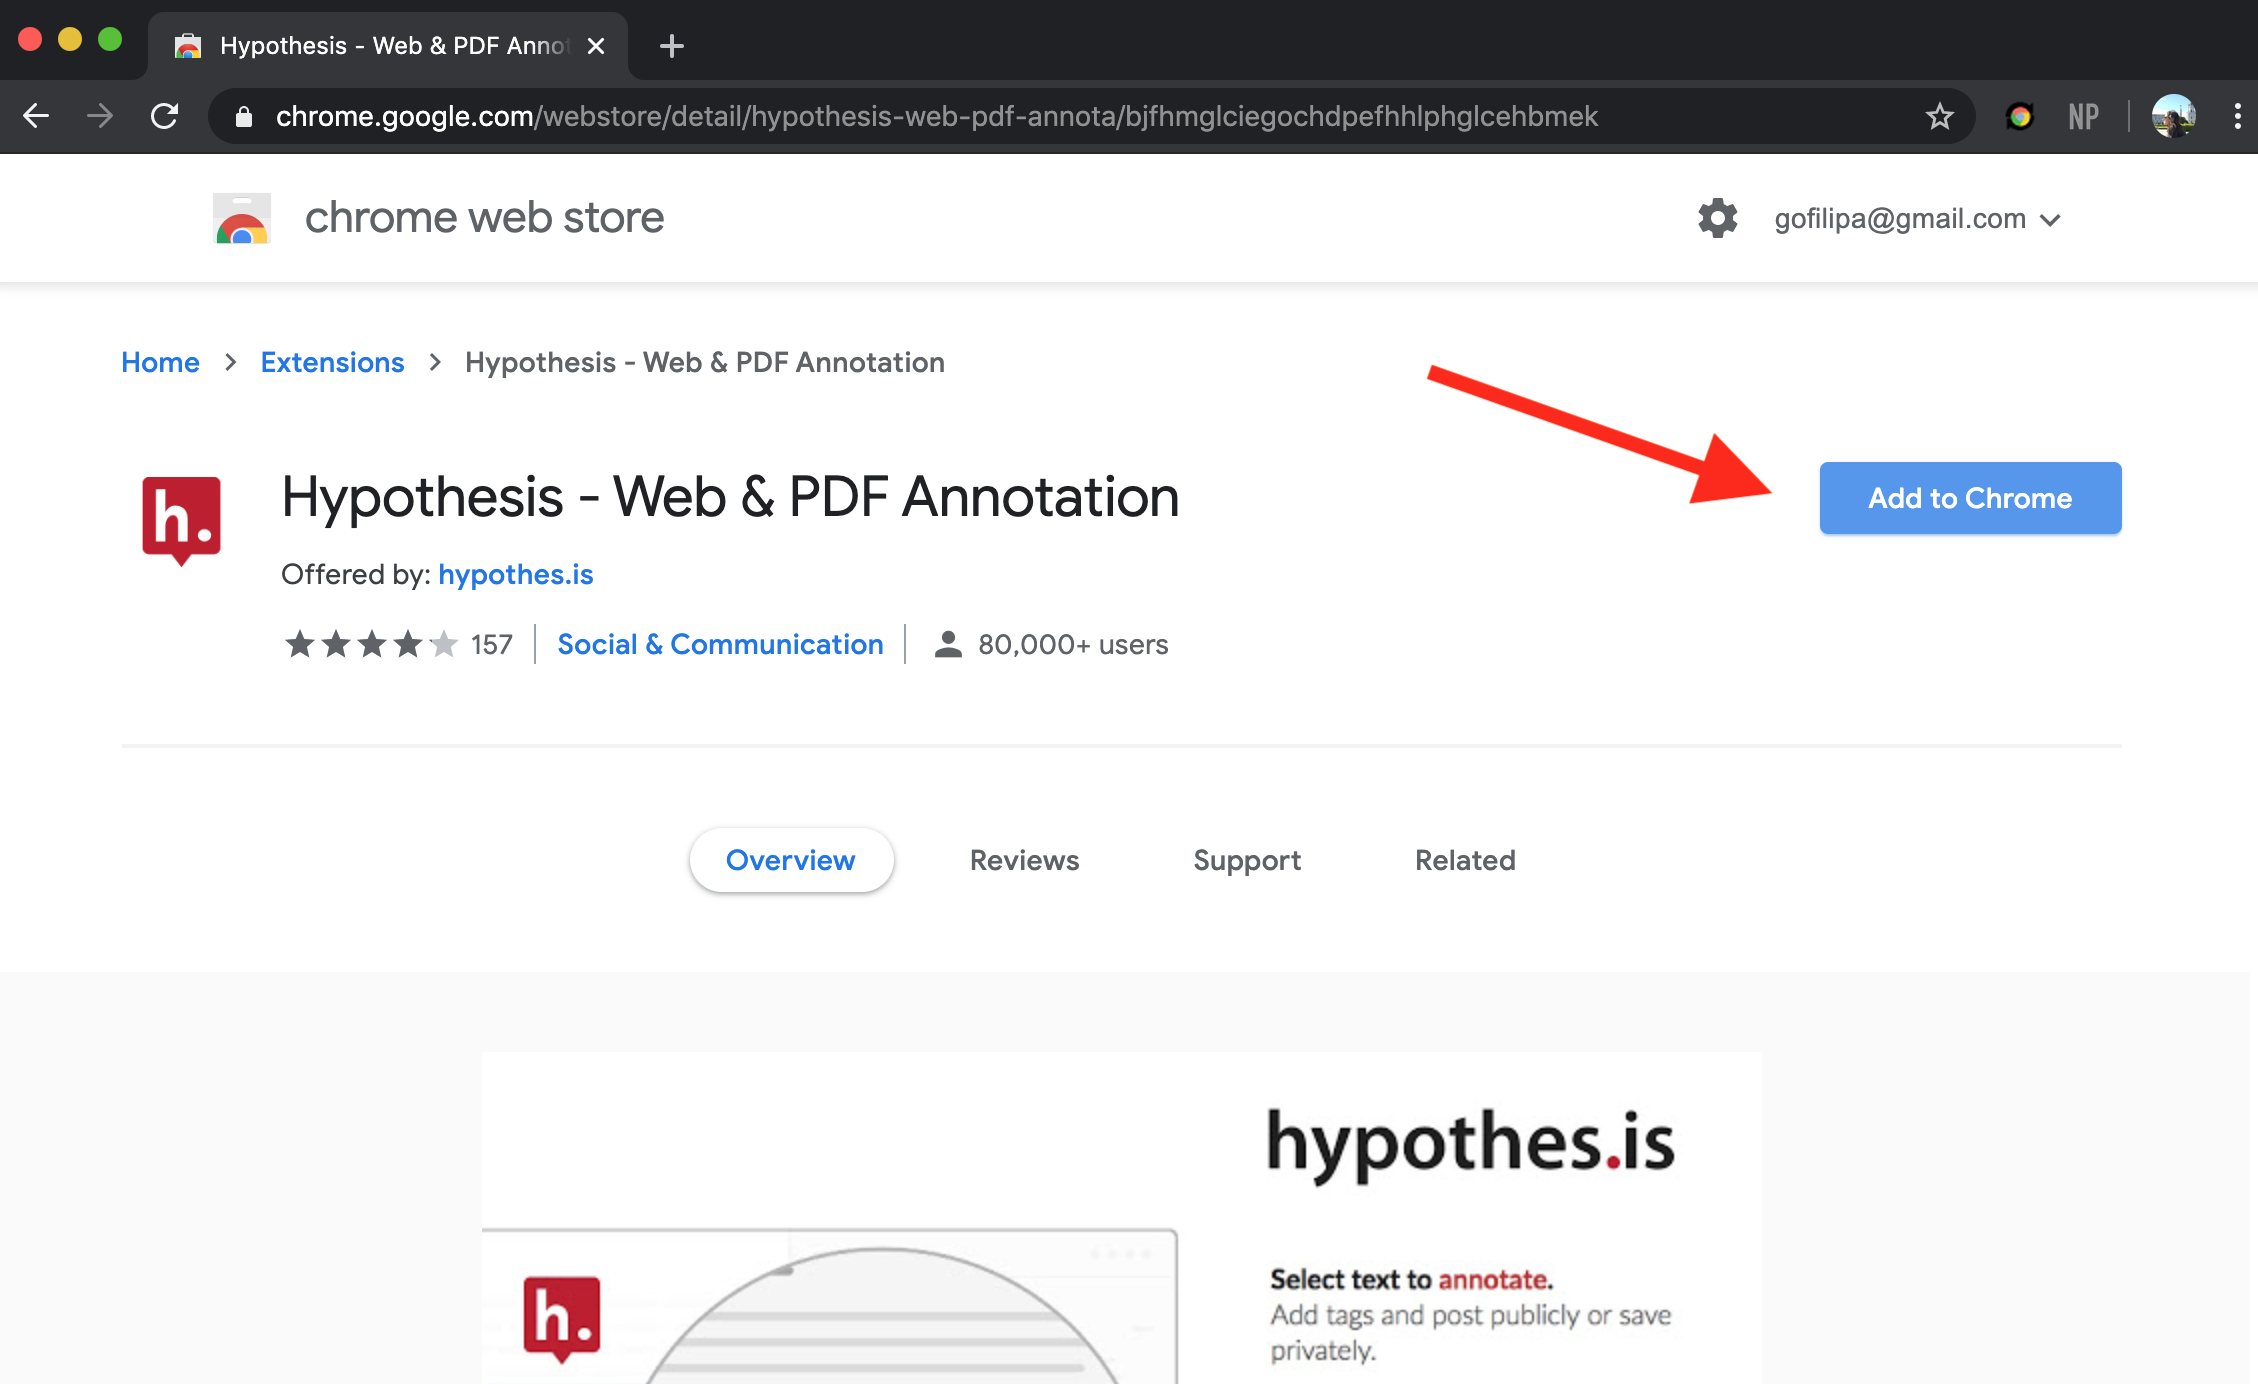
First, go to the Google Chrome web store, and search Hypothesis. The digital annotation tool should be the top result.
When you get to the Hypothesis page on the Chrome web store, click "Add To Chrome" on the right.
Once you have added Hypothesis as a browser extension, all you need to do is activate the extension. Go to the top right corner of your screen, and click on the button with the three dots, also known as the "More" tab. It should be the furthest icon on your Chrome toolbar.
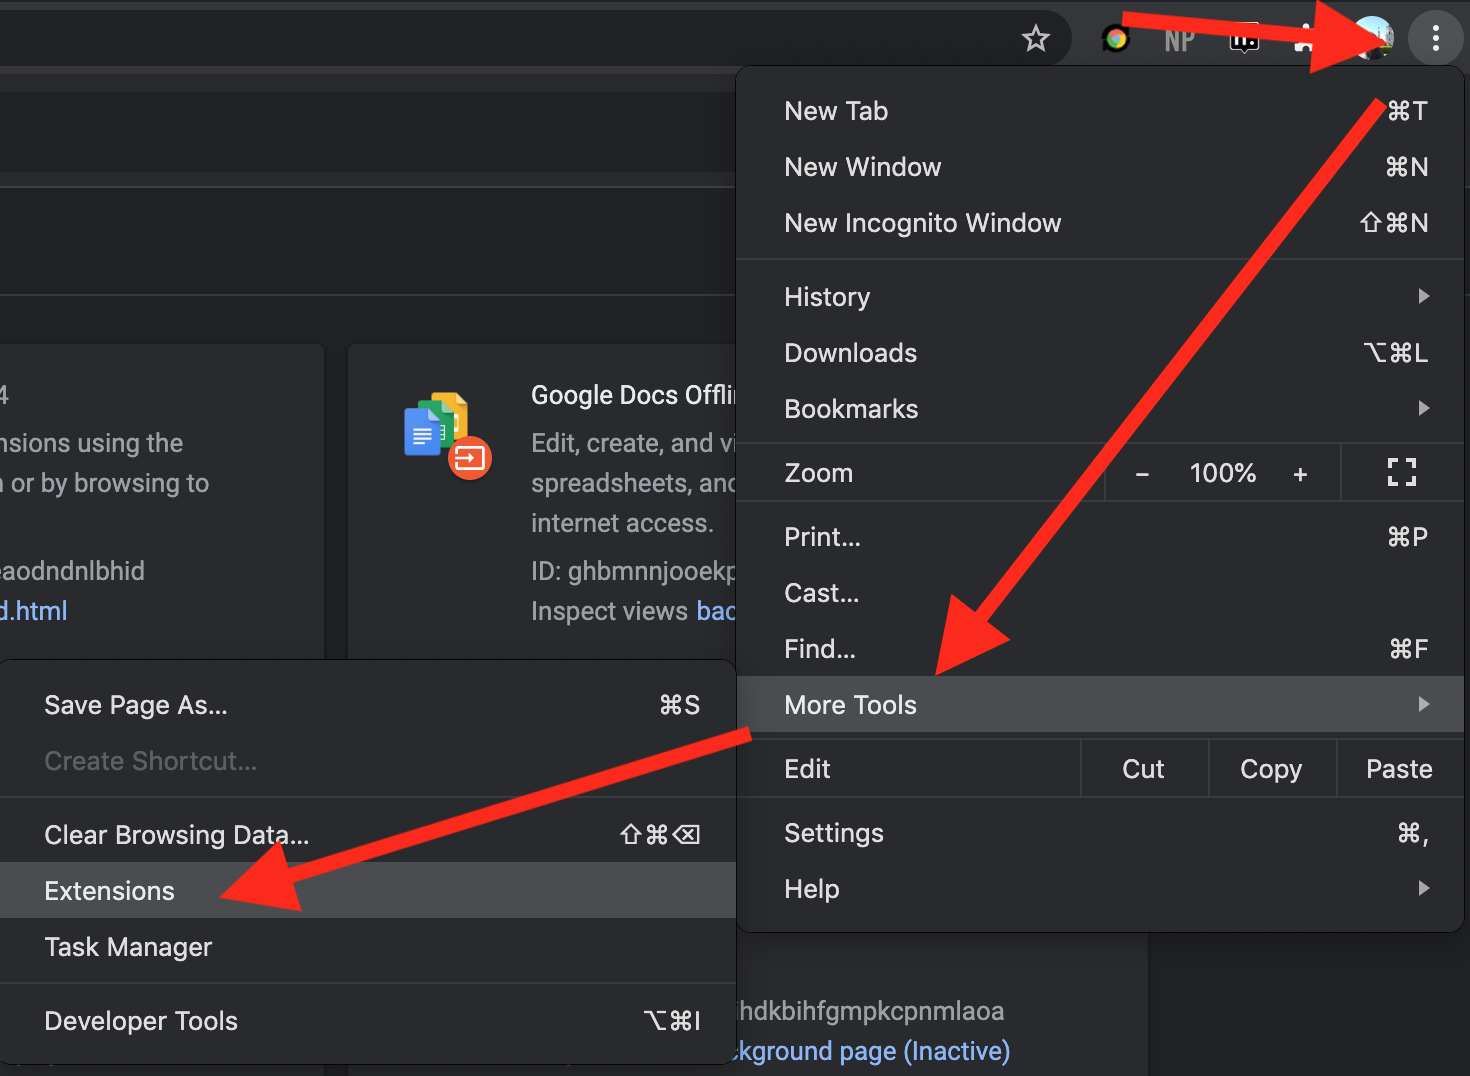
In the dropdown menu that appears, click on the "More Tools" option. Another dropdown should appear, with a section that says "Extensions." Click on that option.
Here, you'll make sure that the plugin is turned on by flipping the little switch in the box that says "Hypothesis".

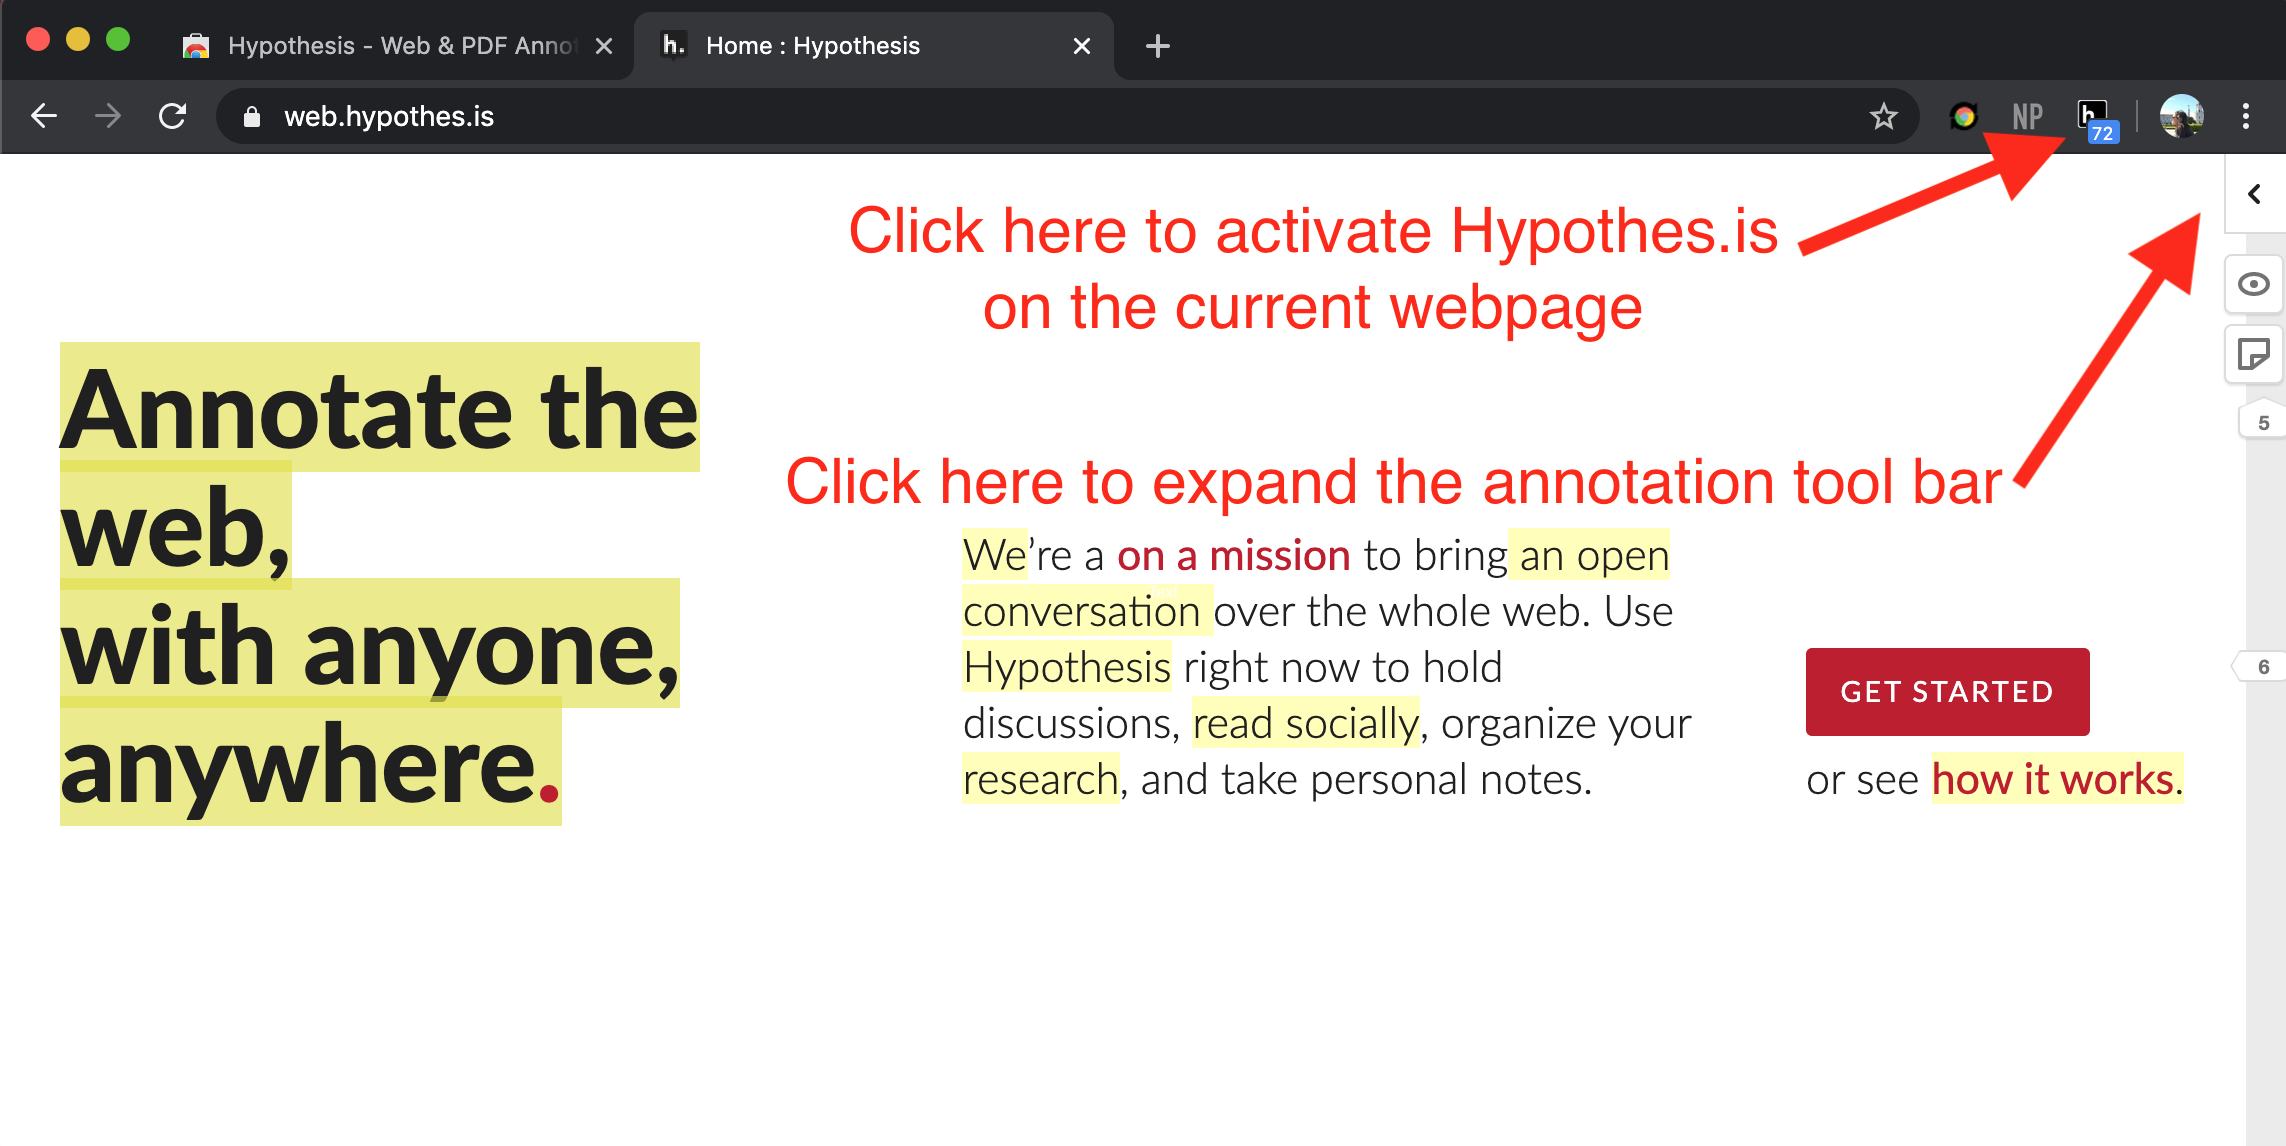
The Hypothesis browser extension should now be active on your Chrome browser. You should be able to see it in your toolbar, at the top right. The icon looks like the letter "h" within a speech bubble.
To activate Hypothesis on the current webpage, simply click on this icon. Then, the Hypothesis toolbar should appear on the righthand side, as a panel on the edge of your window. You can expand the toolbar by clicking on the little arrow at the top of this panel.
In order to make annotations, you'll have to login to your Hypothesis account.
Third Option: The Via Method
This option is slightly more advanced than the browser extension method, but it is more reliable and can be a good back-up method in the event that the browser extension isn't working properly. You can think of it as a hack that gets hypothesis to load when all else fails.
Whenever I teach a class that uses Hypothesis, I always introduce my students to this method, even if I do not explicitly have them use it. The reason is that I want them to be familiar with this back-up option because, at some point or another, we'll might have trouble getting extension to load, or the CUNY Academic Commons tool to work properly. The Via Method is fairly reliable and functions as a last minute workaround that forces the Hypothesis tool to activate.
First, if you haven't already, please sign up for a Hypothesis account.
The process for using the Via Method is very straightforward. Begin by navigating to the webpage where you want to use Hypothesis. Then, take a look at the URL bar, it should look something like this:
https://www.wsj.com
At the beginning of the URL, add the following text, making sure that you include the https:// and the final / before the regular URL.
https://via.hypothes.is/
This snippit is known as the via link. I consider it like a prefix that you just add to the beginning of the URL. The URL bar should then appear like so:
https://via.hypothes.is/https://www.wsj.com
When everything looks ready, you can reload the page (do this by pressing enter). The Hypothesis sidebar should automatically appear, which you can see on the right hand side.
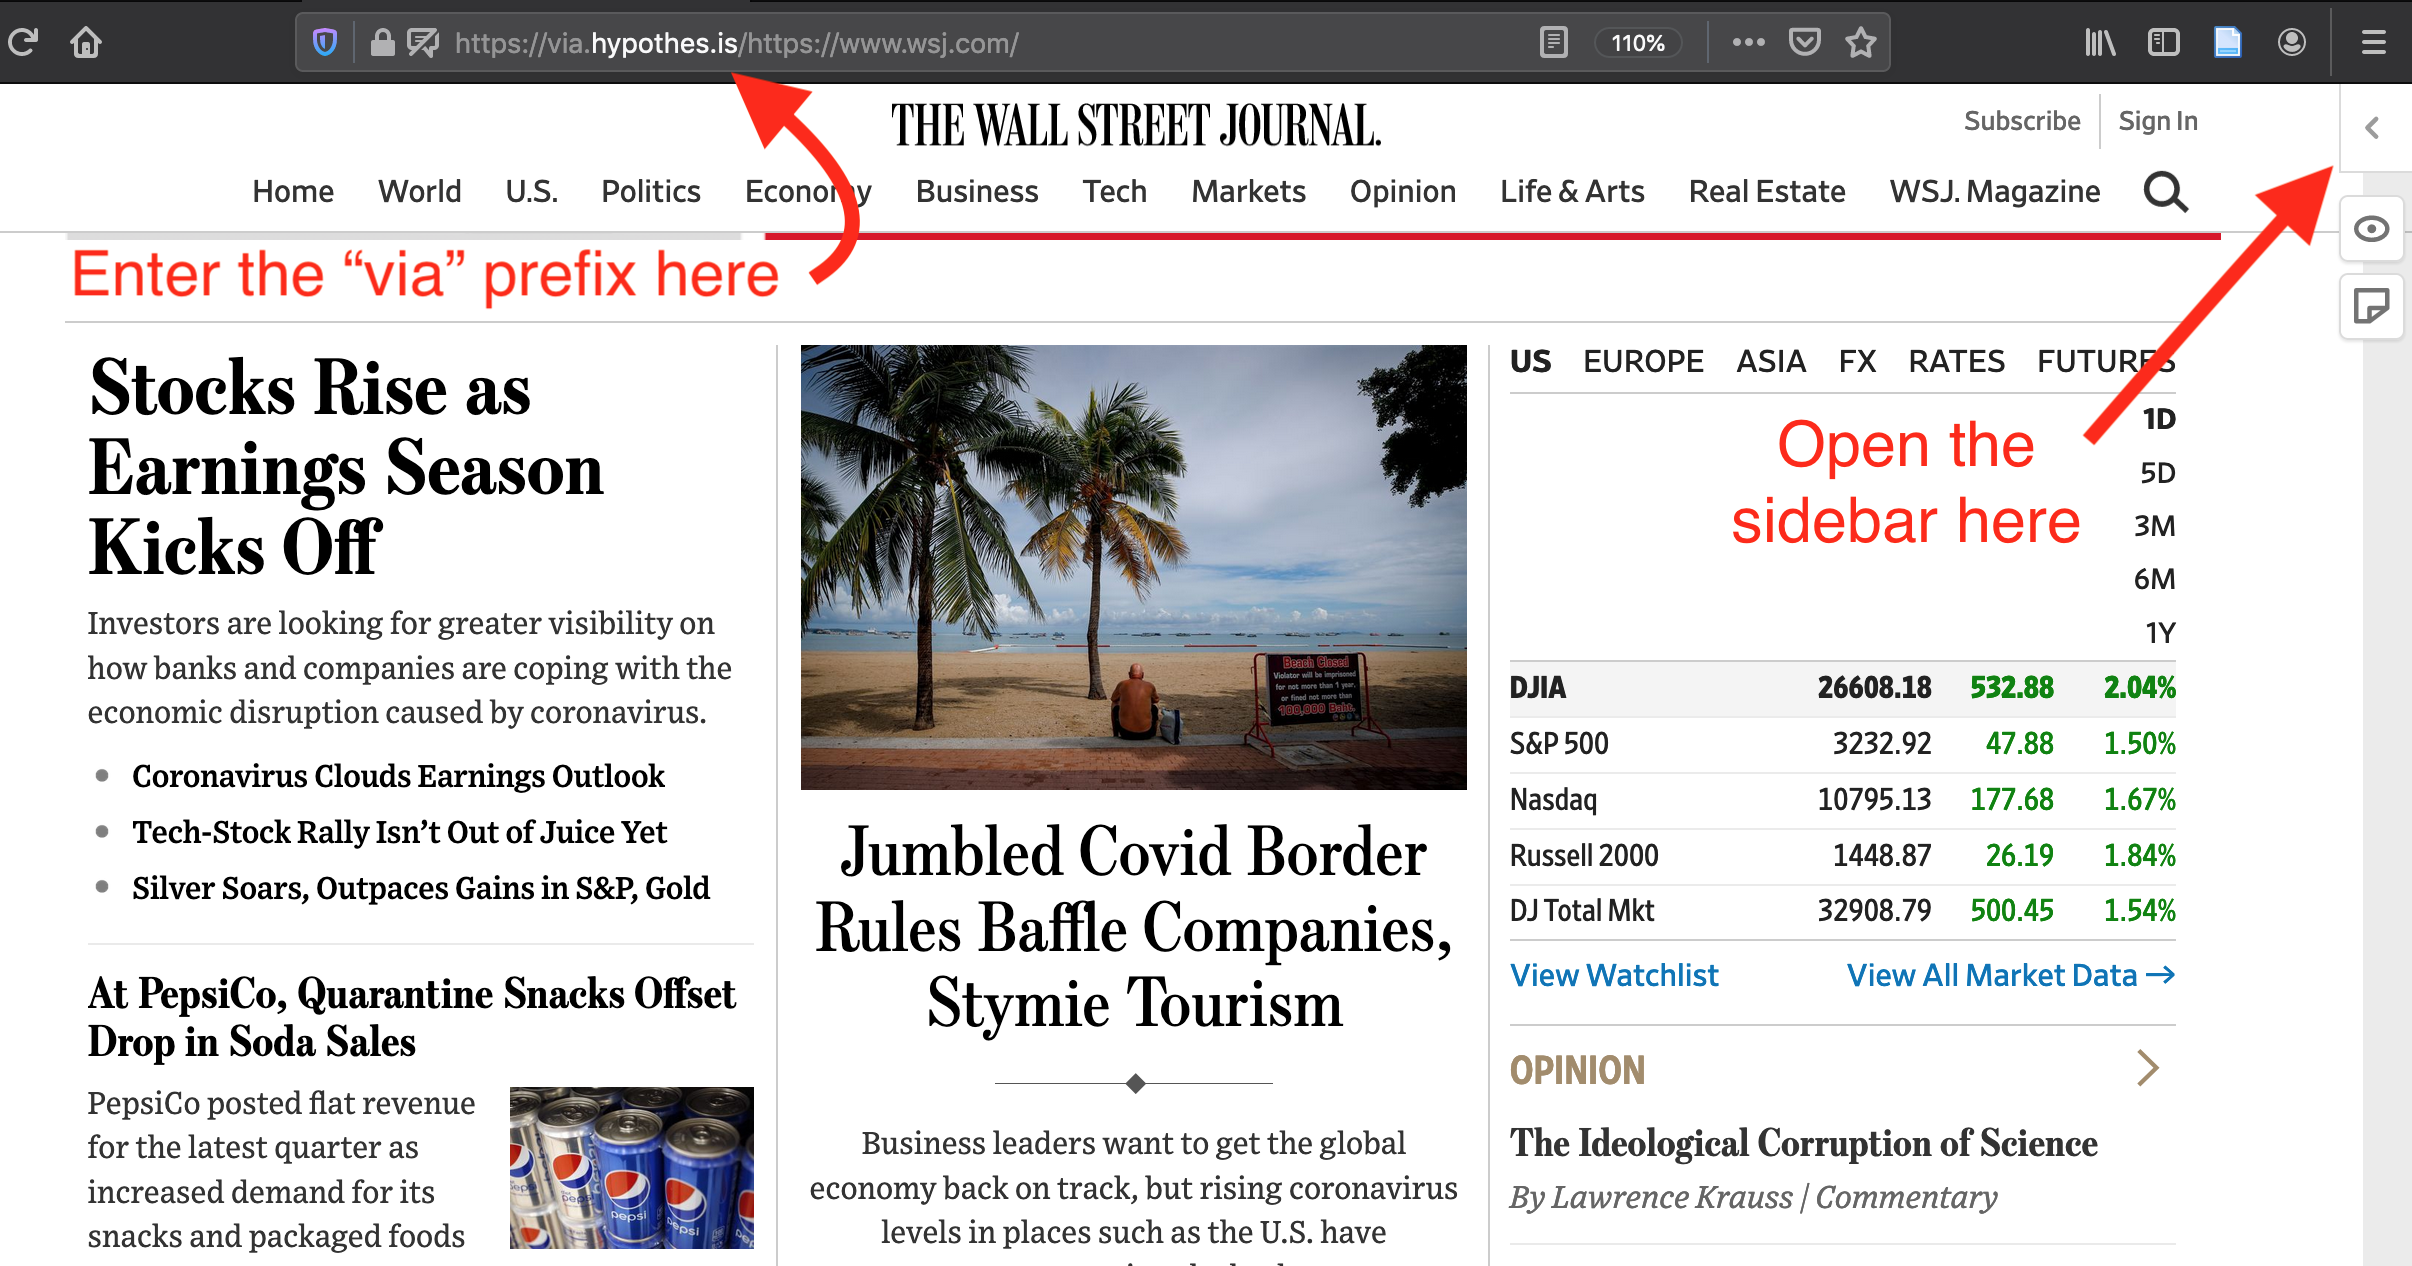
Neat, right? This little prefix https://via.hypothes.is/ activates hypothesis on whatever website that follows the Via URL. You can copy and paste the snippit wherever you want it, and you don't need to mess with the browser extension or embedding the tool at all. Like I said before, the Via Method works very well as a back-up option.
Fourth Option: Embedding Hypothesis into your Website
This is the more advanced option. It requires that you have access to your own website, and can modify the HTML files that make up your website. If you do have access to your HTML files, you can insert a little script at the bottom of each file that tells the browser to load Hypothesis automatically on that page.
If you set up your website with the embedding link, this would be the easiest option for your students. All they have to do is navigate to the website, and the tool will appear immediately, with no need to download or install any plugins. From the perspective of the student, this option is easiest to use, and similar to their experience on a CUNY Academic Commons page that has Hypothesis enabled. Let's jump into how it works.
First, if you haven't already, please sign up for a Hypothesis account.
To embed Hypothesis into your website, open up your desired html file. I'm going to use the html file from my personal website as an example. Your file will look different from mine, but it should have the same html structure, with html, head, and body tags, like below:
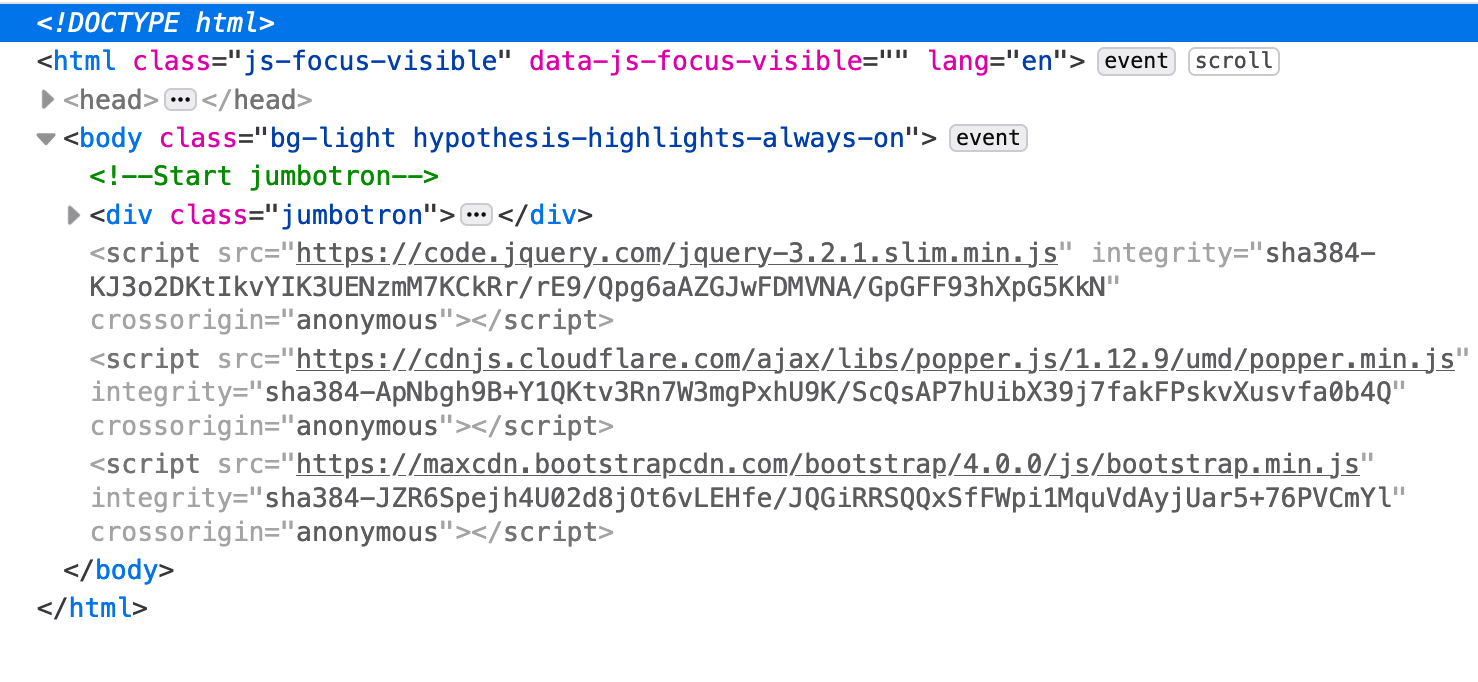
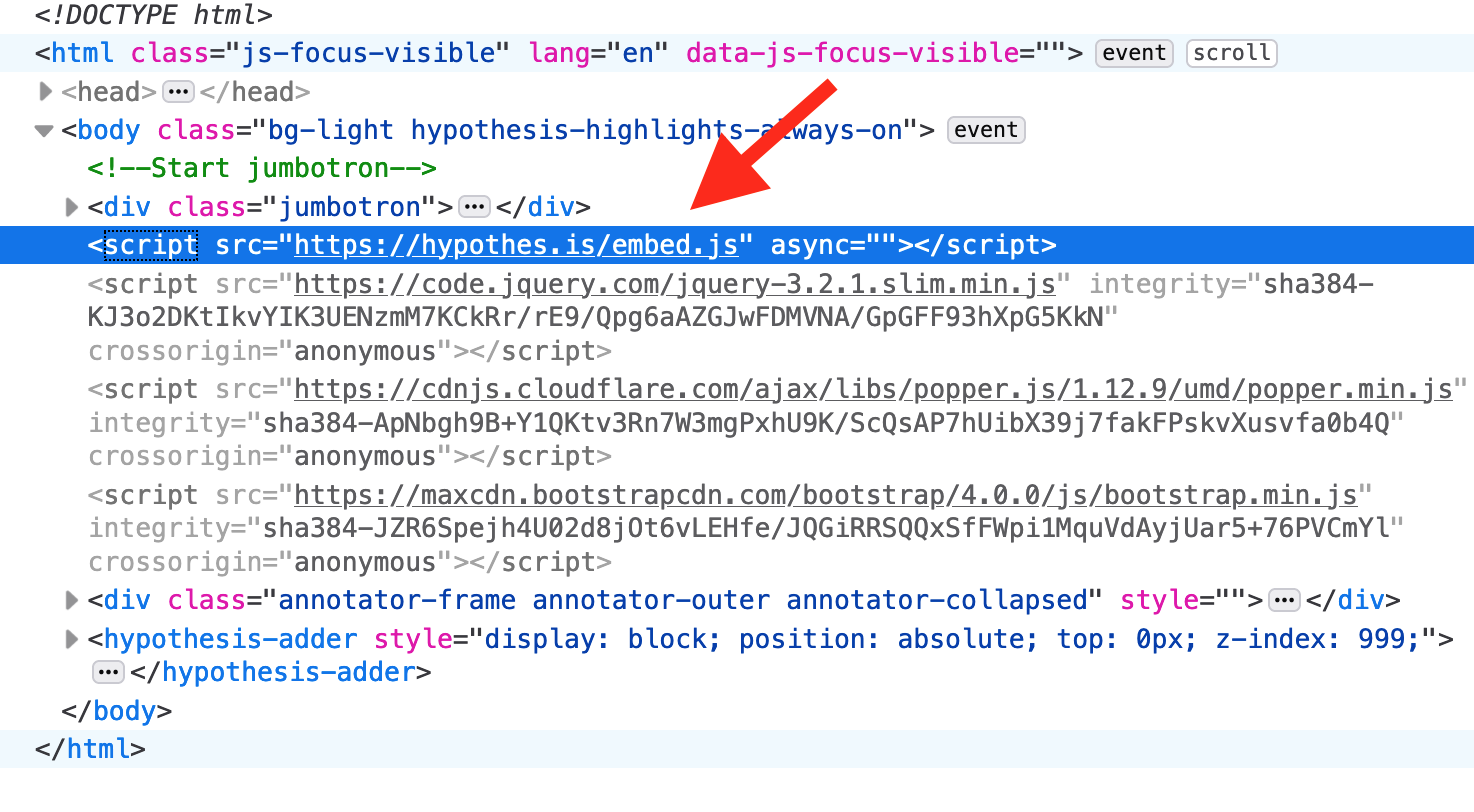
Next, you'll go to the section of the page that has all the scripts. Search for the <script> tag, which should be somewhere near the bottom of the <body> section. Here, you're going to add a new script, which is pretty simple. Just copy and paste the below script into the script section of your html page:
<script src="https://hypothes.is/embed.js" async></script>
Now, your HTML page should have the script included.
The browser, when it sees this script, goes to the source website at https://hypothes.is/embed.js (do not try to read this!) that has all the directions for loading hypothesis for that page. It then executes these directions.
Once you've saved and reloaded the page, the Hypothesis sidebar should pop up on the right-hand side. You can expand it, then login to annotate.
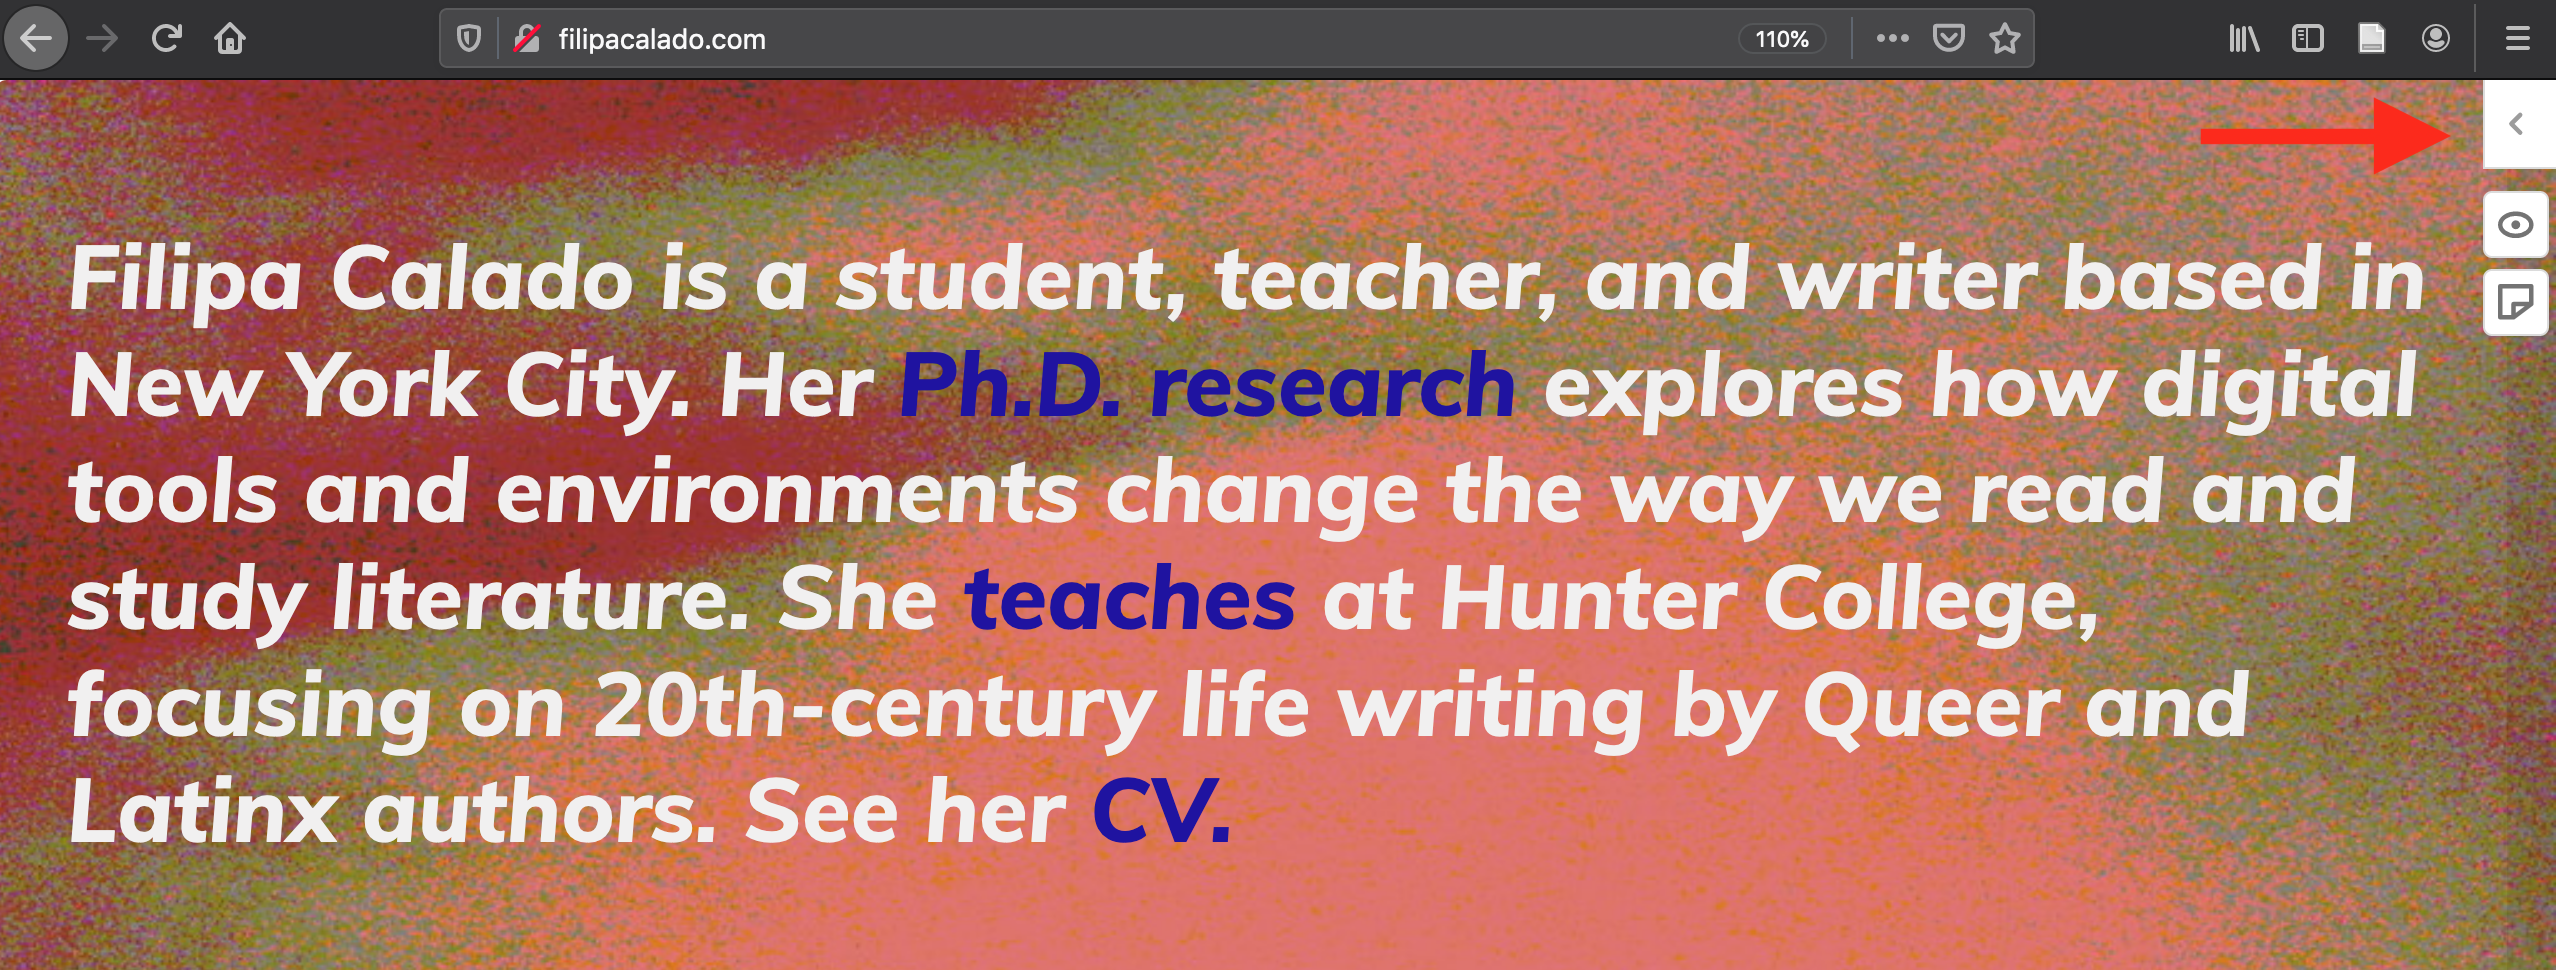
And that's it!
If you need more help or want to further configure how Hypothesis appears on the site, check out the more detailed instructions here.
Reading Groups
Have your students annotate as part of a “Reading Group,” which keeps groups annotations limited to viewing and responding within group members. Reading groups are recommended if you want multiple groups annotating the same document over time, and necessary if you want those groups of people to not see previous group’s annotations (for example, annotations from a class last semester). They are also easier for grading, because instructors will have access to all of the annotations in one place.
To create reading groups, send your students a registration link to join the group. Then, when they are ready to annotate, have them switch annotation mode from “public” or “private” to your Group Mode. Specific instructions on doing this are below:
Before getting started, make sure you have created an account on Hypothesis.
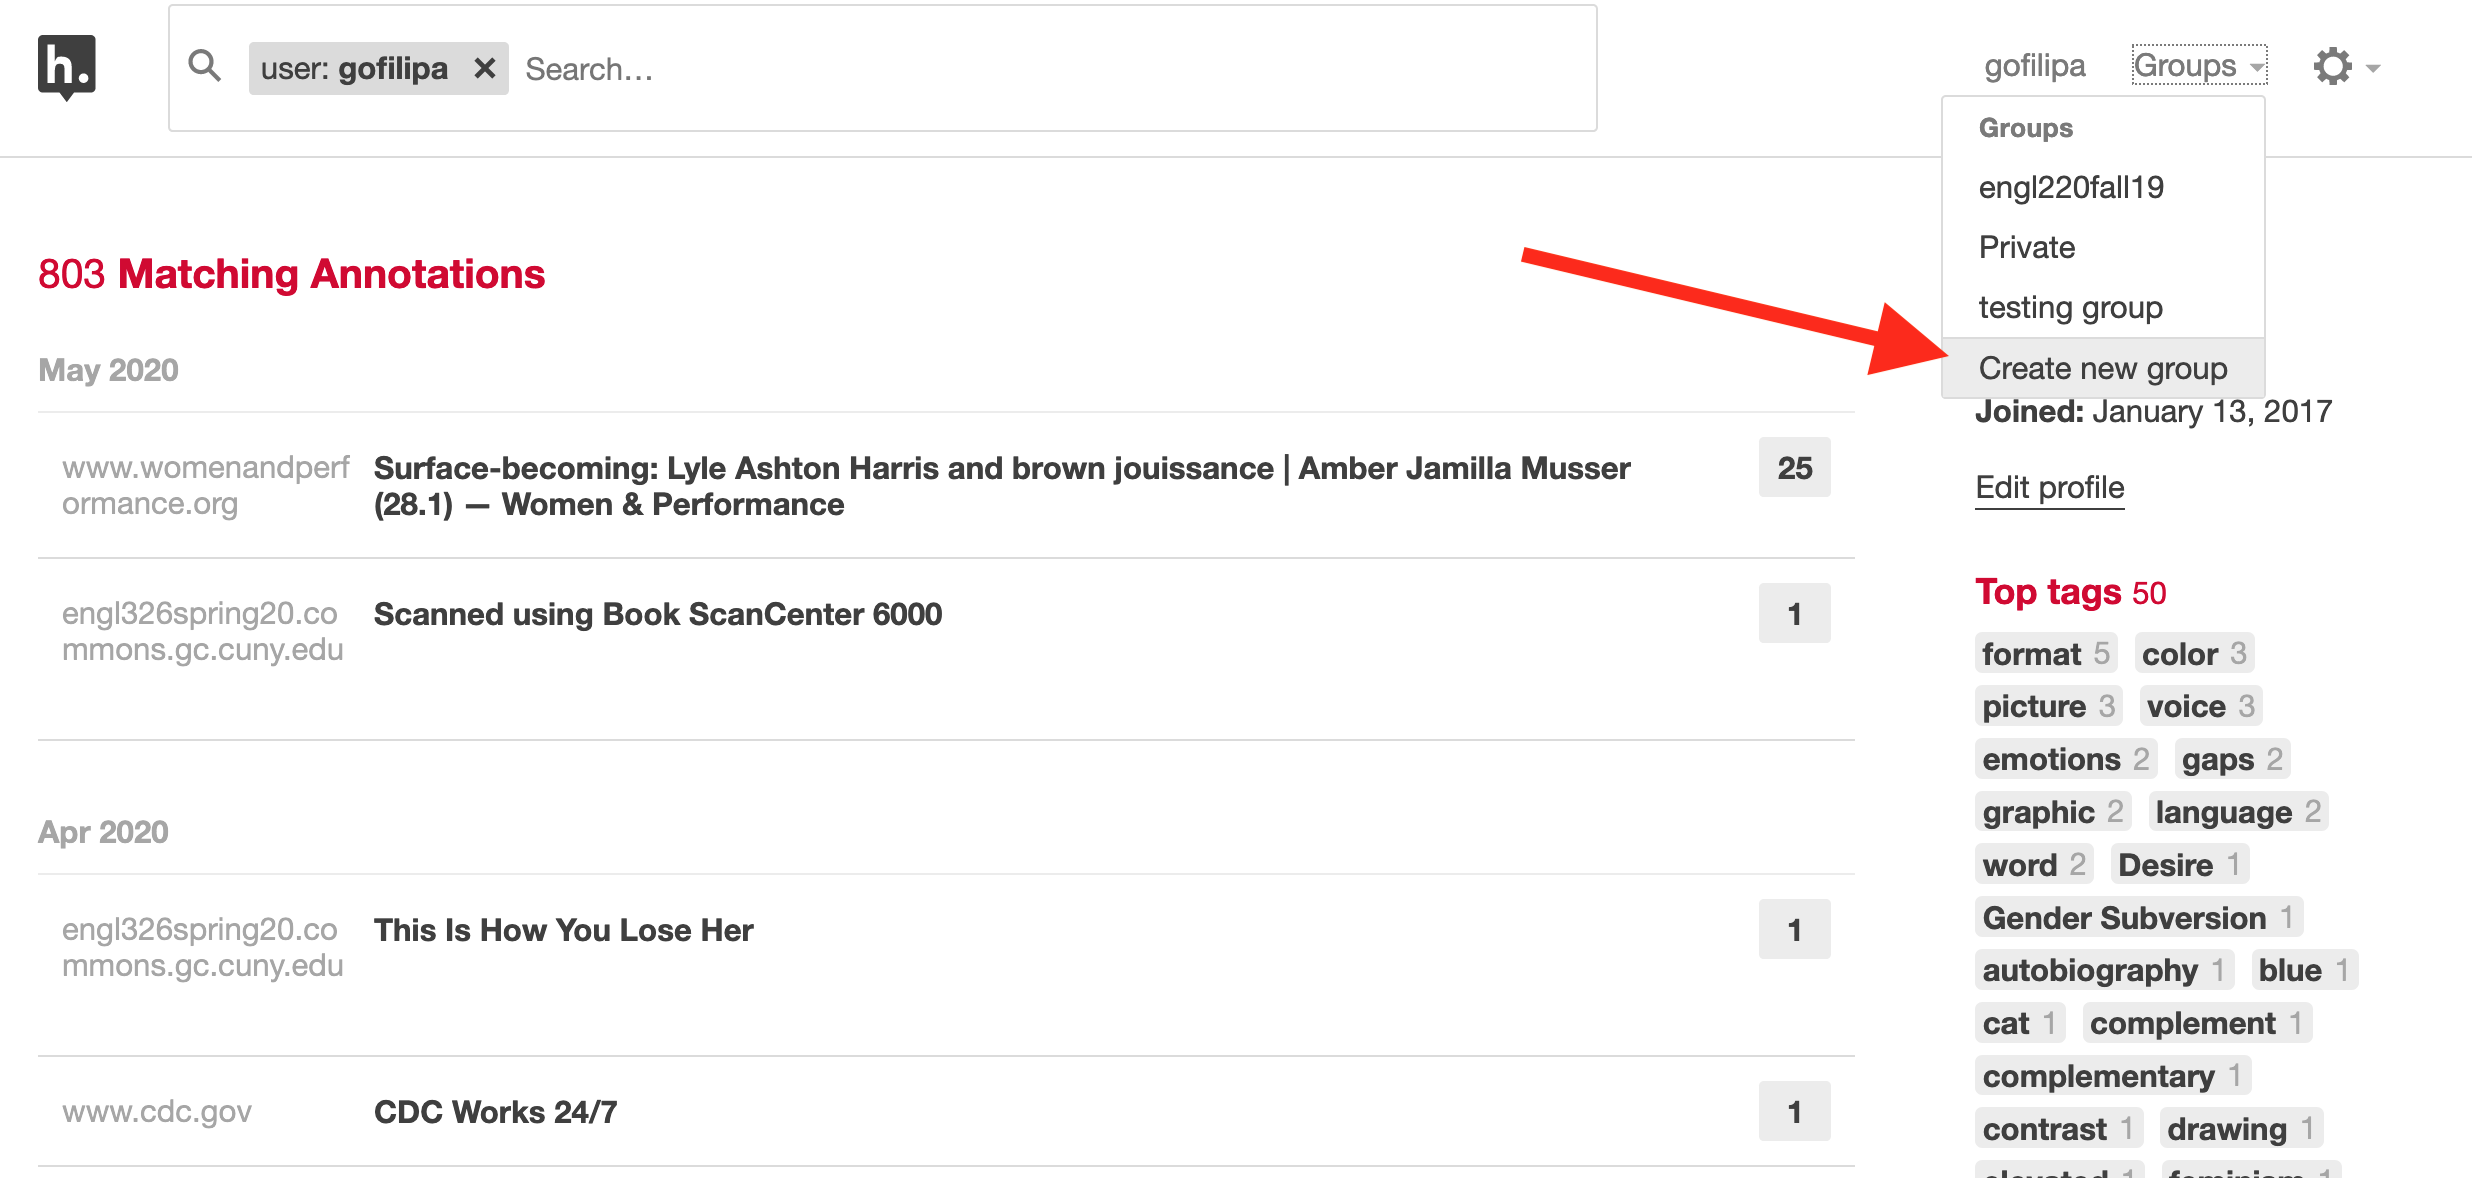
Then, go to your account page on Hypothesis (the first page after loggin in). On the top right hand corner, there's a little tab called "Groups." Click or hover on this tab to open the drop-down menu. Select "Create a New Group."
Give a name to the group. I usually use my course code, with the section number, like ENLG22049, or something. Below the group name, include a brief description of the group, using the full course name, school, and semester/year.
Then, copy the link to group registration. This link will be in the bottom right hand corner of the page.
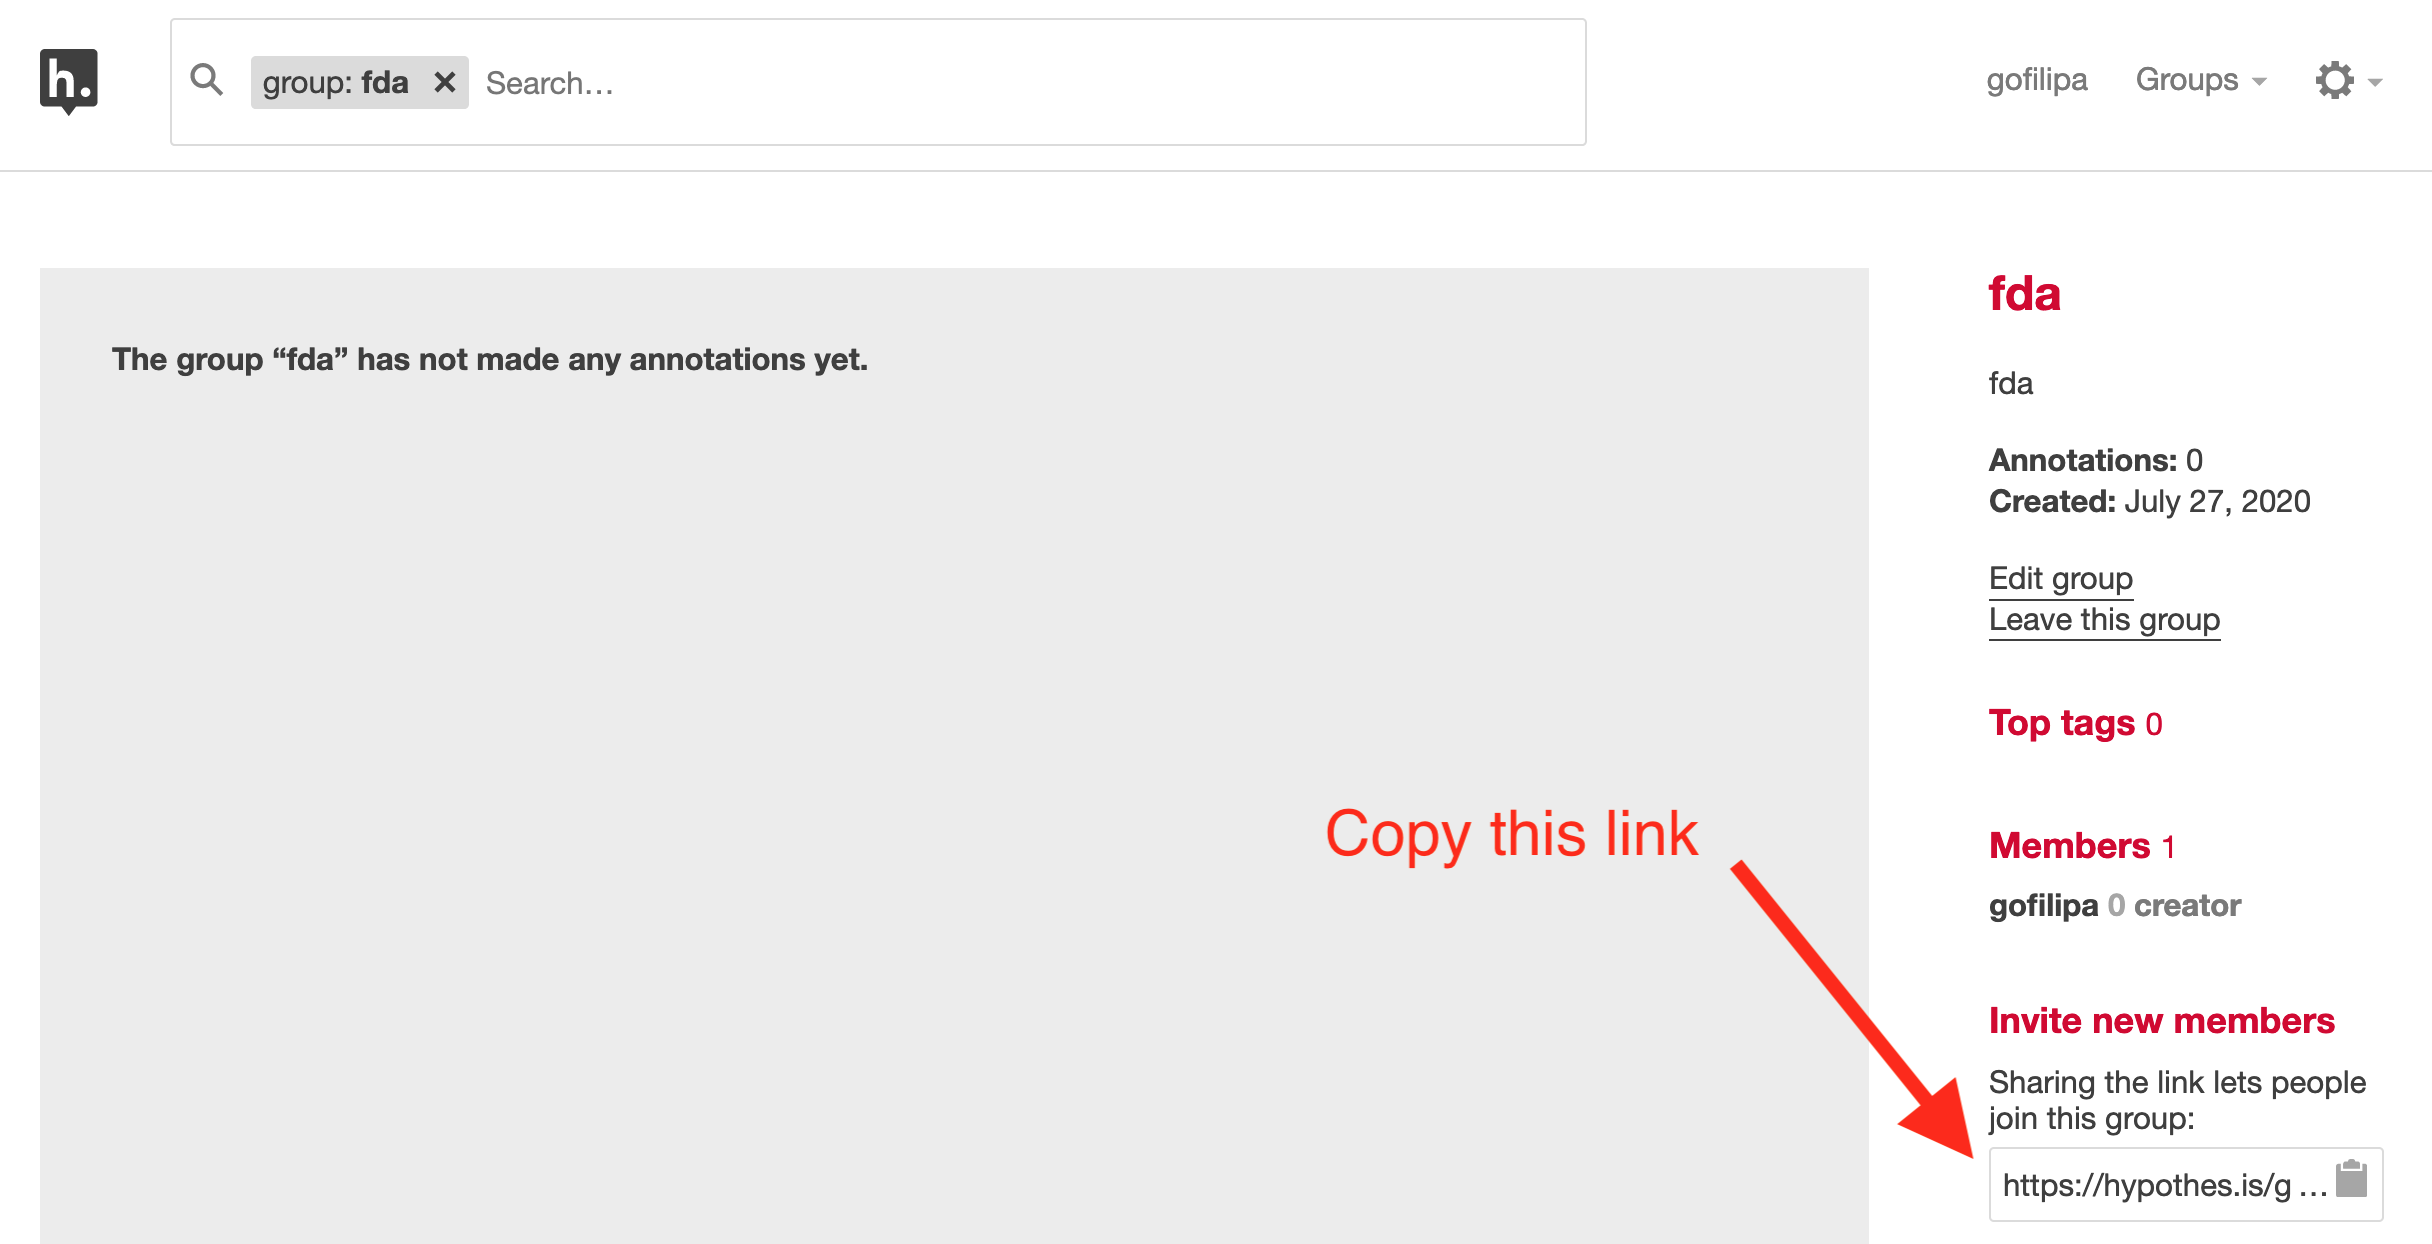
Once you have the link copied, you can send it directly to your students. They will click on the link, and automatically join the group.
Now, in order to annotate in "Group Mode," you need to activate that reading mode in your Hypothesis sidebar.
First, activate Hypothesis on your webpage (if not already activated). Make sure you are logged in.
Then, expand the sidebar by clicking the arrow on the right. Now, look for the "Public" tab at the top of the sidebar. Click or hover on this tab, and a dropdown menu will appear. Here, select the group that you want to activate.
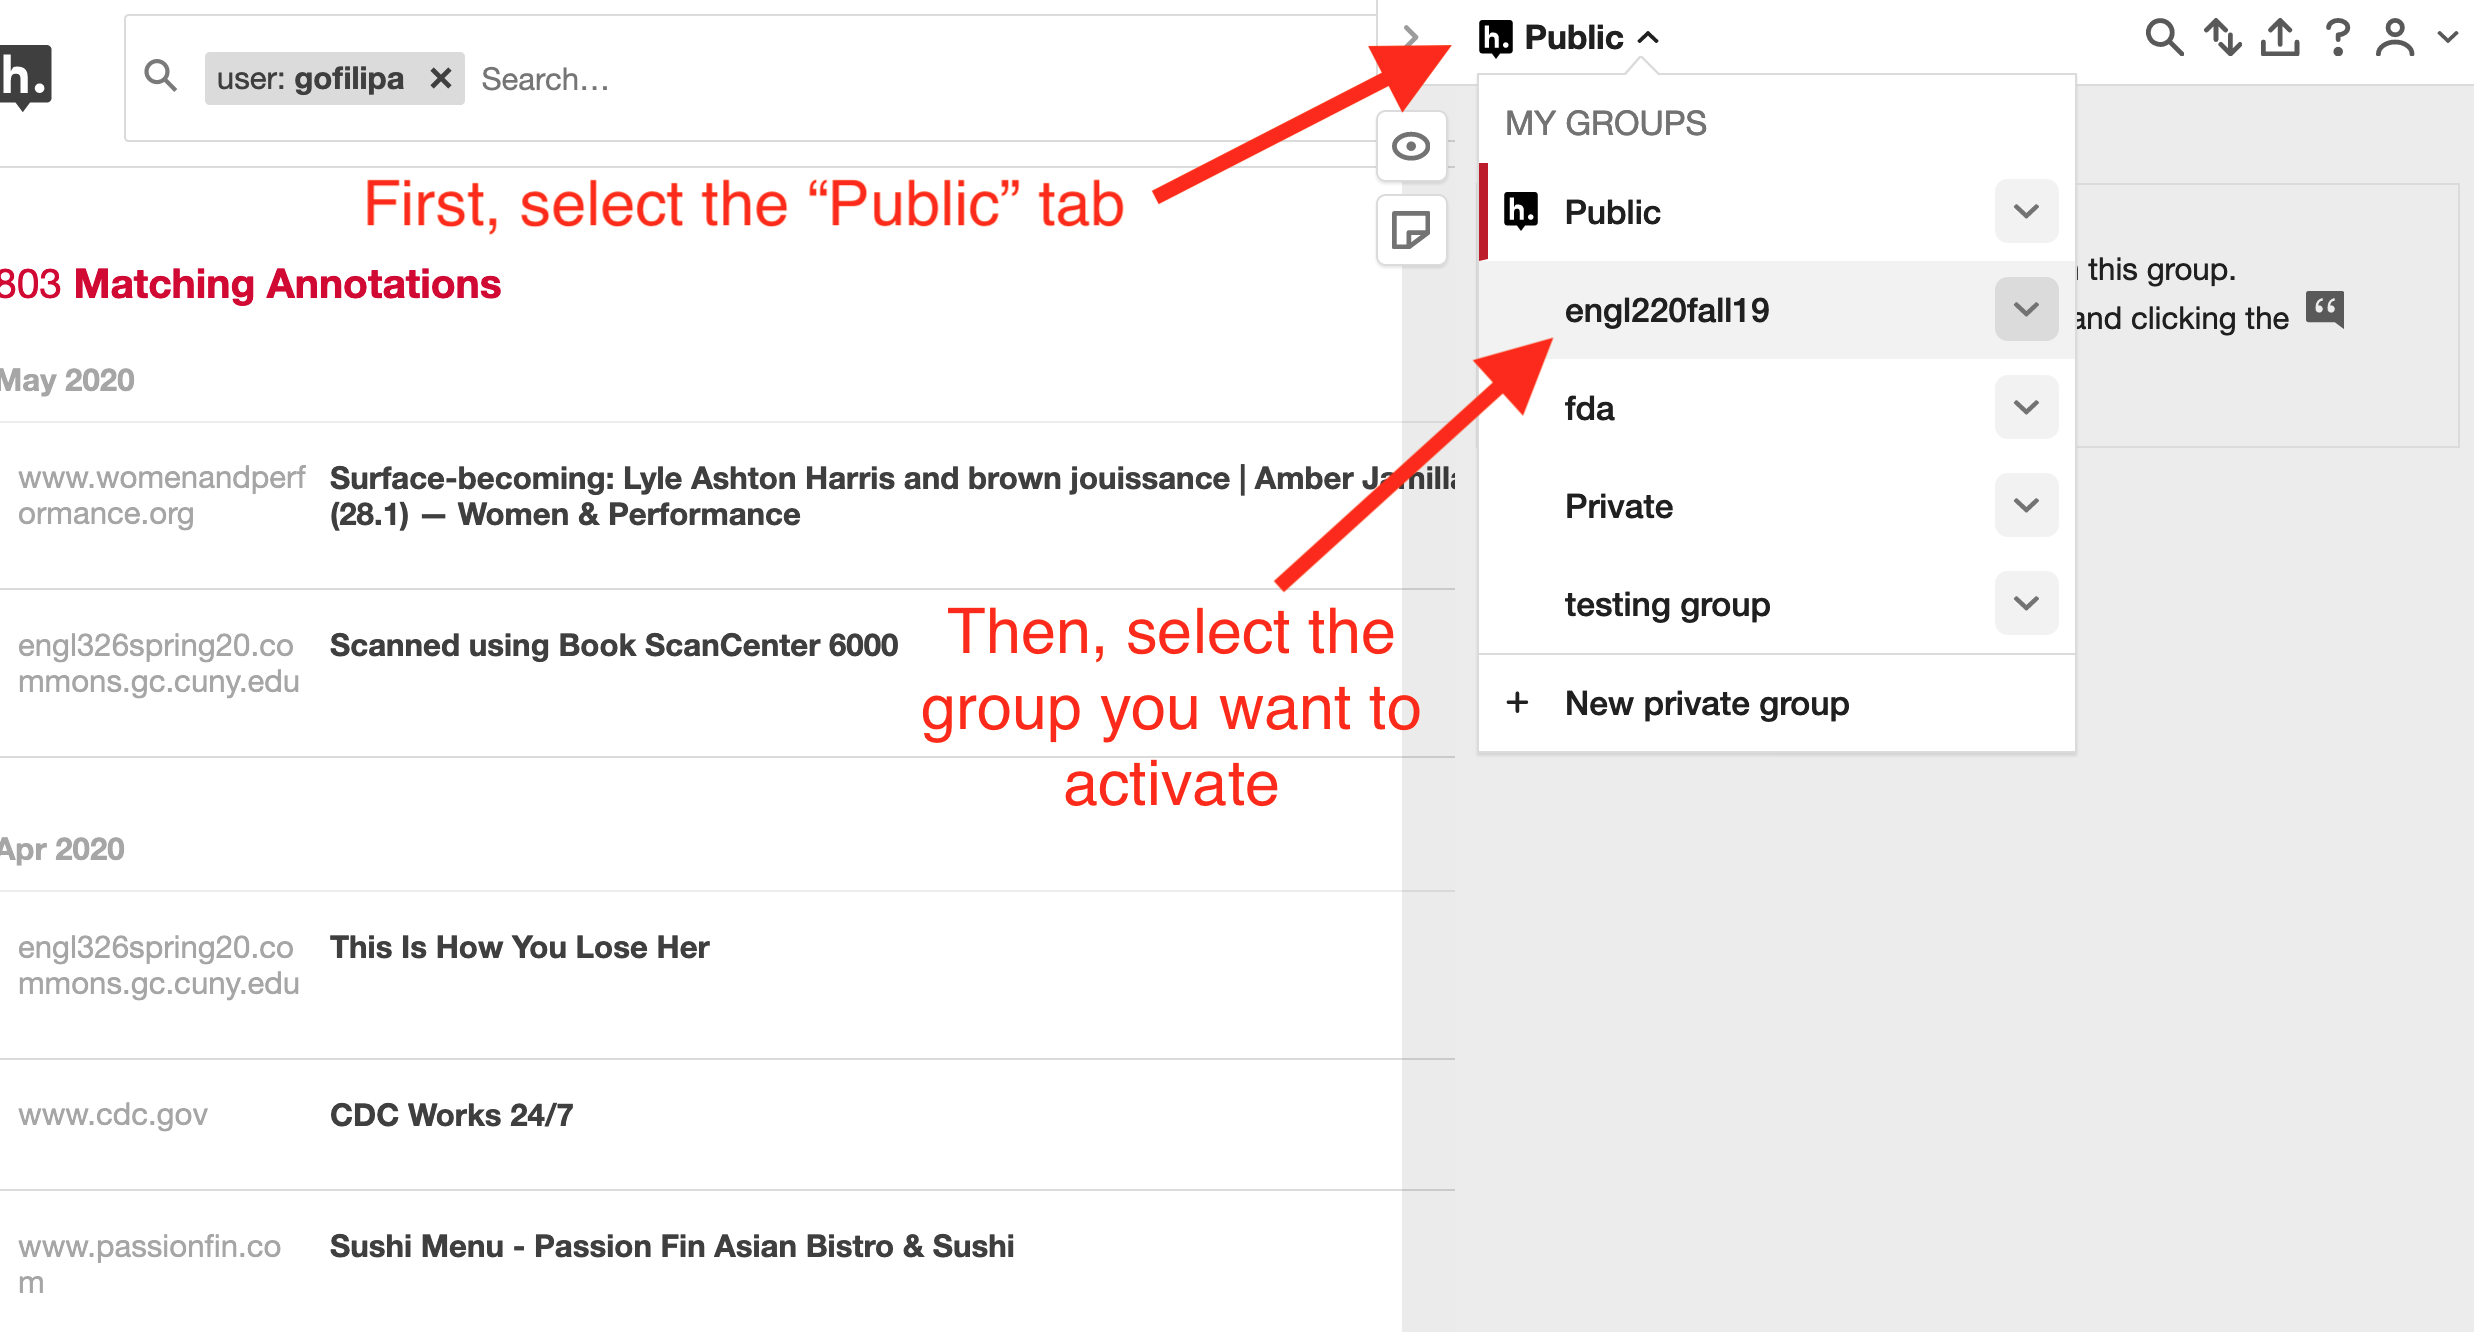
And that's it!
Remember to remind your students to select this group before annotating. Otherwise, their annotations will default to the "Public" mode and won't be visible within the group.
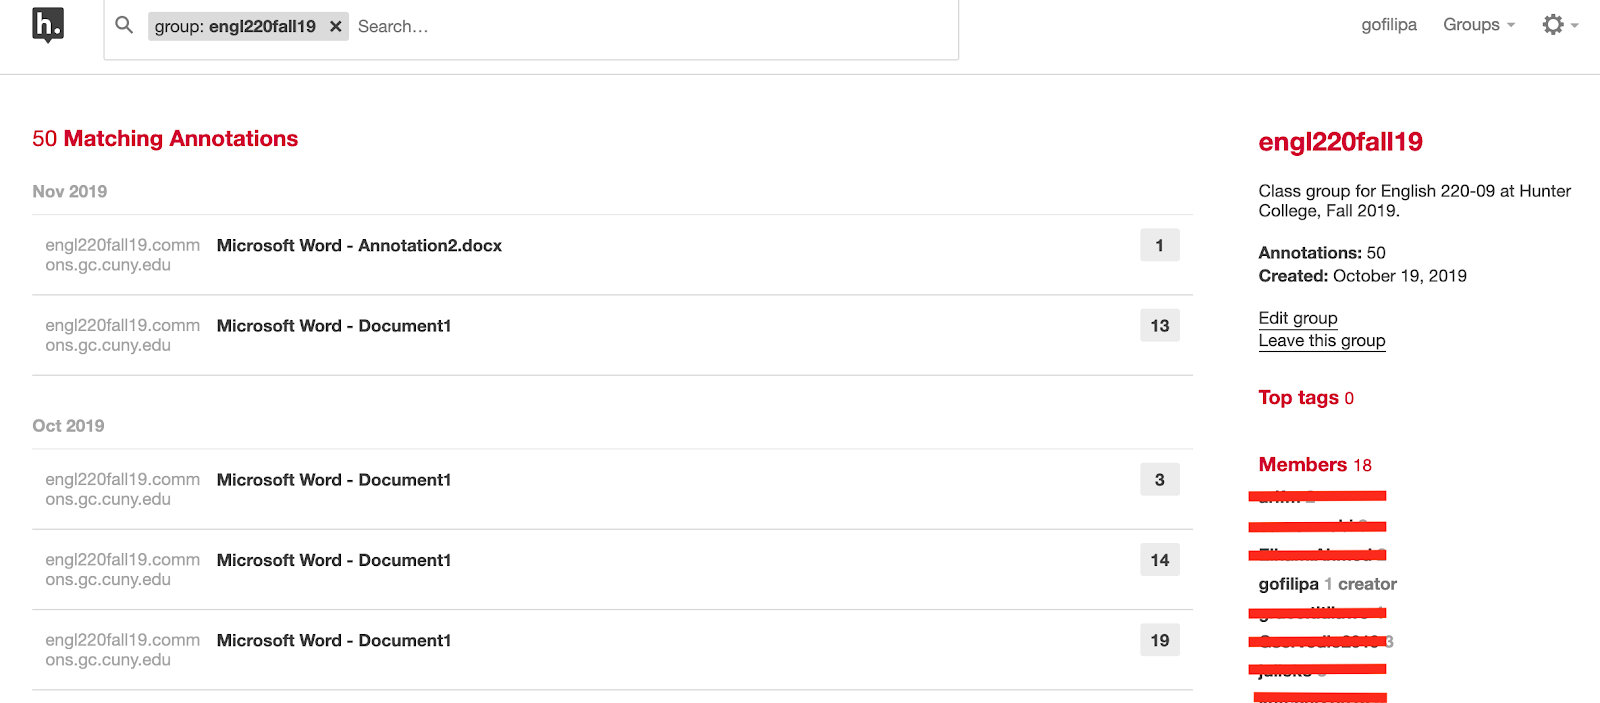
You can review group activity on the Hypothesis user page. Just navigate to your account on Hypothes.is, and at the top right, where it says "Groups," select your group. You will be taken to a page that shows all the documents annotated by that group. By selecting the individual documents, you'll get a list of all the annotators on that page. This is a quick and easy way to check who has annotated a given page, without having to scroll through all the annotations.
If you want more help with configuring groups, check out Hypothesis's Reading Groups tutorial.
That's it!
You've reached the completion of the workshop. Please join me for a live demonstration of using Hypothesis at ___ . In that synchronous workshop, I'll walk participants through the four different options for using Hypothesis and Reading Groups, and will take questions. We will also discuss some strategies for incorporating Digital Annotation into your remote teaching.
Thank you for reading!

This entry is licensed under a Creative Commons Attribution-NonCommercial-ShareAlike 4.0 International license.