Understanding the Basics of Digital Images
Because digital photography is ubiquitous in both digital and print projects, this post is geared toward bloggers and scholars who would like an introduction to the logistics and vocabulary of resizing and scaling images. The ideas here are pretty basic, but the vocabulary will be useful when you become advanced enough to learn Photoshop or a similar image editing program, or when you need work with publishers to get articles and books to press.
Image size and density
We generally think of digital photos as being two-dimensional images on a flat screen. But if you imagine a digital image as a malleable, three-dimensional object like a cube of modeling clay, you can get a more tangible idea of how the manipulation of digital images works. For instance, a cube of clay could have a width and height of 100 pixels each. Additionally, it would also have and a specific depth/density that is similar to an image’s resolution. (More on pixels and resolution below).

Think of a digital image as a malleable, three-dimensional object with a height, width, and depth (resolution).
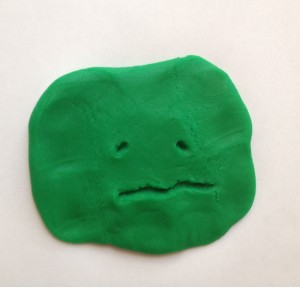
A helpful, if slightly cheesy, metaphor is to think of a digital image as a malleable, three-dimensional cube of clay, as in the image at left. Translating that metaphor into image editing terms: When you scan an image (or choose one that is already digitized), it will be at a specific size and density. The size (width and height) is often measured in pixels but could also be in inches. The density, often measured in dpi (dots per inch) or ppi (pixels per inch), refers to the resolution of the image.
Image resolution and proportion
As you increase size of a digital image, you decrease the resolution. Looking back to the clay metaphor, if you flatten the cube, you increase the surface area (size), but you also decrease the density because you will have a wide, thin blob instead of a dense cube. When a photo has been stretched too thin in this manner, it becomes pixelated and has a bitmapped quality to it.
To that end, it helps to know ahead of time how the image will be used (i.e. in print or online) and at what size. A high resolution (hi-res) image of approximately 300 dpi would be necessary for commercial printing. But a digital image intended for online use would be fine at a lower resolution of 72-150 dpi.
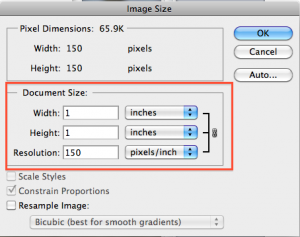
The Document Size box shows the image’s width, height, and resolution.
To change the Image Resolution and proportion in Photoshop, to to the top menu item, “Image” and scroll down to “Image Size.” See the photo at left for an example. The Document Size is the print size.
Regarding the Document Size: the Width/Height of the image and its Resolution are inversely related—as one increases, the other must decrease. You cannot add dpi without shrinking the image; this will cause it to bitmap. (Note for the moment that “Resample image” box is not checked. See the Resampling section, below, for more on this).
For more information, try this handy tutorial by Steve Patterson on resizing images in Photoshop.
Don’t forget to constrain proportions when you resize an image.
Also note that as you flatten the modeling clay, the proportions can get completely out of whack. The same goes for a digital photo— it’s important to constrain proportions. If you increase the height, you must increase the width by the same ratio, or you’ll have a photo that looks like it has been stretched out of shape.
In most software programs, do this by holding the shift key and pulling the image from the corner. (Don’t resize an image from the top, bottom, or sides because it may stretch out of proportion). This works in PowerPoint, Word, and Photoshop. (In PowerPoint choose the Format Picture tab and go to the Size section at right; if you have the box checked next to the Height and Width measurements, the proportions will stay constrained as long as you pull the image from the corner).
Cropping Digital Photos
Cropping the image (using the crop tool from the toolbar) will remove unselected content from the width and/or height of the image. For more information try this Photoshop Essentials tutorial on “Cropping Photos to Specific Frame Sizes in Photoshop.”
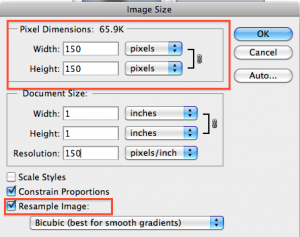
When the Resample Image box is checked, the pixel dimensions (and amount of data in the file) can change.
Resampling the Image
When you check the “Resample image” box, Photoshop can redraw the image with a new pixel count based on what you specify. This will change the number of pixels in the image and can change the file size (i.e. the number of MB in your image file).
- “Upsampling” adds pixels. (It does not change resolution but width and height will change relative to pixel dimensions). If you increase the number of pixels this way, photoshop fills in pixels to redraw image, letting the software make decisions as to which pixels to replicate—this is not a good idea for image quality!
- “Downsampling” is decreasing the pixel count; it is perfectly fine for shrinking the image.
In other words, when resampling, the pixels are always affected, and it changes amount of data in image. Resampling does not change the image resolution.
Resampling affects image quality, and can degrade it, especially if you increase the resolution with the Resample Image box checked. Don’t resample an image more than once, even if you are downsampling. For more information, see the Adobe tutorial on Advanced Cropping, Resizing, and Resampling.
This post coincides with our recent workshop, “Intro to Image Editing.” Click here for the workshop handout.