
In the Intro to Educational Game Design workshop held last October, we discussed a few common tools and software for designing computer games. In this post, I’d like to follow up with a more detailed look at one tool in particular: Pygame. If you know a bit of Python and want to jump right in to creating games, Pygame is a great place to start.
First, let’s take a look at the basics of Pygame and some of its most useful features. Then, we’ll get started writing a basic Pygame program. Although we won’t create a full-fledged game in this short post, we’ll get you started with a basic foundation to build upon.
What is Pygame?
In the GitHub repo, the developers describe Pygame as:
Pygame is a free and open-source cross-platform library for the development of multimedia applications like video games using Python. It uses the Simple DirectMedia Layer library and several other popular libraries to abstract the most common functions, making writing these programs a more intuitive task.
As they indicate, the Pygame library provides you with a set of built-in modules that allow for quick and easy application of common game development processes in Python. Because it is open-source and community driven, contributors have created a wide range of tools that address many different aspects of game development, from rendering graphics to the screen, to monitoring collision detection in games, to handling hardware input. (We’ll demonstrate a couple of these features when we get to creating our first project below.)
In short, instead of having to write a game engine in Python from scratch, Pygame shifts the brunt of the coding work to designing and applying the actual ideas for your game. This makes Pygame ideal for rapid prototyping and iterative project development.
Why Use Pygame?
There are many worthwhile reasons to use Pygame for creating games.
- It utilizes the Python programming language. Python is a very flexible and useful language to learn, especially if you are just starting out learning how to code. Pygame utilizes this simplicity and is suitable for learners of all ages and skill levels. Much of the complex Python syntax is done behind the scenes, so you can focus on the important stuff for your game.
- It is well documented. Nearly all of the important mechanics of Pygame are explained in the official documentation. The docs also provide you with several tutorials and articles written about Pygame.
- It has a great community. There are many devoted users of Pygame who are willing to help if you ever get stuck. There are official mailing lists and channels, but perhaps the most efficient resource for getting help lives on the Pygame subreddit or Discord server. The community also runs weekly events for showcasing and discussing your work.
- It is extensible. Even if making games is not your particular goal, Pygame is a rich library that can be employed in many other contexts. Its easy-to-use display and user input functions could be useful when creating many other types of software. In applications of all kinds, the Pygame library could be used to render images to the screen, handle button presses, or track mouse movements. You could, for example, use Pygame to create an interactive drag & drop interface for your software applications.
All this being the case, it should be acknowledged that there are a few limitations to using Pygame when it comes to designing games. For example, although Python is a great programming language, as an interpreted language it runs much slower than a compiled language like C++. Because large, complex games require a lot of computing power, Pygame can suffer when creating substantially large games. Pygame is also mostly limited to creating 2D games, so if your goal is to create 3D environments, you should use another tool.
Getting Started
Let’s get started writing your first Pygame project. As we mentioned at the top, although we won’t be creating a full-fledged game in this post, you will learn some simple Pygame techniques to help you get started on the right track. Specifically, you’ll learn how to install Pygame and create a simple program that tracks user input and draws a rectangle shape to the screen.
Installing Pygame
By default, Pygame is not included with Python installations. We’ll assume here that you’ve already installed the latest version of Python on your machine. If you need help with installing Python, check out this handy guide in the Digital Humanities Research Institute website.
To begin, let’s install Pygame via pip in the command line or terminal. Open up the command prompt and type the following command:
pip install pygameYou should see the installation process begin automatically in your command prompt and a message that Pygame has been successfully installed.
Note: If you happen to have Pygame already installed, you can upgrade to the latest version with the following command:
pip install pygame --upgradeWhile you are still in the command prompt, there is another way to check if Pygame installed successfully. Pygame comes with a few example games you can run right off the bat from the command line. For example, you can run an “Aliens” game by typing the following command in your terminal/command prompt:
python -m pygame.examples.aliensAfter a moment, the Aliens example game should appear on your screen.
Note: You can check the official installation instructions if you run into any difficulties installing Pygame.
Writing Your First Program
Begin by creating a new empty Python (.py) file in your code editor of choice and import the Pygame library into this file:
import pygameNext, we want to initialize all the imported Pygame modules by calling init():
pygame.init()Note: For more on importing and initializing Pygame, see the docs here.
Now that we’ve imported and initialized the necessary modules, we need to create the screen for our program. We’ll start by declaring the parameters for the screen:
import pygame

pygame.init()

#set screen size, caption, and background color
SCREEN_HEIGHT = 700
SCREEN_WIDTH = 700
SCREEN_TITLE = "A Pygame Program"
WHITE_COLOR = (255, 255, 255)
First, we declare the height and width of our screen (700×700, so it only covers a portion of our computer screen), followed by the title (the caption that will display in the screen window), and lastly the color of the background. In Pygame, color is determined by RGB value (255, 255, 255 is white). Because we don’t want any of these variables to change, we make them all constants (indicated by the all-caps).
We now have all the components we need to build up the game screen window, but we still need to actually create the window itself. We can return this in a variable called game_screen. This variable will represent the entire screen. See the code below:
game_screen = pygame.display.set_mode((SCREEN_HEIGHT, SCREEN_WIDTH))
game_screen.fill(WHITE_COLOR)
pygame.display.set_caption(SCREEN_TITLE)
Our game_screen variable represents a Pygame surface, which you can think of like a canvas on which you draw graphics and text. In the pygame.display.set_mode() function, we will pass an argument for the display resolution, which is our two variables representing width and height in a tuple. Note that the tuple is contained within the function’s parentheses, so there are double parentheses in the function above. We then fill() the game_screen surface with our white color, and set the window caption to our title.
Next, we’ll set the color of the rectangle object we want to draw to a basic red (or whatever color you’d like):
rect_color = (255,0,0)The last set of variables that we’ll need concern our game clock and our “game over” condition (which in this case will simply be the user closing the game screen):
clock = pygame.time.Clock()
TICK_RATE = 60

is_game_over = False
We first create a new Pygame Clock object that can be used to track amounts of time. The clock will serve to control the game’s framerate or FPS, which is the speed at which we’ll refresh the display. For most games, 60 FPS is the standard, so we’ll set the clock’s tick rate to a constant 60. We’ll also set our initial game over condition to false. We’ll turn the condition true once we want the program to end.
We now have all the variables we’ll need to run our program. So far, your code should look like this:
import pygame

pygame.init()

SCREEN_HEIGHT = 700
SCREEN_WIDTH = 700
SCREEN_TITLE = "A Pygame Program"
WHITE_COLOR = (255, 255, 255)

game_screen = pygame.display.set_mode((SCREEN_HEIGHT, SCREEN_WIDTH))
game_screen.fill(WHITE_COLOR)
pygame.display.set_caption(SCREEN_TITLE)

rect_color = (255,0,0)

clock = pygame.time.Clock()
TICK_RATE = 60

is_game_over = False
The last task we need to accomplish is to set up our game loop. All games have a core game loop that runs until a certain condition is satisfied (e.g., the game is over or the player quits). The usual order of things is that each turn of the loop, the game program will process user input, update the game state, and render the game.
This is exactly what we’ll do for our program. Below what we’ve written so far, let’s add the following code to our program:
# run the game loop
while not is_game_over:
    for event in pygame.event.get():
        if event.type == pygame.QUIT:
            is_game_over = True
        print(event)

    pygame.draw.rect(game_screen, rect_color, pygame.Rect(330,350,100,60))
    pygame.display.update()
    clock.tick(TICK_RATE)

pygame.quit()
quit()
First, we set up a while loop that will run until our is_game_over condition turns true. (When working with while loops, always watch your indentation closely so you don’t accidentally create an infinite loop.) To log user input (mouse placement, key presses, closing the window, etc.), we use the pygame.event.get() function in a for loop. This function creates a queue of all events and allows the program to respond accordingly. The logic here goes something like this: for each event that Pygame records, check to see if that event is of the type quit. Then, to control our game over condition, we check if the built-in quit event (meaning the user has closed the game screen window) has actually occurred. We also print all events to the console so we can see the results.
To demonstrate drawing an object on our game surface, we’ll use the draw.rect() function. This function requires three main parameters: the surface to draw on, the color of the rectangle, and the rectangle object (specifying the left position, the upper position, the width, and the height). We then update() the display, and tick our clock so the framerate remains at 60.
Finally, if the is_game_over condition (if the user closes the window) is true, we’ll exit the loop and quit the program.
If you run the program now, you’ll indeed see that we have drawn a red rectangle to the screen:

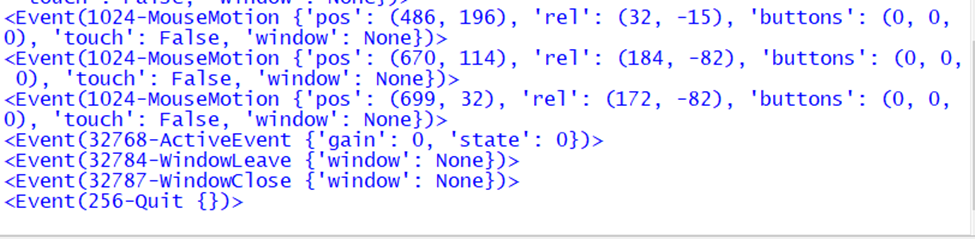
If you check the console, you can see all of the events that occur while the program is running. If you close the game screen window, you should see a Quit event being recorded at the end:
What now?
While the program certainly isn’t very exciting (and doesn’t do much yet), in a short piece of code you’ve already implemented some very important game development fundamentals. You can 1) create and draw to the screen, 2) run a basic game loop, and 3) track a player’s events.
To add some interactivity and make the program more interesting, I’d now challenge you to add some game-like features. You might, for instance:
- Allow the player to move the rectangle around based on their key presses. Try adapting your program by following this TechWithTim tutorial.
- Replace the rectangle with an image of your own. Try adapting your program by following this tutorial, which shows you how to add custom images in Pygame.
- Make a more interesting game over condition. For example, try adapting this tutorial into your program to allow the player to “win” the game by clicking on the rectangle, instead of just closing the screen window.
As always, a good suggestion is to use the Pygame docs to help you figure out how each aspect of the Pygame library works. Good luck!

This entry is licensed under a Creative Commons Attribution-NonCommercial-ShareAlike 4.0 International license.

