On October 13, I led a workshop at the Graduate Center on databases. It was billed as the most fun you will ever have learning about databases. More importantly, it was the second in a series that the Digital Fellows organized this semester. The primary goal of the workshop was to progress from the first database workshop by digging deeper into querying with topics such as joins and aggregations. I was also hoping to demystify databases in general. Databases are used by almost every desktop and mobile application. In order to unmask databases, I am providing here instructions on how to create one and connect it to a commonly used web application, in this case WordPress.
I could write an entire blog post to introduce the WordPress database and intend to in the near future. For now, I will focus on how to a temporary workshop environment. I used such an environment for workshop participants to interact with a shared WordPress database. This allowed me to avoid having each person configure their computers, which would require far more time and effort than a two-hour workshop reasonably allows. I also wanted to be able to reproduce this environment in the future if I (or anyone else) was to give another workshop on databases (or WordPress). Though I focus on WordPress here, the same approach can be used for conducting other educational workshops and avoiding the headaches that come with replicating effort among educators and learners.
I decided to create a server in the cloud on Amazon Web Services (AWS). I prepared the server beforehand to test the exercises I intended to give participants. At the workshop, I turned on the temporary environment, worked through exercises, allowed participants to make changes to the database, and then scrapped everything once we were done. To follow the exercises, participants logged onto a website, much like they would on their own WordPress installation, and they did not have to install any special software on their computers.
I shared a diagram to illustrate where the WordPress database fits into a WordPress server:
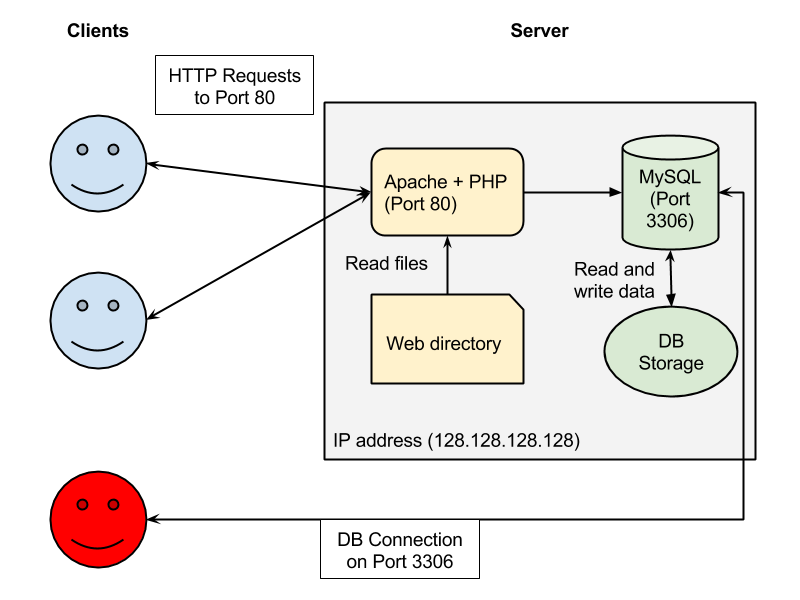
I chose Docker to create this virtual environment with all the components in the “Server” box above. Docker is a wonderful software package that simplifies running applications like web servers and databases on your personal computer. It also simplifies creating a server in the cloud configured as you like it. Docker ultimately allowed me to create a safe and contained environment for participants to play in without them breaking their computers. This is very similar to how DH Box, another project at the GC, creates an environment for digital humanities.
In the Github repository for the database workshop, I included docker-compose.yml, a YAML configuration file used by one of the Docker command line tools, docker-compose, to specify of all the necessary software and data that I needed to install. Before explaining how Docker is executed, I will walk through the parts of my configuration file.
The first line specifies that we will be using the most recent version of the Docker compose file, which makes our job easier than previous versions:
version: '2'
I then specify that first service I want is a database and label it “db”. I chose to use MariaDB, a fully compatible replacement for MySQL. Docker loads the mariadb image from a centralized repository at Docker Hub. By image I don’t mean a picture; a Docker image is an archive of all that is necessary to install some software within the Docker environment. Included in the database service section are variables that are used to create a database for WordPress on the new MariaDB server. I also indicated (through the use of volumes) that I want the new database to be loaded with the sample data stored in the bootstrap/db folder of the Git repository. I created the SQL file used to prepare the new database by dumping an existing MySQL database from a test WordPress site created for theme and plugin developers.
    db:
        image: mariadb
        ports:
        - 3306:3306
        environment:
          MYSQL_ROOT_PASSWORD: wordpress
          MYSQL_DATABASE: qitrw
          MYSQL_USER: qitrw
          MYSQL_PASSWORD: qitrw
        volumes:
        - ./bootstrap/db:/docker-entrypoint-initdb.d
The ability to prepare a database with data so easily was a welcome surprise for me. I wanted the workshop database to be set up with the WordPress schema, since the exercises were meant to examine how WordPress data is stored and retrieved. But a set of empty tables is useless for doing querying exercises. Nor did I want to create the data by hand. Instead, by including a Docker volume in the configuration for docker-entrypoint-initdb.d, I can use the functionality of the docker-entrypoint.sh script included in the mariadb image. This script detects if a Docker volume named docker-entrypoint-initdb.d exists and executes any SQL files in the directory. Though it took me some time to figure out how all this worked together (not helped by the fact that the volumes functionality was broken on the version of Docker on my Windows laptop), I was able to prepare the database whenever I started my workshop environment.
The next section of the compose file sets up the wordpress web server:
    web:
        depends_on:
        - db
        image: wordpress
        links:
        - db
        ports:
        - 80:80
        environment:
          WORDPRESS_DB_HOST: db:3306
          WORDPRESS_DB_USER: qitrw
          WORDPRESS_DB_PASSWORD: qitrw
          WORDPRESS_DB_NAME: qitrw
        volumes:
        - ./build/www:/var/www/html
The wordpress image installs a web server (Apache), along with the necessary PHP modules for Apache to run WordPress, and then downloads the WordPress web application to /var/www/html. The environment variables tell WordPress how to connect to the database from the previous section.
The line
- ./build/www:/var/www/html
is not necessary but allows me point Docker to a preexisting WordPress web installation in a local directory. Anyone customizing themes or adding plugins can change the contents in the local directory and have those changes immediately reflected in the WordPress server running within Docker.
In the last section, Docker installs PHPMyAdmin, a commonly used database management tool for MySQL and WordPress installations, so that workshop participants can write and execute queries from a web page:
    phpmyadmin:
        image: phpmyadmin/phpmyadmin
        environment:
        - PMA_ARBITRARY=1
        restart: always
        ports:
        - 8080:80
        volumes:
        - /sessions
Having installed Docker for Windows (Docker for Mac also works) and specified how I wanted Docker to set up my Docker machine, I opened a terminal and executed the following from the folder where I had checked out the Git repository:
docker-compose up -d
The first time I ran this tool all the necessary Docker images were downloaded from the Docker Hub. Once downloaded, the images are installed and configured according to the Docker compose file.
If you are following along, you can now test the WordPress server deployed in your local Docker by opening http://localhost/ in a web browser. You should see the WordPress test site. The “localhost” here is used because on most computers this domain name resolves to the computer itself, rather than a server somewhere on the internet.
Once I was done with preparing my exercises and ready to shut down my temporary environment, I executed the following to stop and remove all the services that Docker had started:
docker-compose down
Having successfully configured the Docker environment on my laptop, I was ready to deploy it to the cloud. Fortunately for me deploying to the cloud (AWS EC2) was a straightforward process using the docker-machine command line tool:
docker-machine create -d amazonec2 \
    --amazonec2-access-key ... --amazonec2-secret-key ... --amazonec2-region ... \
    NAME
I used my AWS credentials when executing docker-machine and had it name the new the machine “qitrw”. This step took a few minutes, but once complete I was able to use the Docker host on AWS just as I had the Docker host on my laptop. To do so, I first had to set up my shell environments on the Windows command line:
& docker-machine env qitrw | Invoke-Expression
If you are on a Mac, you instead execute the following to prepare your shell environment:
eval $(docker-machine env qitrw)
Having set up the shell environment, I executed the docker-compose just as I had to set up the Docker environment on my laptop but this time on AWS. Voila!
Once the workshop was done, and everyone went home, I shut down the Docker host on AWS:
docker-machine stop qitrw
docker-machine rm qitrw
One caveat for those who want to dive into using AWS with Docker: by default the AWS EC2 host does not allow any inbound connections, so I couldn’t actually get to the WordPress website, nor the PHPMyAdmin tool. You can make the necessary changes the security policy for the new EC2 machine from the AWS Management Console. Fortunately the aws-cli command line tool, maintained by Amazon, also allows the same change to be made:
aws ec2 authorize-security-group-ingress \
    --group-id ... --protocol tcp --port 8080 --cidr 146.96.0.0/16
The “group-id” is the one used by the new Docker environment (which I got from the AWS Management Console). The “cidr” argument specifies that only connections originating from the Graduate Center network will be allowed. This is probably an unnecessary precaution for the purposes of an educational workshop but does highlight how Docker and AWS can be used to create a safe and contained environment for learning.
If you have any questions, come by our office hours on Tuesdays from 2 to 4pm or email us at gc.digitalfellows@gmail.com.

This entry is licensed under a Creative Commons Attribution-NonCommercial-ShareAlike 4.0 International license.


