
It’s a new year and a great time to revamp your academic website! You do have one, don’t you? While there are many options for creating a personal website, including our very own CUNY Commons, you might be interested in learning how to create something more personalized that can travel with you to other institutions. If you’re an #rstats geek like myself, you can even use this as an opportunity to highlight your R skills by building your website using tools developed in R. In this tutorial, I’m going to help guide you through the process of setting up a basic personal website using the Academic website builder for Hugo. In a later tutorial, we’ll cover how to add additional content such as blog posts and publications.
This process ended up being a bit more complicated than I originally anticipated and you may need to do things slightly differently depending on your computing environment. If you’re having difficulties, I’d highly recommend joining our newly-formed R Users’ Group which will meet on alternating Friday afternoons in the upcoming Spring semester. Here you will find a community of R enthusiasts of all different backgrounds and levels of proficiency. Although the online, #rstats community is extremely welcoming and inclusive, it often helps to have a group of people to work through roadblocks with IRL.
A few additional things to note, this tutorial assumes you have git installed on your computer with an associated GitHub account, basic familiarity with navigating your computer with the terminal, and R and RStudio installed. If you need additional training on these topics, consider applying to participate in the GC Digital Research Institute or one of the many training workshops and other events offered by the GC Digital Fellows.
Install
To get started, first fork the academic kickstart repository on GitHub.

Next, open a terminal and navigate to where you would like to save your project (I’m using my desktop). Run the following command replacing <USERNAME> with your GitHub username:
git clone https://github.com/<USERNAME>/academic-kickstart.git My_Website
Now navigate into this newly formed folder and initialize the theme using the following commands:
cd My_Website
git submodule update –init –recursive
Open the RStudio application. In the console panel (left) install the blogdown and hugo dependencies by running the following commands:
install.packages(“blogdown”)
blogdown::install_hugo(force = TRUE)
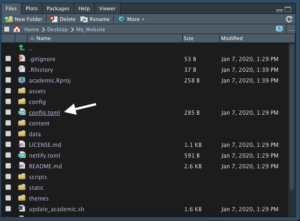
Now open My_Website.Rproj in RStudio (File –> Open Project) saved on your desktop (or wherever you decided to save it). To avoid a known bug, open up the My_Website folder on your desktop and move “config/_default/config.toml” to “config.toml” in the root of the folder. Replace the config file in the root when prompted.
Now you have a pre-made template for your academic website! To view it, run the following command in the RStudio console:
blogdown:::serve_site()
In the viewer panel (bottom right) of RStudio, you should see a rendered version of the website template. To view this in your browser, click on the 3rd button in the upper left of the viewer.
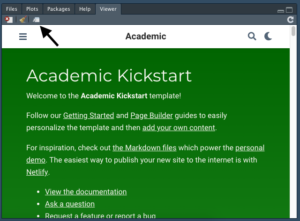
These two views are particularly helpful because they display the mobile and desktop views of the site.
Personalize
Now let’s modify the files in this project to personalize your website. You can navigate and open the project files within RStudio by clicking the “Files” tab in the viewer panel (see above). Here you’ll see the entire project directory. Click on the “config.toml” file so we can modify and personalize its contents.
In the scripting pane (upper left), you should see the config file which controls many aspects of your site. Within that config file, go ahead and change the title of your site to your name
# Title of your site
title = “Natalie O’Shea”
To render these changes, simply save your config file. In the lower right side pane, switch from the viewer to the files tab to view this change (you may need to save more than once for changes to show up).

Now click on the “Files” tab again and navigate to the “params.toml” file in the “config/_default” folder.
Let’s go through this file section-by-section together. If I don’t specifically mention a section or parameter, just leave the default options untouched. Below, I’m going to describe my changes by commenting out my narration using the hash symbol (#). As you go through the file, you’ll notice each section has additional details in the comments. Use these comments to make your own design choices.
############################
## Theme
############################
# here you specify your theme and font
# you can view themes and fonts here: https://sourcethemes.com/academic/themes/
# the template includes only a theme parameter
# you can add a font parameter to mix and match your options
# I’m going to use the rose theme with a minimal font for my website
# identify the following parameters and modify them in your own file
theme = “rose”
font = “minimal”
############################
## Contact details
############################
# supply your relevant contact information
# if you don’t want to display something, simply clear that field to “”
# I don’t want my phone number listed so I simply clear that field in the example below
email = “youremail@gmail.com”
phone = “”
# assuming you are a student at the Graduate Center, you’ll likely want to use the GC address for your academic website
address = {street = “365 Fifth Ave.”, city = “New York”, region = “NY”, postcode = “10016”, country = “United States”, country_code = “US”}
# you don’t *have* to provide geographic coordinates, but it’s fun to have a map on your site so let’s input the GC’s latitude and longitude information
# if you’re not at the GC you can get your coordinates by right-clicking on Google Maps and choosing “What’s here?”. The coords will show up at the bottom.
coordinates = {latitude = “40.7485”, longitude = “-73.9841”}
# I cleared the following fields
directions = “”
office_hours = []
appointment_url = “”
contact_links = []
Now that we’ve altered some core parameters of the site, let’s choose our layout. Return to the “Files” tab in the viewer panel and navigate to content/home folder where you will see a range of markdown (.md) files. The academic kickstarter template has already deactivated many non-relevant sections, but you can add or remove sections as you see fit. Simply open the markdown file of the section you’re interested in and change the active parameter to “false”. For example, let’s deactivate the demo section on our homepage which explains the Academic Kickstart template– we definitely don’t want that on our final site!
Open the “demo.md” file and set the active parameter (line 8) to false.

I want a simple homepage for now (we’ll focus on adding additional content in a later tutorial) so I’m going to set the active parameter to false on some more sections: “accomplishments.md”, “featured.md”, “posts.md”, “projects.md”, “publications.md”, “skills.md”, “tags.md”, and “talks.md”. You can view your simplified website by returning to the “Viewer” tab in the viewer panel. Sometimes the changes don’t fully render there, so you may need to open a browser tab by clicking on the 3rd button in the upper left of the viewer (as demonstrated at the beginning of the tutorial).
Our simple website should now contain only three major sections: biography, experience, and contact. We’ve already altered the contact information and we’ll edit the biography in the next step. To edit the experience, simply open the “experience.md” file and alter the experience blocks to match your background. As mentioned in the comments on the file, you can add/remove as many experience blocks as you’d like. A typical experience block will look something like this:
[[experience]]
title = “Adjunct Lecturer”
company = “Lehman College”
company_url = “https://www.lehman.cuny.edu/”
location = “Bronx, NY”
date_start = “2016-01-01”
date_end = “”
description = “””
Description:
* Taught Human Evolutionary Biology (ANT 120) and Intro to Human Evolution
(ANT 171) to undergraduate and postgraduate students
* Developed rapport with students, designed curriculum and materials, graded
labs and exams, and met with students one-on-one to explain difficult concepts
“””
By now, you’ve probably noticed that the default user is still not showing your information. In order to display your correct information, we need to change the information located in the “_index.md” file located in the “content/authors/admin” folder. Return to the “Files” tab in the viewer panel and navigate to this file, open it in the scripting panel, and edit to match your details. You can change your profile picture by replacing the “avatar.jpg” file also located in the content/authors/admin folder with a headshot.
One final step before we’re ready to deploy our site. Currently, our navigation bar has links to sections that don’t exist. Let’s fix this by navigating to the “menu.toml” file in the “config/_default/” folder and making some changes. Since I know that I want to add additional sections with content in the future, I’m going to replace everything below line 5 with the following script which has sections to be included in the future commented out for now.
[[main]]
name = “About”
url = “#about”
weight = 10
[[main]]
name = “Experience”
url = “#experience”
weight = 20
#[[main]]
# name = “Posts”
# url = “#posts”
# weight = 30
#[[main]]
# name = “Projects”
# url = “#projects”
# weight = 40
#[[main]]
# name = “Publications”
# url = “#featured”
# weight = 50
[[main]]
name = “Contact”
url = “#contact”
weight = 60
# Link to a PDF of your resume/CV from the menu.
# To enable, copy your resume/CV to `static/files/cv.pdf` and uncomment the lines below.
# [[main]]
# name = “CV”
# url = “files/cv.pdf”
# weight = 70
Deploy
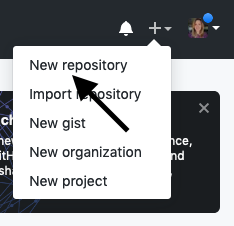
Now we’re finally ready to deploy our site! There are many options for website hosting, but I’m going to demonstrate how to deploy your site on the free GitHub webpage that comes with your account. First, you need to create a new repository for your GitHub site by pressing the plus sign in the upper right on your homepage and selecting “New repository”.
Name your repository <USERNAME>.github.io, where <USERNAME> is your Github username, and initialize with a README file.

In RStudio, navigate to your config.toml file in the root of the website directory and set the baseurl parameter to your GitHub website address.

Now, close out of RStudio and open the folder containing your website. Delete the “public” folder that is in the root of the website directory (you will regenerate this folder in the next step). Using the command line, navigate to the root of your website folder (in my case: Desktop/My_Website). Run the following commands, replacing <USERNAME> with your GitHub username:
git submodule add -f -b master https://github.com/<USERNAME>/<USERNAME>.github.io.git public
git add .
git commit -m “Initial commit”
git push -u origin master
Now you need to regenerate the HTML for your site. Open your project in RStudio again and run the following command in the console:
blogdown:::serve_site()
Return to the command line and run the following commands:
cd public
git add .
git commit -m “Build website”
git push origin master
CELEBRATE!
That’s it! You should be able to navigate to your GitHub page (<USERNAME>.github.io) and view your new, simple academic website. In my next tutorial, I will cover how to add additional content to your site.

This entry is licensed under a Creative Commons Attribution-NonCommercial-ShareAlike 4.0 International license.