
Visual Novels (VN) are an increasingly popular form of interactive fiction, now often hitting the tops of the Steam (computer game marketplace) charts in sales. To deliver their story, visual novels typically utilize text with branching storylines and player choice, static images and backgrounds, and sound effects and music.
Recently, I have been interested in how the genre could be tapped for an academic/pedagogical context. For instance, instead of just reading a lesson from a textbook, students might engage with a short educational VN experience that requires them to apply their knowledge to advance the narrative. It would allow for a fun and low-stakes experience that provides immediate feedback and connects with the student through a variety of learning modalities (visual, auditory, textual). Ultimately, what lies at the heart of the visual novel is the ability to not just read or watch a narrative, but to interact with it—and this is where the possibilities get interesting from an educational perspective.
If you have some basic Python knowledge, you already have the skillset needed to make a VN yourself. In this post, I will introduce you to a free and open-source visual novel engine made with Python called Ren’Py, and demonstrate how a basic VN is built with it.
Getting Started with Ren’Py
Although it is possible to build a visual novel from scratch with Python, there are several frameworks and engines out there that can do much of the heavy lifting for you. For Python scripting, Ren’Py is one of the best and most popular, with fully fleshed-out features for implementing branching dialogue, images, and sound effects. It also has detailed documentation and a helpful community.
To get started, you first need to download the Ren’Py launcher. Simply download the SDK and extract the folder. Within the folder, you will find a renpy.exe file—double-click this file to run the launcher.
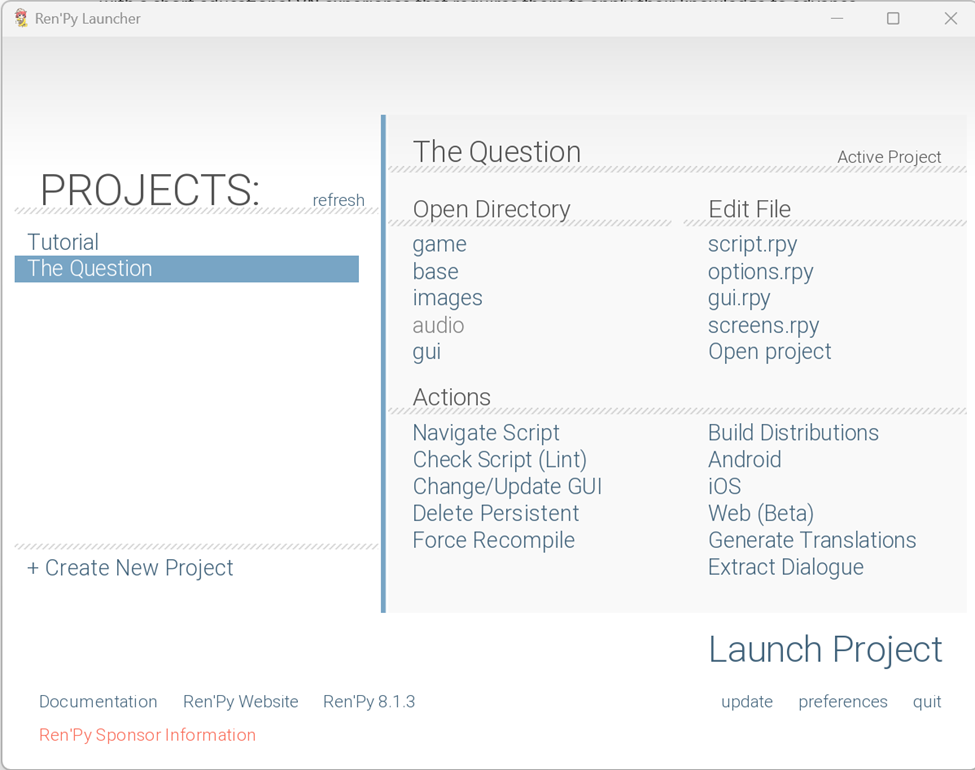
Note: During the installation, the program might ask which code editor you’d like to use. While any of the options they present will do, my personal choice is VSCode. If you use VSCode, I highly recommend installing the Ren’Py Language extension for ease of use, as well. Once you launch Ren’Py, the application will look something like this:
Creating a New Project
Click the Create New Project button and follow the prompts to determine the directory, the name of the project, the screen resolution, and the starting theme colors (each of these options can be changed later). Ren’Py will then process and create a new project that you can see in the Projects directory.
Let’s go ahead and launch the project. You will see that Ren’Py has populated the game with some content already: a menu screen, and, once you click to Start the game, a basic interaction with a placeholder character named “Eileen.”

Let’s look at how we can make some edits to the project, including adding our own character and dialogue choices.
Editing Your Project
Under the hood, Ren’Py has predefined functionality for controlling and modifying text, images, and sounds. If you look to the Edit File section of the launcher, you will see a script.rpy file. For directly editing the content of the game, this is the file we want. Go ahead and open it now, and you should see the following:
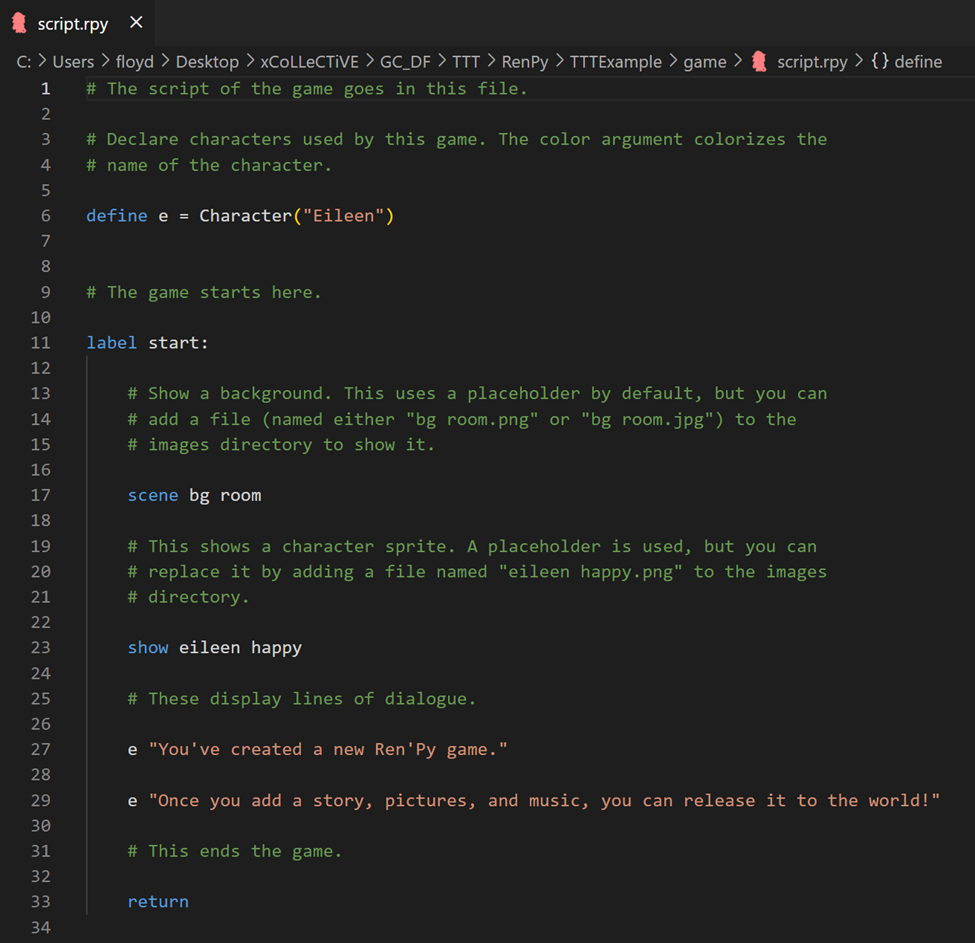
If you are familiar with Python, the general syntax should be recognizable to you. However, many of the statements (label, scene, show, etc.) are unique to Ren’Py. Helpfully, you can see that the developers have written some comments (preceded by a hash) to explain some of these statements.
Let’s make some edits to create an educational game for an imagined Intro to Philosophy class. We can begin by defining a new character—let’s say good ole Socrates. In place of the character definition for Eileen, we can write the following:
define s = Character(“Socrates”, color="#c8ffc8")
Here, we have created a new variable (s, short for Socrates) that is of the predefined Ren’Py class Character. The full name of the character is defined in quotation marks and is what will be displayed on the screen. We have also set a color (a sort of light green) for the character’s name.
Now that we have a character, let’s continue. In the script, the next statement we see is “label start:”. In short, this is where the game loop will begin. Everything that we want to occur during the game should be placed within the start label, using typical Python indentation.
Following this, we can see a “scene” statement. This displays a background image for the current game screen and can be loaded from your image files in the /images directory. For now, let’s not worry about this, and instead focus on displaying our character and presenting some interactive dialogue.
Adding Interactivity
Let’s engage with our Socrates character. To add our own images, we can place them in the game/images folder. I have added a new image file, “socrates.png”, to my /images folder. To display it on the screen, we can use the “show” label, like so:
show socrates at truecenter
Ren’Py searches for image files in the /images directory, which can be found by selecting “images” in the “Open Directory” section of the launcher. Ren’Py expects character art to be an PNG, WEBP, or AVIF file, while background art should be a JPG, JPEG, PNG, WEBP, or AVIF file. The name of a file is very important – the extension is removed, the file name is forced to lowercase, and that’s used as the image name. I have also added an “at truecenter” attribute to my code, to position my image in the center of the screen both vertically and horizontally.
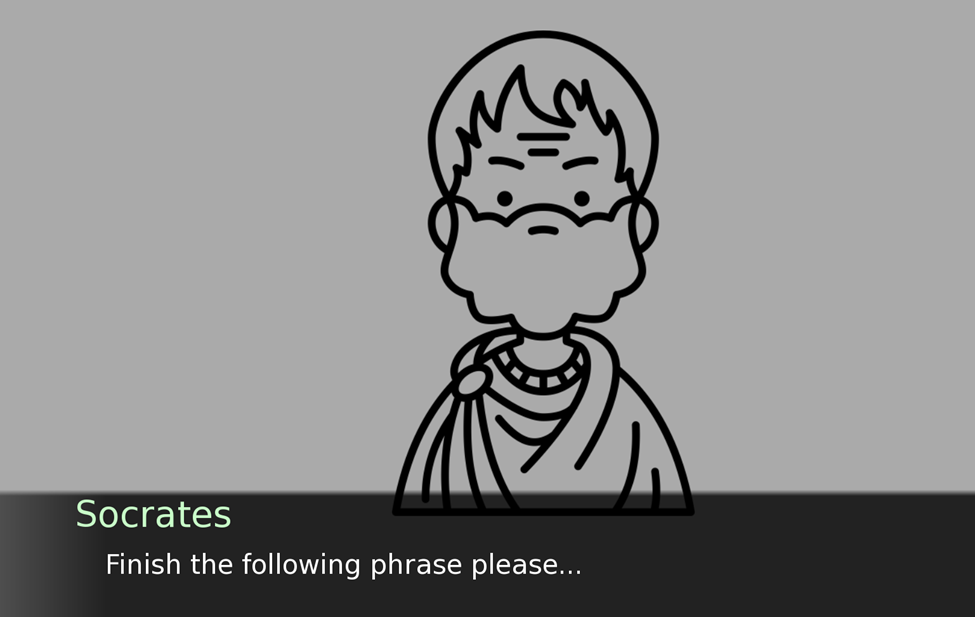
Next, we’ll give Socrates some dialogue. Let’s have the player finish Socrates’ famous quote “I know that I know nothing.”
s "Finish the following phrase please..."
s "I know that I know..."
The result looks like this:
Next, let’s add a menu of options for the player’s response. To do this, we can use the “menu” statement, like so:
menu:
        "Nothing":
            s "Correct!"
            jump end
        "Everything":
            s "Wrong!"
            jump end
label end:
    s "That's all for now."
return
“Menu” allows us to create some options for the player to choose from (in this case, “Nothing” or “Everything). If the player chooses “Nothing”, Socrates will say “Correct!”, and if the player chooses “Everything”, Socrates will say “Wrong!”.

Whichever choice the player makes, the program will then “jump” (using the jump statement) to the “label end”, which is the end of our program. The jump statement is crucial, as it transfers control to a label defined using the label statement, and the script statements following the label are run. In this case, we simply have Socrates say “That’s all for now.” We then end the game with a “return” statement.
The full code looks like this:
define s = Character("Socrates", color="#c8ffc8")

label start:

    scene bg room

    show socrates at truecenter

    s "Finish the following phrase please..."

    s "I know that I know..."

    menu:

        "Nothing":
            s "Correct!"

            jump end

        "Everything":
            s "Wrong!"

            jump end

label end:
    s "That's all for now."

    return
And that’s it! We have now created a simple game that allows the player to interact with a character and make choices to determine the flow of the game.
Learning Resources
As I mentioned before, Ren’Py has excellent documentation. I’d highly recommend looking through the documentation if you’d like to learn about Ren’Py in more detail.
To follow along with a very in-depth tutorial, I would also recommend checking out this resource.
I hope this introduction to Ren’Py has given you some inspiration to start making your own games. Happy creating!

This entry is licensed under a Creative Commons Attribution-NonCommercial-ShareAlike 4.0 International license.


