Image by Willow Brugh (database skillshare relational) [CC BY-SA 2.0], via Wikimedia Commons
The Basics
This tutorial is based on the recent SQL workshop hosted by the Digital Fellows, and is designed to get you started using relational databases. Before continuing here, I highly recommend reading Keith’s post Databases for Smart People Who Are Scared of Databases for a helpful conceptual overview of the what and why of databases.
If you don’t have a chance to check out Keith’s post, here are the short answers to a couple questions that you may be asking yourself:
What is a database?
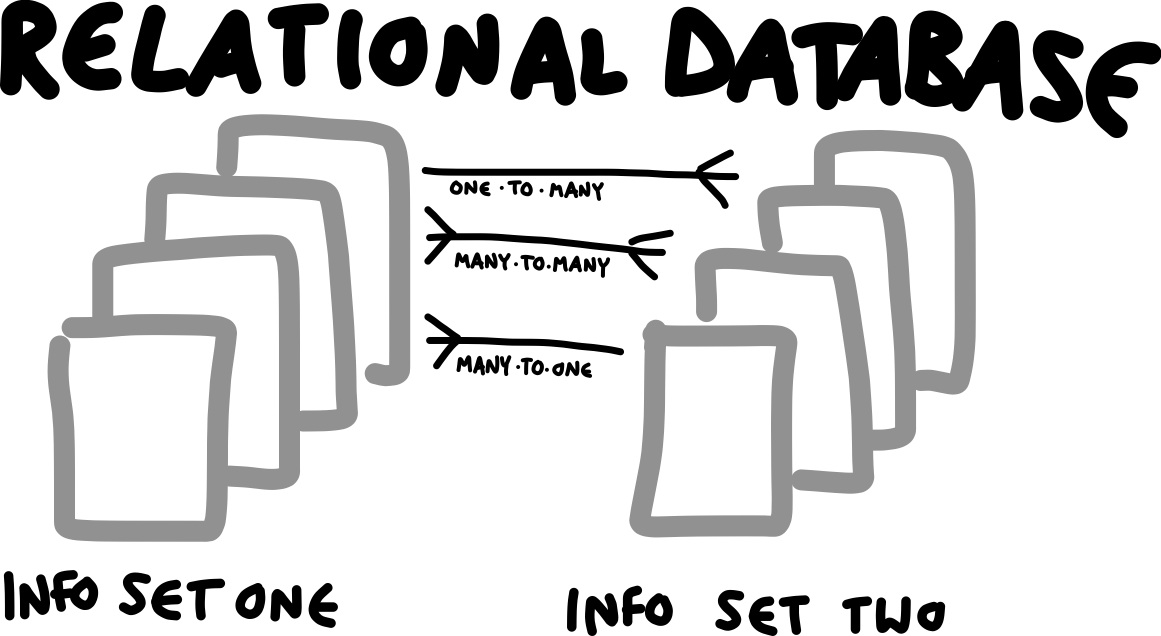
A database is a collection of data that is structured to allow for manipulation. There are different kinds of databases—one kind is a relational database. In a relational database, the data is contained in different tables.
What is SQL?
SQL (Structured Query Language) is a programming language for interacting with data in a relational database. There are different implementations of SQL—one implementation is SQLite. Different implementations (such as PostgreSQL and MySQL) have their own higher level specialized functions, but the all handle the same basic operations covered in this tutorial.
We’re going to use SQLite in this tutorial because getting set up requires less work. SQLite is a little different from other implementations of SQL because it operates on regular plain old local files and does not require a server connection, unlike PostgreSQL and MySQL. The databases you work with in SQLite exist in .db files that you can store anywhere on your computer.
How do I use SQL?
The database holds your data, but you need a client to see and interact with it. There are a couple options for SQLite GUI database mangers, including SQuirreL SQL Client and SQLiteStudio. SQLite also has a command-line utility, but since this tutorial is an introduction, we’ll be using SQLiteStudio.
Building a Database
Now that you know the basics, we’re going to jump right in and start building a database.
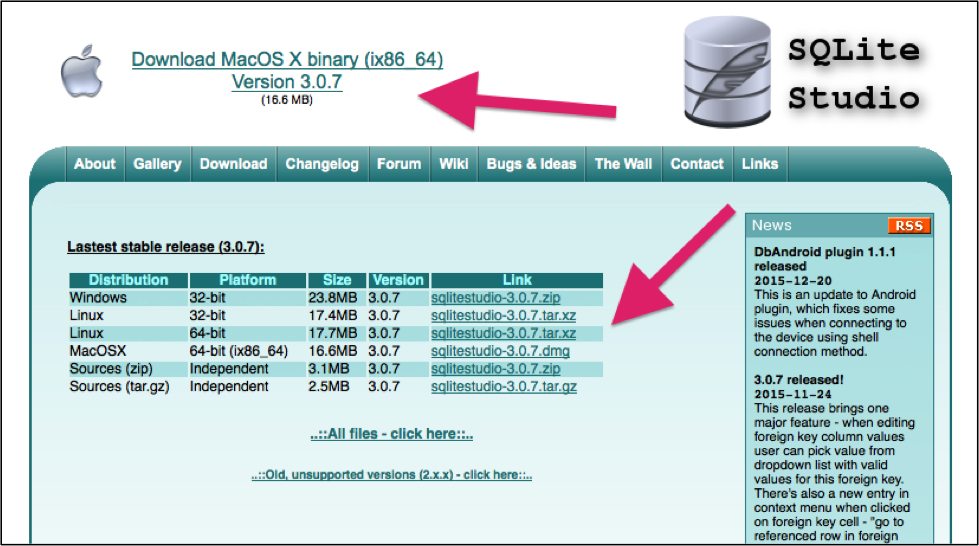
First, you need to download SQLiteStudio, the database manager we’ll be using for this tutorial. The correct version for your operating system should appear at the top. If not, select it from the options below.
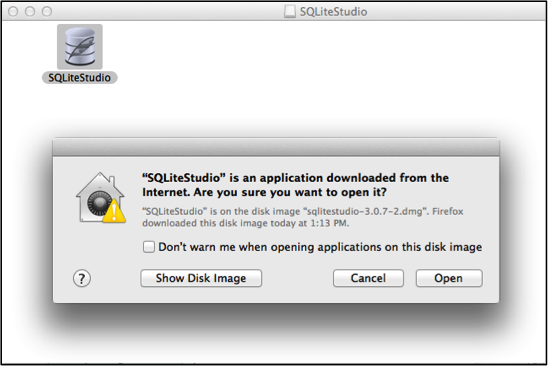
Follow the download prompts. When you double click the SQLiteStudio icon (shown below), the dialog box that opens should give you the choice to open the application. If there is no “Open” button, for Mac users, try holding “control” when you click and then select “Open” from the menu that appears. For Windows, try right click then “Open”.
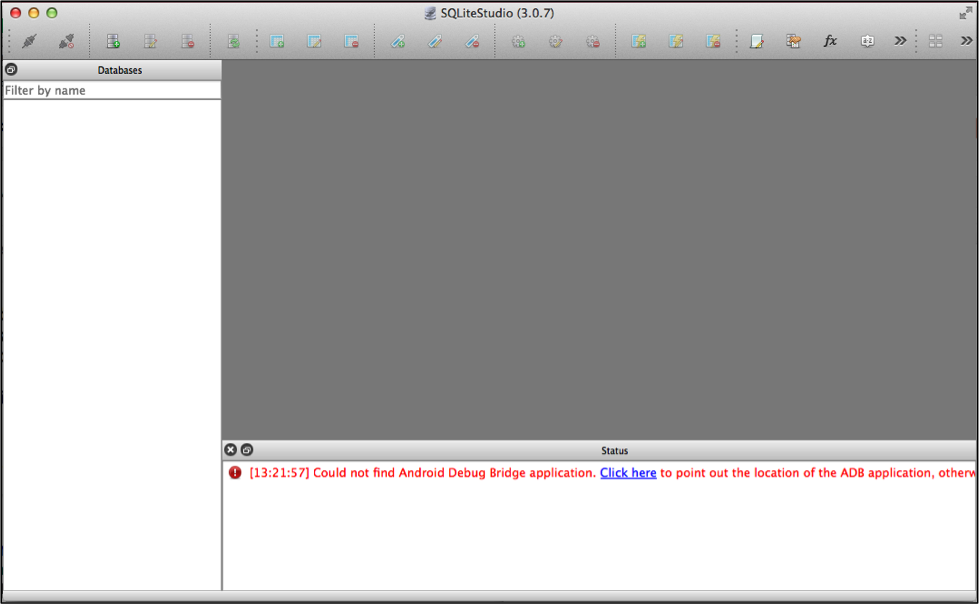
Once you open SQLiteStudio, you should see this interface:
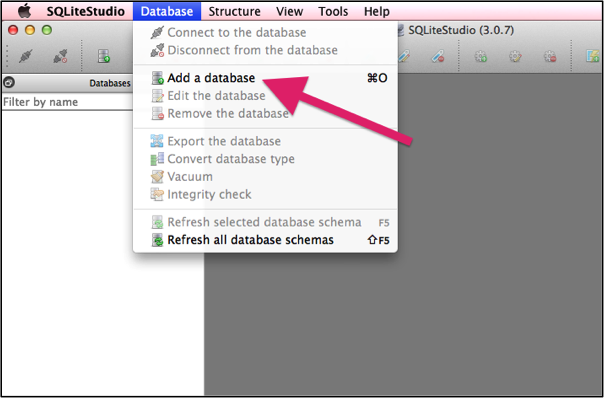
To create a database, click on “Database” then “Add a database”.
In the next window that appears (the left one below), click on the green “+” to create a new database. In the window that pops up next (the right one below), give your database a name (mine is “testdb”) and make sure it is saved to a folder that is outside of the SQLiteStudio download folder. Here I saved my “testdb” to a folder called “SQLite_Tutorial”, which is on my desktop.

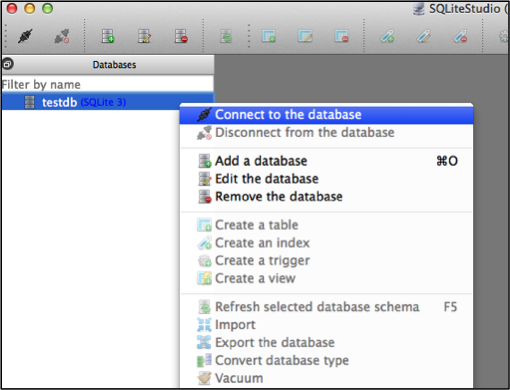
If you successfully created a database, you should see it in the left-hand “Databases” window. Click on it and select “Connect to the database”.
Congratulations! You now have a database.
The next step is creating the tables where your data will go. Before creating the tables for your own data, it’s important to plan out what kinds of data each table will contain, and how the tables will be related. At the end of this tutorial, there is a link to a online database designer, which allows to you draw your tables and then output the corresponding SQL script that will generate them in your actual database.
You can use the GUI tools in SQLiteStudio to create tables, but we’re going to create them in the SQL editor, so you can get used to SQL syntax.
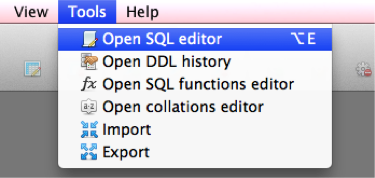
To open the SQL editor, go to “Tools” and click on “Open SQL editor”.
Your SQLiteStudio interface should now look like this:
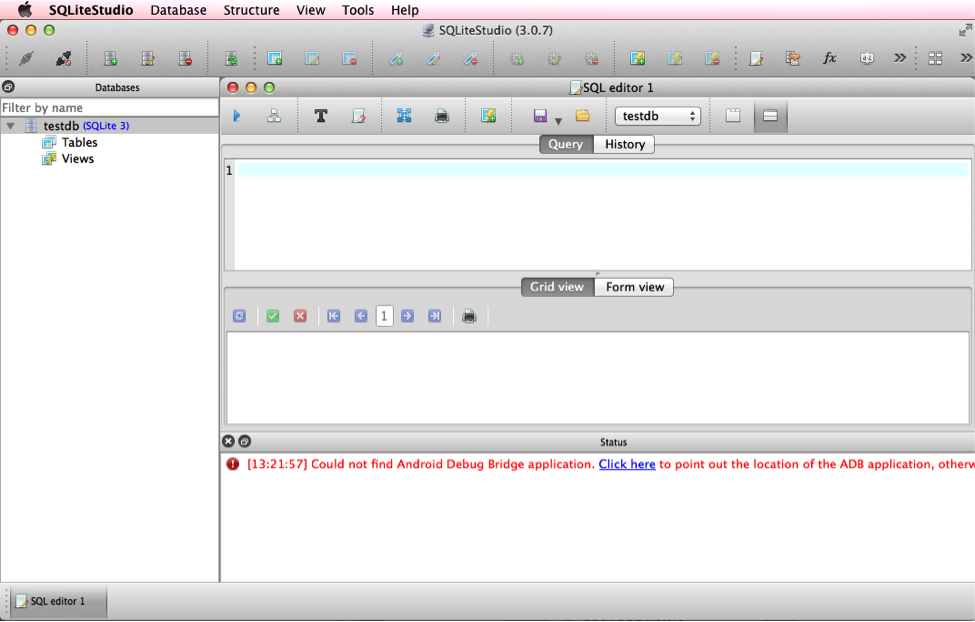
The top window is the SQL editor—we will be entering SQL commands here. The middle window will show the output of the commands we run in the editor. The bottom window will show the status of the commands we run (e.g., how long they took to complete, or if there’s an error in our SQL syntax).
Tables!
Now that we’ve created our database, the next step is creating the different tables that will hold our data. For this part of the tutorial, we’re going to create a database that contains information about students and their academic programs. We want to structure our data so that each different type of entity has its own table. The entities in our database are academic programs and students, so these will be our two tables. Recall that each column in a table is a field and each row is a record.
The syntax for creating a table in SQLite is as follows:
CREATE TABLE table_name (field_name DATA_TYPE CONSTRAINT)
The data type you select will affect the behavior of the data in that field. SQL data types are things like DATE, TIME, VARCHAR, INTEGER, XML. You can find out more about SQLite data types and how they behave by doing a quick search for ‘SQLite data types’.
The constraints you select will also affect the behavior of the data in that field. Constraints are things like PRIMARY KEY, FOREIGN KEY, UNIQUE, DEFAULT, AUTOINCREMENT, NOT NULL. We’ll learn about some of these here by example, but you can find out more by searching ‘SQLite constraints’.
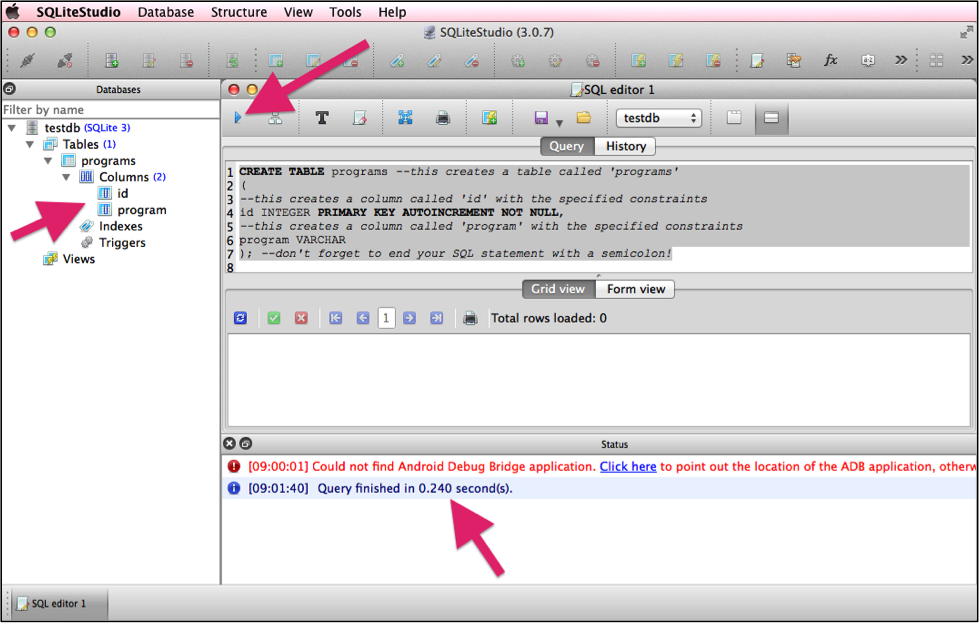
So, to create a table that will hold student data, we’re going to enter the following in the SQL editor:
CREATE TABLE programs
(
id INTEGER PRIMARY KEY AUTOINCREMENT NOT NULL,
program VARCHAR
);
This statement will create a table called ‘programs’ with two fields called ‘id’ and ‘program’. The ‘id’ field will contain integers (INTEGER) and will serve as the primary key for each record in the table (think of this as a unique identifier for each record in this table—PRIMARY KEY). The value in this field will increment automatically for each new record added to the table (AUTOINCREMENT) and a record will not be allowed in this table without a value in this field (NOT NULL). The ‘program’ field will contain data that will be a string of characters without a specified length (VARCHAR).
Next, highlight the entire statement that you typed in the SQL editor and click the blue triangle to execute the code (see below).
You should notice a couple things:
- There should now be a ‘programs’ table with ‘id’ and ‘program’ fields in the Databases window on the left.
- If there were no errors in your SQL code, the status window at the bottom should show you how long the query took to execute.
- In my SQL statement, there are a bunch of comments introduced by ‘–‘. These comments are ignored when the code is executed, but will serve as helpful reminders about what each line of code does. You should always comment your code so you can figure out what it does when you come back to it later.
*************************************************************
Tips!
- SQL is not case sensitive
- Each SQL statement must end with a semicolon ‘;’
- Whitespace doesn’t matter
- Use ‘–‘ to comment your SQL code
- ‘Query’ refers to any operation on a database
*************************************************************
Now that we have a table, let’s insert some data!
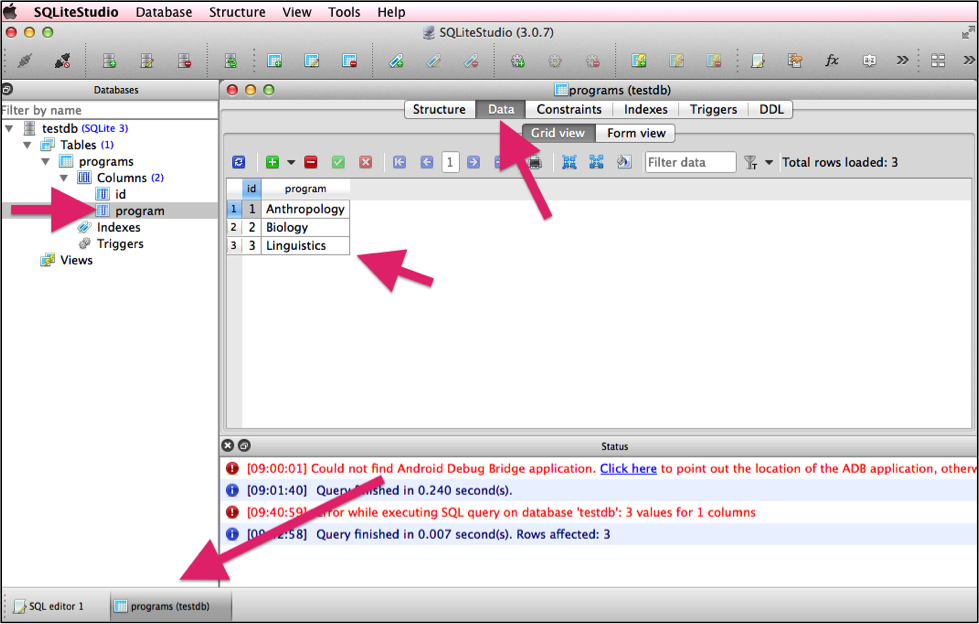
--INSERT SOME DATA INTO THE PROGRAMS TABLE
INSERT INTO programs(program) VALUES
(‘Anthropology’),
(‘Biology’),
(‘Linguistics’);
This will enter the values ‘Anthropology’, ‘Biology’, and ‘Linguistics’ into separate rows in the ‘program’ field of the ‘programs’ table.
Highlight this code in your SQL editor and click the blue triangle to run it. If the query was successful, you can double click anywhere in the ‘programs’ table in the Databases window on the left. In the window that appears, click ‘Data’ and you should see each program in a separate row in your table. Notice that the ‘id’ field auto-populated with integers. To switch back to your SQL editor, click the tab at the bottom of the screen.
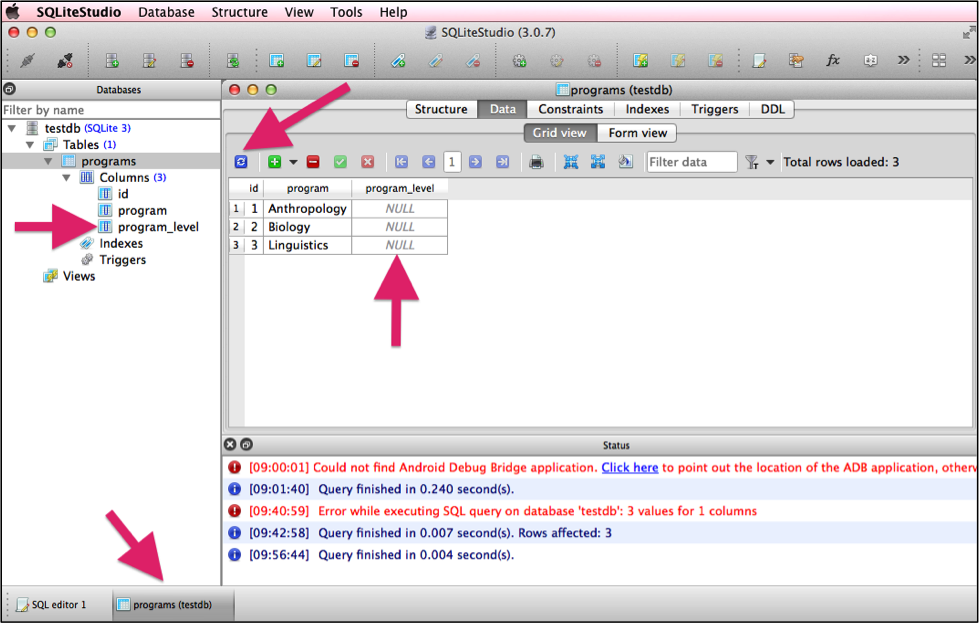
Let’s imagine at this point you suddenly remembered that you need to include information about the program level. No problem! We can add another field to an existing table like this:
--ADD ANOTHER FIELD TO THE PROGRAMS TABLE
ALTER TABLE programs
ADD program_level VARCHAR;
If you successfully executed this statement in the SQL editor, you should now see a new field ‘program_level’ in the Databases window on the left. Check your ‘programs’ table window, by clicking on the ‘programs (testdb)’ tab at the bottom of the interface. You should now see the ‘program_level’ field in the table, with ‘NULL’ values in each row. If you don’t see this, click on the small blue refresh button.
Now that our ‘programs’ table has a new field, we need to populate it with data for each existing record. To do this, we use the following two statements:
--UPDATE THE PROGRAM_LEVEL FIELD FOR EACH PROGRAM
UPDATE programs
SET program_level = 'Master''s'
WHERE program = 'Linguistics';
UPDATE programs
SET program_level = 'Ph.D.'
WHERE program IN ('Anthropology', 'Biology');
If you successfully executed these queries, the ‘programs’ table should now look like this:

You may have noticed a couple new items in the SQL statements we just executed. WHERE acts like a filter, and controls which records will be updated. In the first UPDATE statement, we set the value for ‘program_level’ to ‘Master’s’ only where the value for ‘program’ is equal to ‘Linguistics’. (Notice that in ‘Master’s’ you need to add an additional single quote to escape the apostrophe.) Without the WHERE clause, this statement would set ‘program_level’ equal to ‘Master’s’ for every record in the table. In the second UPDATE statement, we set the value for ‘program_level’ equal to ‘Ph.D.’ for records where ‘program’ is either ‘Anthropology’ or ‘Biology’.
At this point, we have a decent looking table for our academic programs. The next step is to create our students table. We’re going to use the same syntax that we used to create the ‘programs’ table, but with one extra element—a foreign key.
--CREATE A TABLE FOR STUDENTS (PAY ATTENTION TO THE FOREIGN KEY!)
CREATE TABLE students
(
id INTEGER PRIMARY KEY AUTOINCREMENT NOT NULL,
student VARCHAR(255),
id_program INTEGER,
FOREIGN KEY (id_program) REFERENCES programs(id)
);
If you successfully executed this query, you should see a positive message in your status bar (e.g., “[09:34:13] Query finished in 0.074 second(s).”) and the ‘students’ table should appear in the Databases window on the left. Double click on ‘students’ in the databases window, and then click ‘Structure’ at the top of the ‘students’ window that appears.
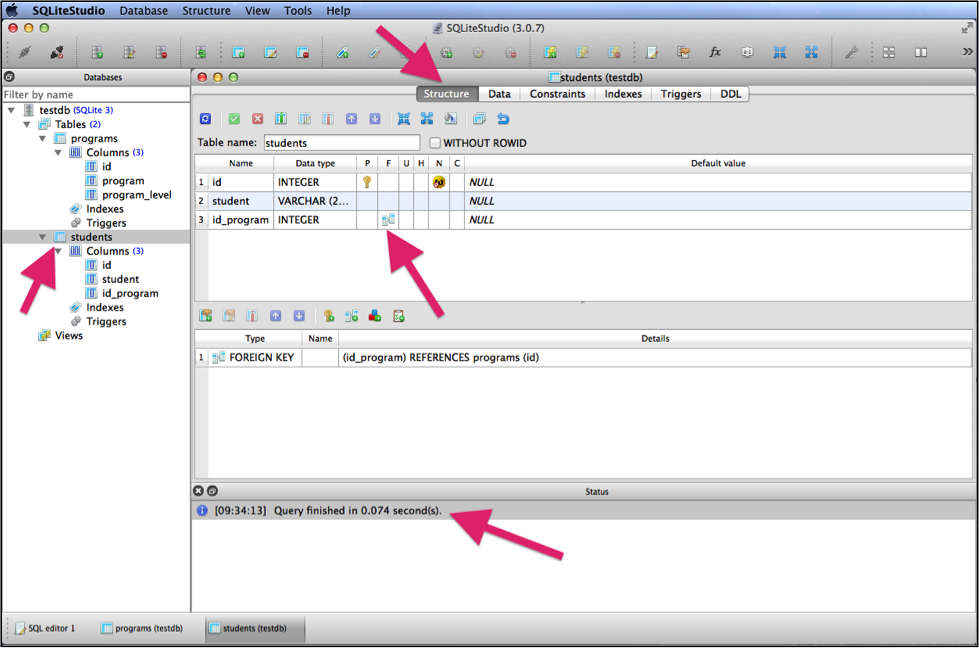
You should notice that the ‘id_program’ field you just created has a foreign key constraint. The foreign key points to a primary key in another table, in this case the ‘programs’ table. This relationship is specified with the clause FOREIGN KEY (id_program) REFERENCES programs(id), which links the ‘id_program’ field in the ‘students’ table to the ‘id’ field in the ‘programs’ table. This relationship requires that all records in the ‘students’ table point to a valid primary key in the ‘programs’ table.
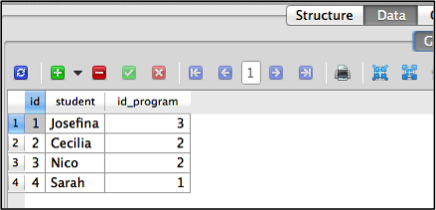
Before we start playing with our database, we just need to enter some data in the ‘students’ table:
--INSERT SOME DATA INTO THE STUDENTS TABLE
--REMEMBER THAT THE PRIMARY KEY WILL AUTOINCREMENT
--FOREIGN KEYS MUST BE ENTERED MANUALLY
INSERT INTO students(student, id_program) VALUES
('Josefina', 3),
('Cecilia', 2),
('Nico', 2),
('Sarah', 1);
If you successfully executed this query, the ‘students’ table should now look like this:
Data Time!
Now that we have a decent looking database, we can execute some queries to manipulate our data.
Type each one of these SQL statements in the SQL editor, run them one at a time, and see what they return. Each of these statements should show you the fields that are specified in the SELECT clause (‘*’ shows the whole record, meaning every field), and the WHERE clause will filter what records are included.
The SELECT clause is essentially creating a new table based on the criteria specified in the FROM and WHERE clauses.
--SHOW ALL THE RECORDS IN THE TABLE STUDENTS
SELECT *
FROM students;
--SHOW THE VALUE FOR ONLY THE STUDENT FIELD FOR ALL RECORDS IN THE
--TABLE STUDENTS
SELECT student
FROM students;
--SHOW THE VALUES FOR THE STUDENT AND ID FIELDS FOR ALL THE RECORDS IN
--THE TABLE STUDENTS
SELECT student, id
FROM students;
--SHOW ALL THE RECORDS IN THE TABLE STUDENTS WHERE THE VALUE OF THE
--ID FIELD IS EQUAL TO '3'
SELECT *
FROM students
WHERE id = '3';
--SHOW ALL THE RECORDS IN THE TABLE STUDENTS WHERE THE VALUE OF THE
--STUDENT FIELD STARTS WITH 'J'
SELECT *
FROM students
WHERE student LIKE('J%');
Each of the queries up to now is just returning data from one table in the database. This final query demonstrates the power of relational databases in that you will be coordinating data from two different tables. This is where the foreign key comes in.
--SHOW ALL THE RECORDS FOR STUDENT WITH THE INFORMATION ABOUT THEIR
--RESPECTIVE PROGRAMS
SELECT *
FROM students INNER JOIN programs
ON students.id_program = programs.id;
If executed successfully, this query should return what you see below:
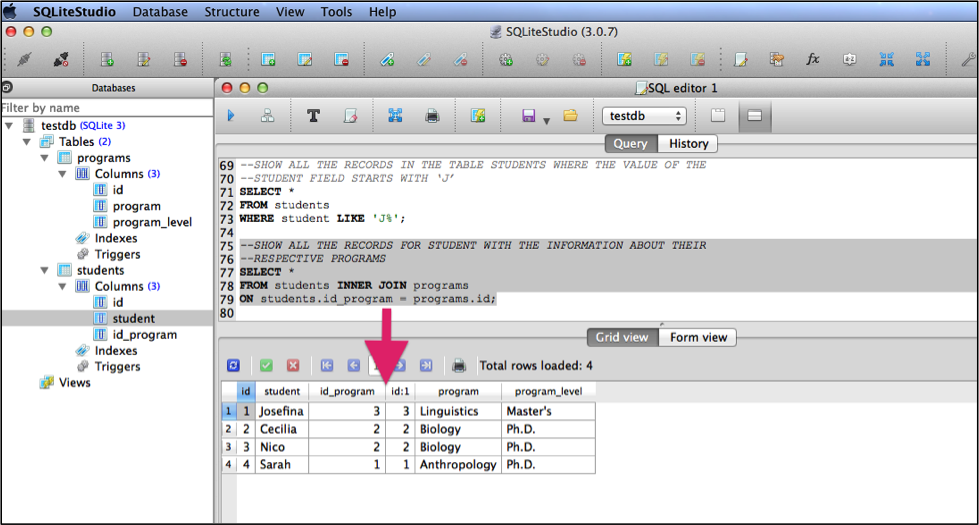
What’s important to notice here, is that the new table you created contains data from both the ‘students’ and ‘programs’ tables, AND these data are linked by the ‘students’ foreign key ‘id_program’ and the ‘programs’ primary key ‘id’ (here it appears as ‘id:1’ because it has the same name as the ‘id’ field in the ‘students’ table). The ON clause specifies how these two tables should be joined. Try executing this query without the ON clause and see what happens. You should see that it ‘multiplies’ the tables and the data from each table are not linked in any meaningful way.
If you’d like one more challenge, see if you can write a SQL query that returns only student name, program, and program level, AND orders the results alphabetically by student name in descending order.
Hint: You will need to figure out how to order the results on your own. I suggest doing a Google search.
Your results should look like this. The SQL query that produced this is below the graphic!
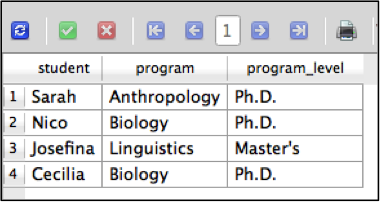
--SHOW STUDENT NAME, PROGRAM, PROGRAM LEVEL
--ORDER THE RESULTS ALPHABETICALLY BY NAME IN DESCENDING ORDER
SELECT students.student, programs.program, programs.program_level
FROM students INNER JOIN programs
ON students.id_program = programs.id
ORDER BY students.student DESC;
So, that’s about it for this tutorial. There is a ton more you can do with SQL, so I encourage you to keep learning via experimentation and Google searches.
Here are a couple resources to get you started:
- For practice with basic SQL queries, W3schools has a nice tutorial.
- For designing your database, check out this SQL designer. Once you set up your database structure using the GUI tools, you can export the SQL code as a .sql file.
*****************************************************************************
Extra special challenge: Integrating SQL with a Python script
*****************************************************************************
Are you ready for a challenge? Try integrating SQL with a Python script.
To get started, check out my git repo: spending. This is a python script for keeping track of shared expenses (good if you have roommates!). Download the code and play around with it from the command line. You can build on this script or use it as a model to create your own.
Just FYI, this uses PostgreSQL (not SQLite) and the Psycopg2 adapter to translate Python into SQL. If you are using SQLite, you will need to figure out how to connect to a SQLite database and use the sqlite3 Python library, instead of Psycopg2, as Psycopg2 is only for PostgreSQL.
Good luck!


.jpg)